We’ve been asked this question many times and, until now, haven’t had an answer. Good news, now we have!

Here’s an example post we created on our demo site. It leads to a grid of products where a visitor taps / clicks the product they want. That takes them to the Zazzle product page where they can then personalize and buy as usual.
To get this, the steps we went through are summarised here. Keep going to see each step in detail, with screenshots:
- We used the Nifty Promo Control Panel to set up the products we wanted
- In Step 2, we selected the Product Grid option.
- Next, when the product grid sharer page opened, we scrolled to the bottom and clicked the button shown there.
- In what shows up, we dragged the smaller image to our desktop
- Back on the blog we chose to write a new blog post
- We dragged the image from the desktop to a new image block
- We returned to the product grid sharer page and right-clicked and copied the link where indicated
- Back to the blog and the image block – we added the link to the image in the panel on the right hand side
- After adding some tags for the post, we published it.
Step-by-step with screenshots
👣
If you want to follow along, here’s everything you need to make the same content for your own blog post. But don’t do that – use your own Zazzle store’s products.
The first time, it should take about 15 minutes because you’re learning. Next time it should take around 5 minutes before you’re fleshing out your blog post with text.
👩🎨
Don’t panic – it’s easy as pie for non techies to do! All you’ll be typing is your store’s name and your referral id – the rest is just click, click, clickety-clicking!
It may look daunting at first – but that’s because we’ve taken lots of care to make sure every step is clearly explained for those who need it.
Note that our store link on Zazzle is http://zazzle.com/store/hightonridley so we’d use hightonridley for the storename in a couple of steps time…
First, set up the products with Nifty
Let’s say you want a grid of 60 of the most popular products from your store.
Here’s the link you need to start up Nifty. It opens in a new window when you click, The 60 in the link tells Nifty to request that many products from Zazzle. The other bit tells it to open the product grid sharer section in Step2.
https://niftytoolz.com/npcp/nifty-promo-control-panel.html?mcslsh=pgshr&ps=60
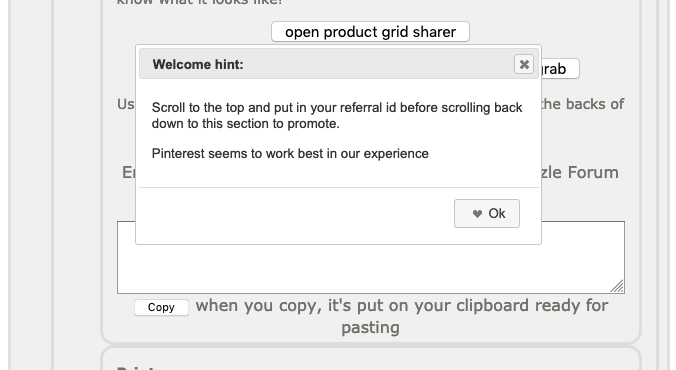
The first thing you’ll see is a dialog box to tell you to scroll up to put in your referral id – also known as your associte id. (Doing so advances you to 50/50 referral sharing, described at the end of this tutorial.)
When you’ve scrolled to the top, that’s the time to put in your storename. Remember, that’s the one in your store link on Zazzle.
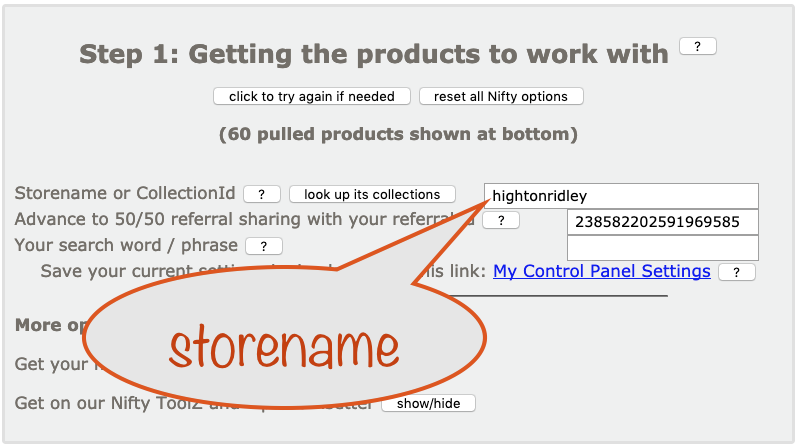
Our store link is https://zazzle.com/store/hightonridley so we’d use hightonridley for the storename. So put in yours to get products from your store. By default you’ll get the most popular. When you’ve put it in and pressed enter, scroll to the bottom to see the products pulled from your store. In a few steps time, those are the ones you’ll see in your product grid sharer page, the one linked to from your upcoming blog post.
For the blog post we’re using in this tutorial, we didn’t use our storename, we left it blank to get products from the marketplace instead.
Preparing the product grid option in Nifty Step2
When the product grid sharer page opens, you’ll want a title for it.

We’ll skip over tracking codes for this tutorial but you can find out about them by clicking the help button highlighted. Find it near the top of Step2.
Ok, you’re nearly there. You’ve clicked the button and you’re looking at the product grid your blog post will link to. All that’s left to do is get the image you want to use on your blog post and write the post!
Getting the image to use on your blog post
The images you can use on your blog post are hidden away on the product grid sharer page. We don’t want normal visitors to see them – unless they like your stuff so much that they want to put them on their own blog!
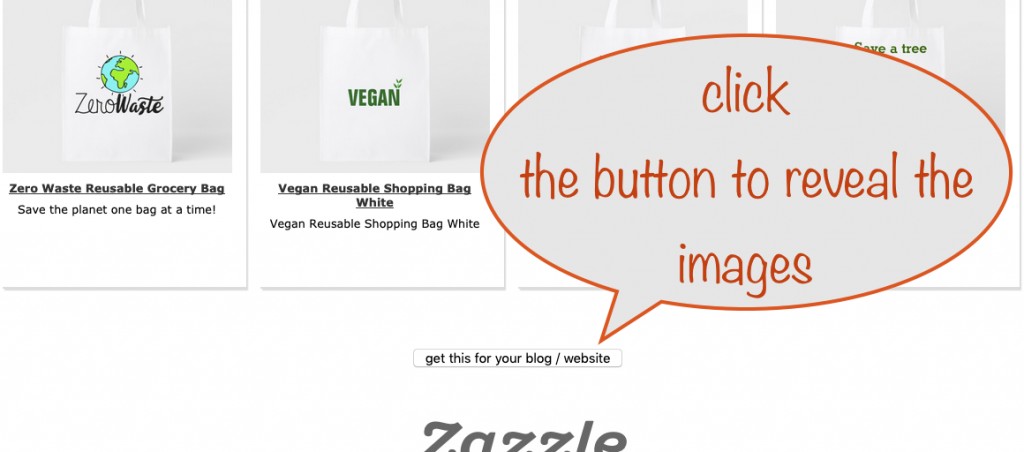
Scroll to the bottom of the product grid sharer page to see the button you need to click and then click it.
This lets you get a copy of the image that you want to use in your blog post.
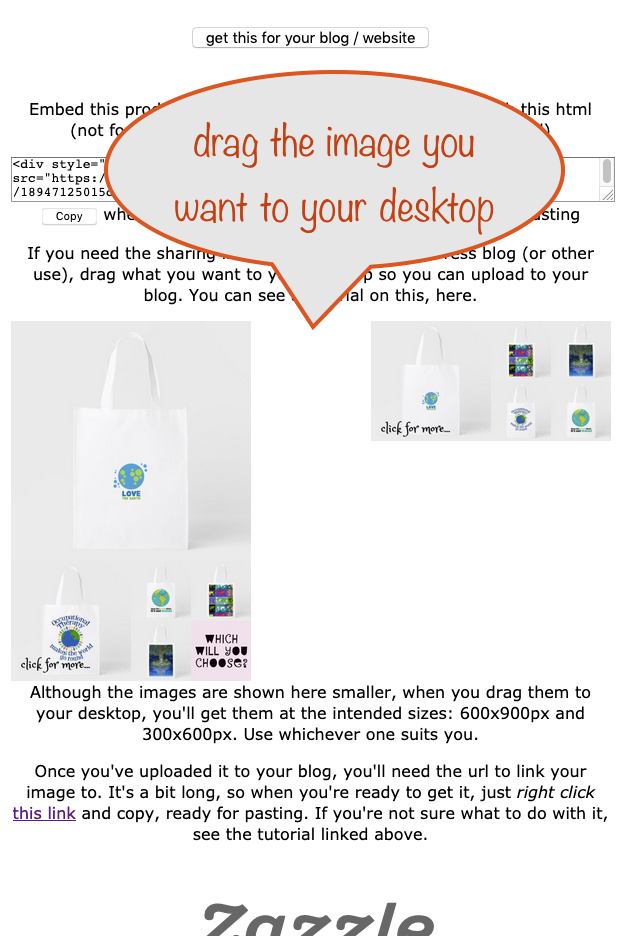
When you click it, you’ll see the two images. Just drag the one you want for your blog onto your desktop. That way you’ll be able to drag it to your new post in just a moment. Don’t close the window yet because you’ll need to get the link for the product grid sharer page shortly.
So you’ve now got all your ducks lined up in a row. All you have to do now is create your new blog post, drag the image from your desktop to the post and link it to your product grid sharer page. Cool!
Starting your new blog post and using the image
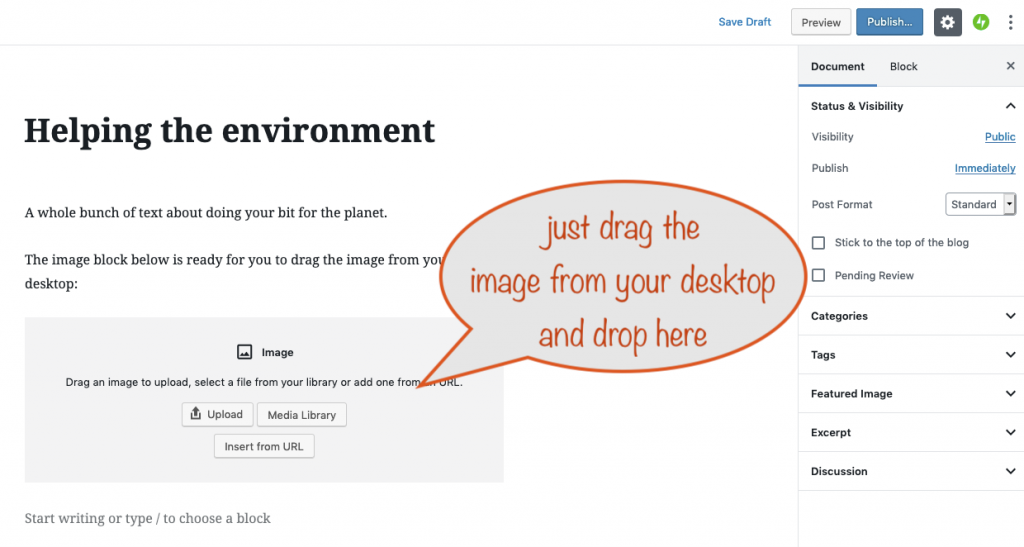
So you’ve now started a new blog post and you’ve added a block ready to accept the image you’re going to drag and drop from your desktop.
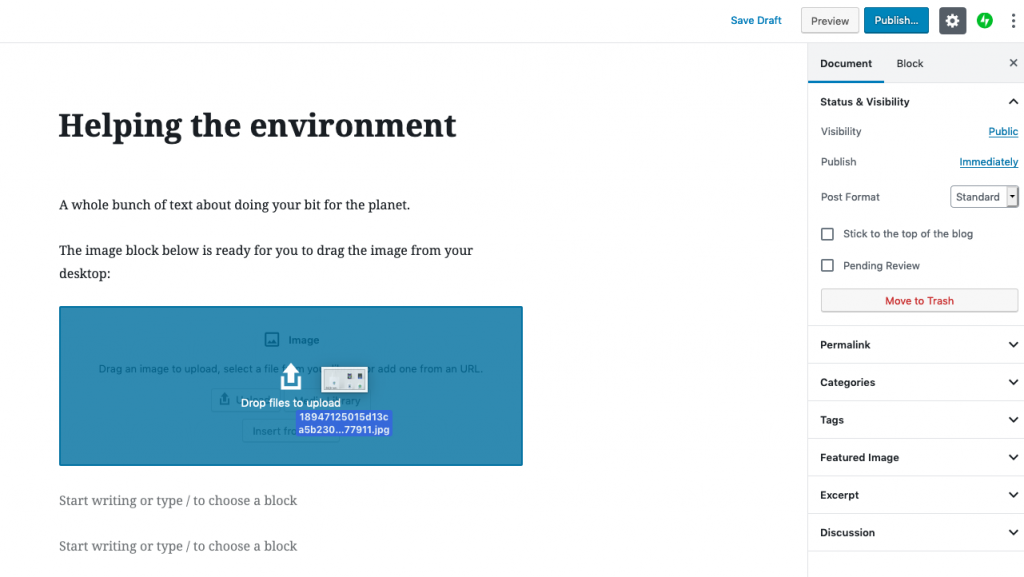
Here’s the drag and drop in progress. Once you’ve dropped it, all that’s left to do is link it to your product grid sharer page.
Linking your blog post image to your product grid sharer page
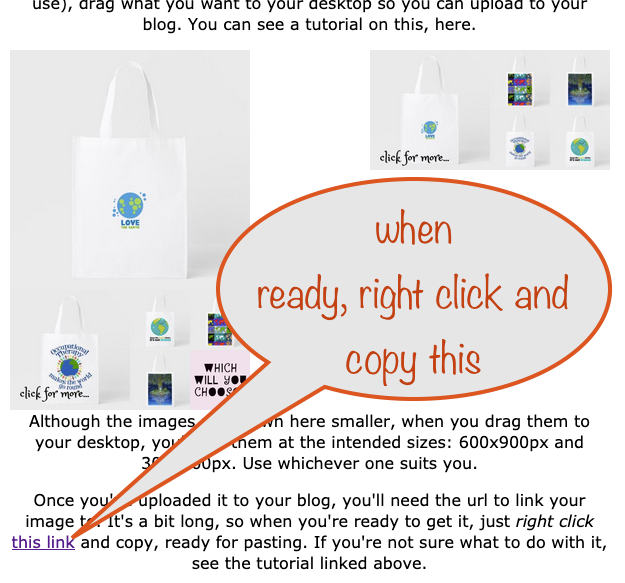
So the first thing to do is to copy the link to your product grid sharer page. Get it by switching to the tab in your browser that’s showing the product grid page. Scroll down and right-click, then choose copy link location (or equivalent for your browser)…
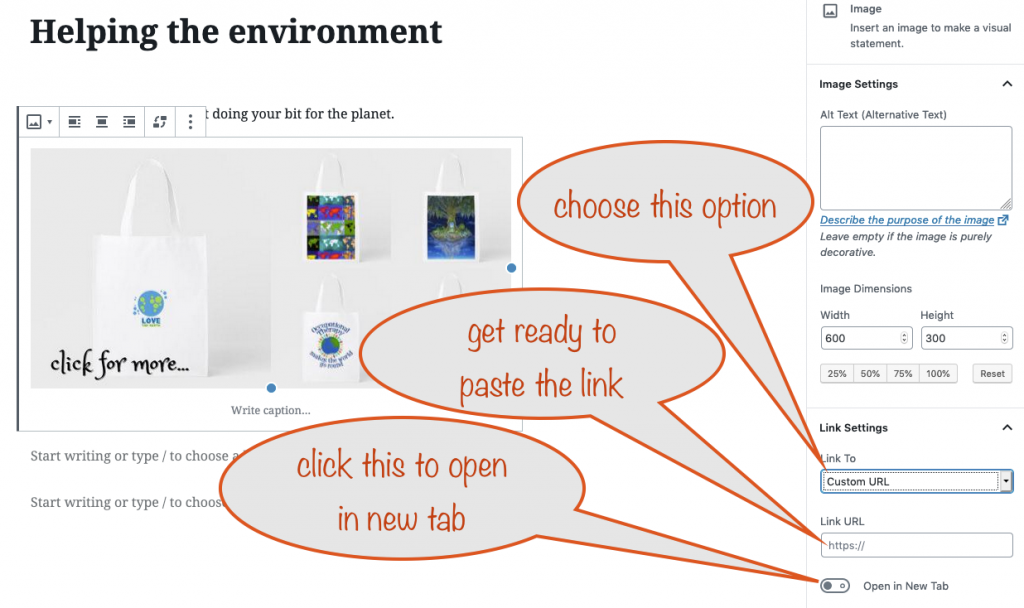
Switch back to your blog post tab. With the image block selected, look over on the right hand side and click the link settings drop down. This reveals the option you need. First choose “custom url” from the drop down. When you do, a couple more options open up as shown.
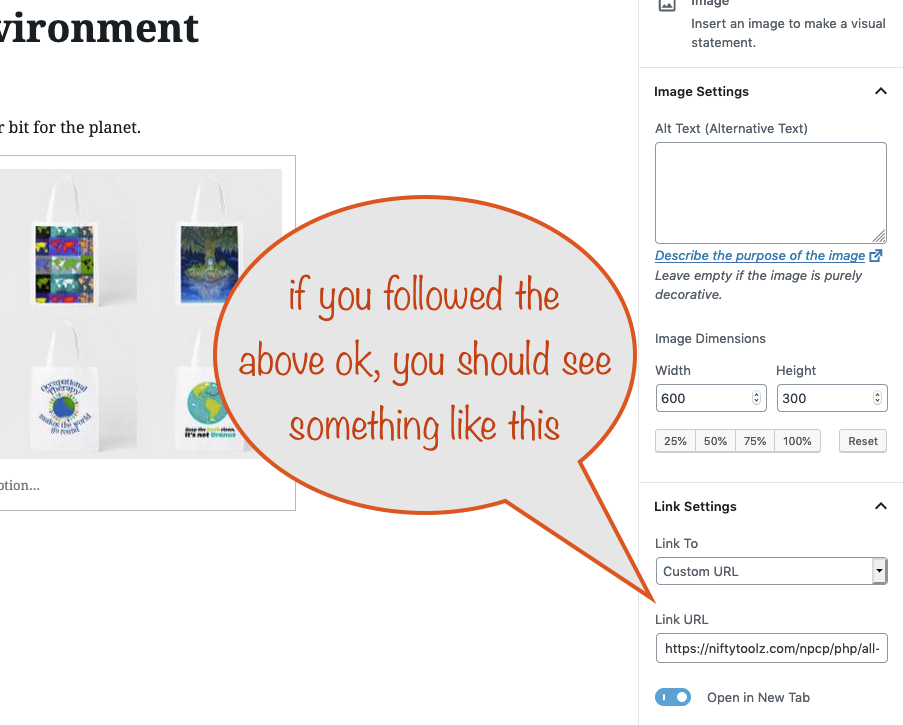
If all went according to plan, you should now see something like this.
Last thing to do is to add a caption to your image block telling visitors to click it. Every encouragement helps 🙂
You’re now ready to finish off your blog post, adding tags, categorizing it etc before finally publishing.
Finishing off your blog post
Do make sure you add alt text in the image settings are on the right. It’s used by screen readers for disabled visitors and also by search engines looking for good stuff to add to their index.
Ok, that’s the end of the tutorial. You’ve seen how to:
- Use Nifty to set up the products for your product grid sharer page
- Get an image for your blog made from the first five products in the grid
- Link that image to your product grid sharer page so your blog visitors can see lots of your designs, then click and buy what they want.
50/50 referral sharing explained, as promised at the beginning of this tutorial.
When you use the Nifty tools without paying for a subscription, the way we cover the costs of our server (and the development of the tools) is the fairest of all. At the toss of a computer coin, every link that Nifty generates uses either your referral id or ours.
This way, you get the benefit of huge time savings in promoting your designs – or even being able to do stuff you couldn’t do otherwise. And it’s risk-free to you.
When you find you’re making referal sales as a result, you can always swap to a paid membership subscription when you see that the amounts involved make sense for you to do that.
Even better, anything that’s generated afresh for each visitor – like the product grids shown here – will always then use your referral id in all the links. You need to do nothing to make this happen, other than paying the subscription. Everything needed happens “under the hood”.
So when the time comes, look over in the nav panel on the left to get your subscription.