Now you can use the product stager to stage your products any way you want – ready for screenshots for your social media – brilliant for Pinterest!
Beginners can get a finished graphic in just 3 clicks once your “pull” is set up in Nifty. Just choose a template, click the button to open the Product Stager and click the download graphic button. Simple! Quick! Easy!
Recent releases have introduced being able to save your finished graphic (no more screenshots!) and the ability to animate and save as a video and animate and save as a gif.
Why not give it a try right now? Here’s a link to the Zazzle Product Stager. It’s simplified for here, so all you have to do is put in your storename to get your own video – in just 2 clicks! (opens in a new tab)
Alternatively, here’s a link to the Society6 stager with tote bags or a general one for other PODs (you manually add all product images)
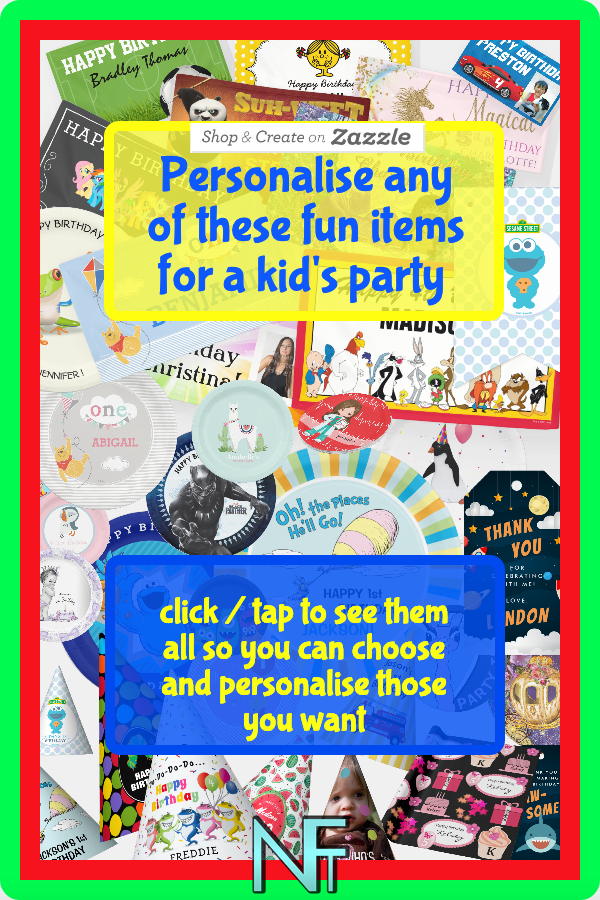
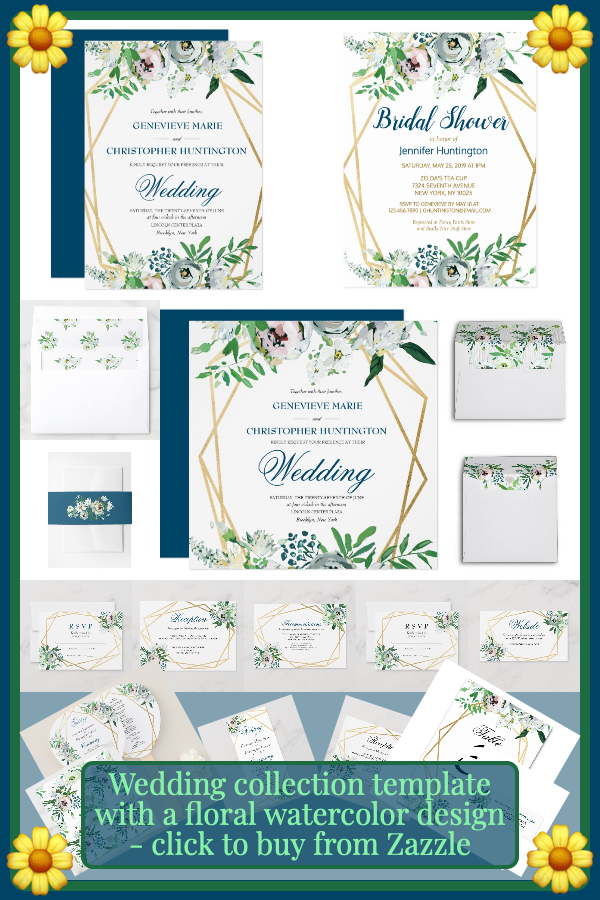
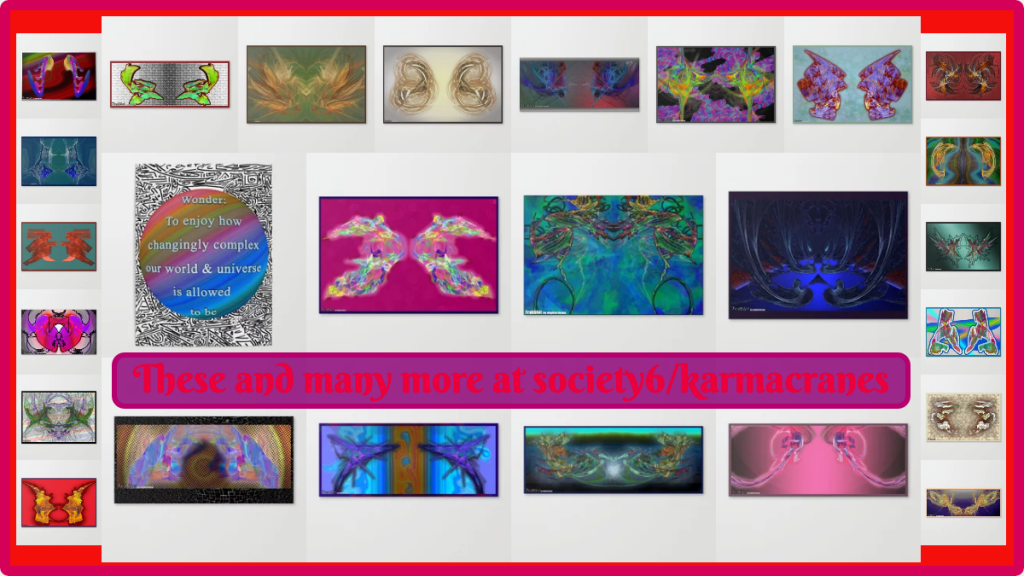
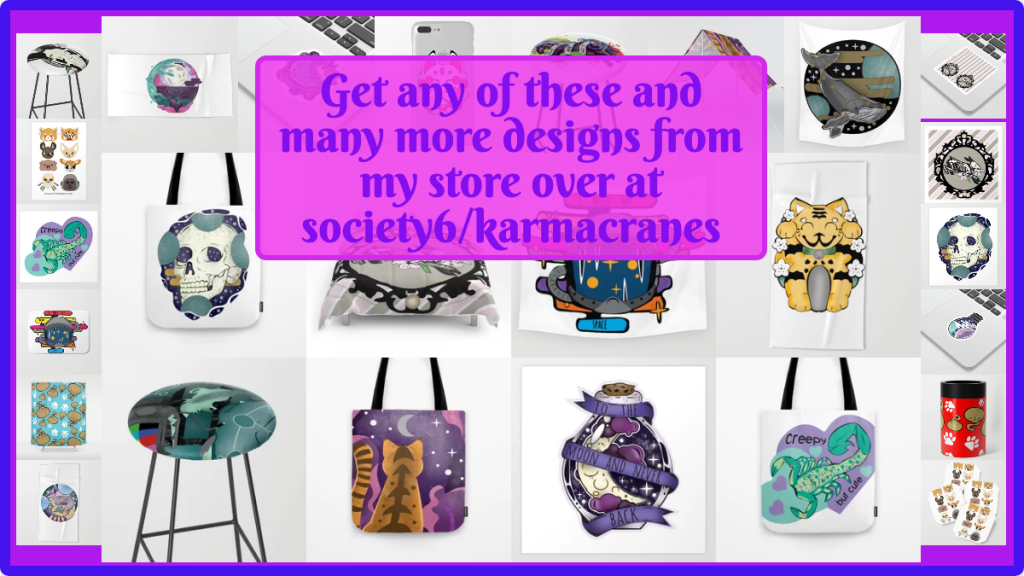
Examples of easy-to-make images for your social media.
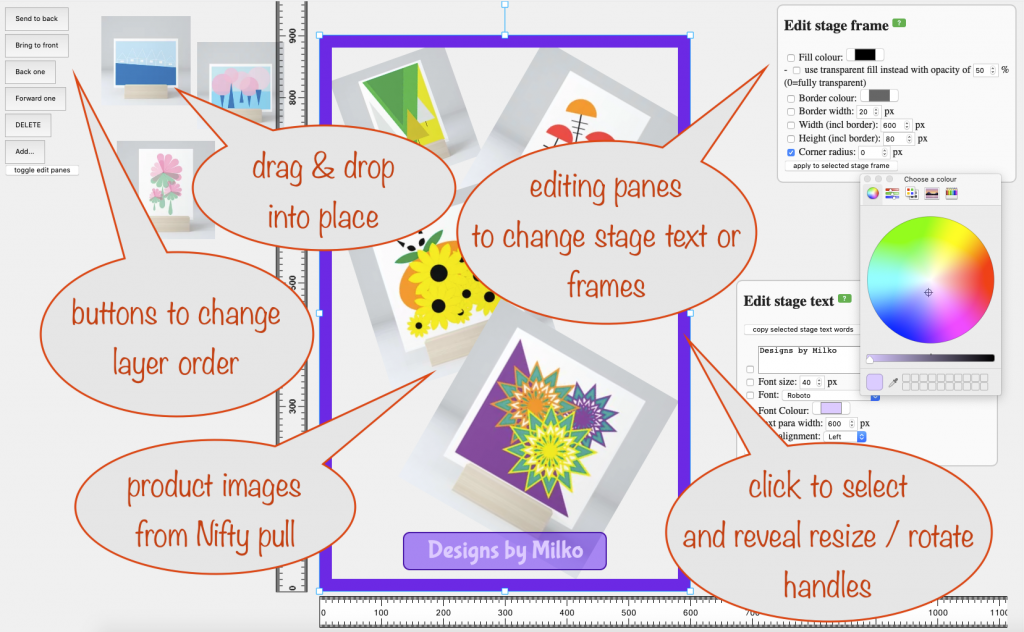
You can add simple rectangular frames, your own images (such as a logo or favourite graphic) and add text to the stage. Or you can start from a library template (or a template you made previously). Keep reading for more!

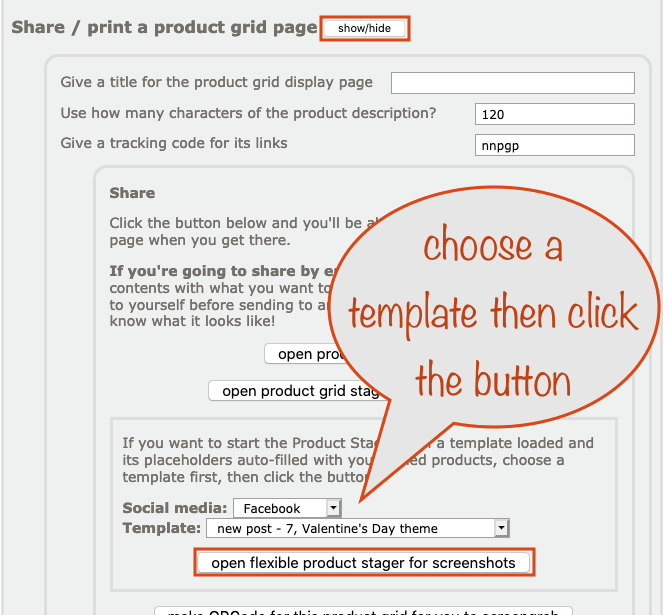
Whether you’re using the Society6 Nifty Promo Control Panel or the Nifty Promo Control Panel for Zazzle, you’ll find the button for the product stager in Step2:
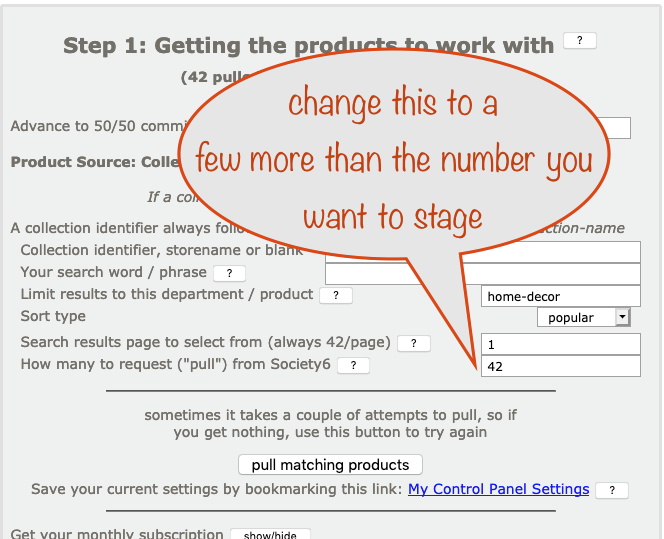
To use it, just set up Nifty to “pull” the products you want – you can get them from your store, from a collection or from the marketplace.
Set the number requested to a good few more than you’ll want to stage – just to make sure you’ve got enough. Experience will tell you how many to go for.
(Society6 is shown but it’s in the same place for Zazzle)
See what Tailwind has to say about designing pins for Pinterest
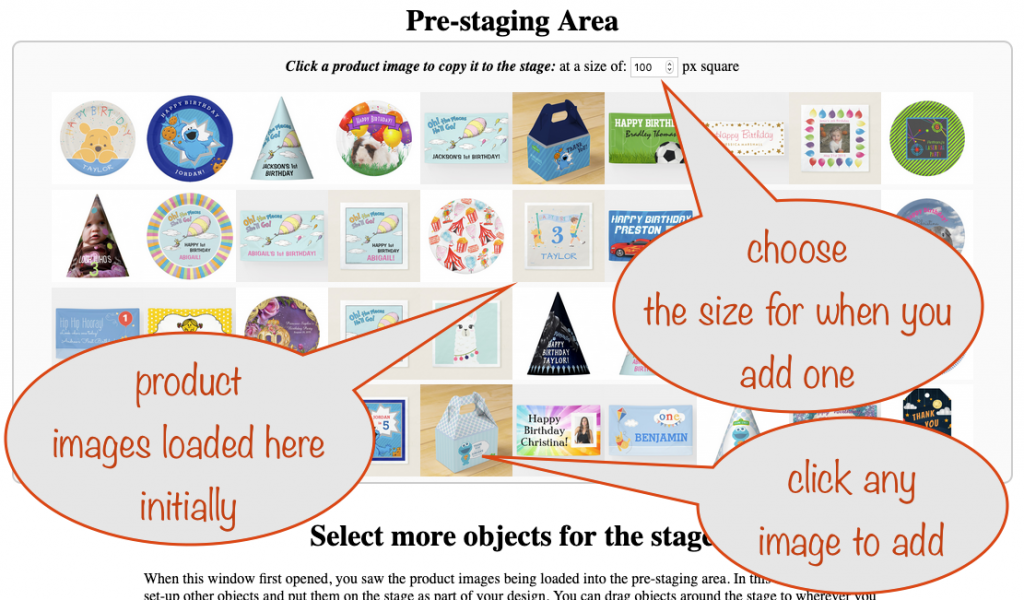
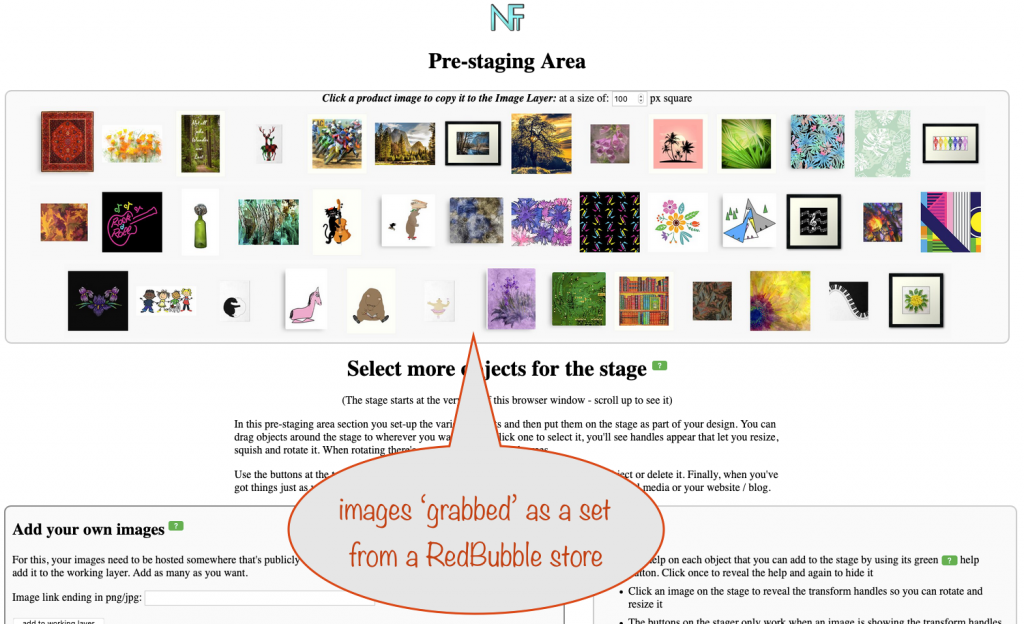
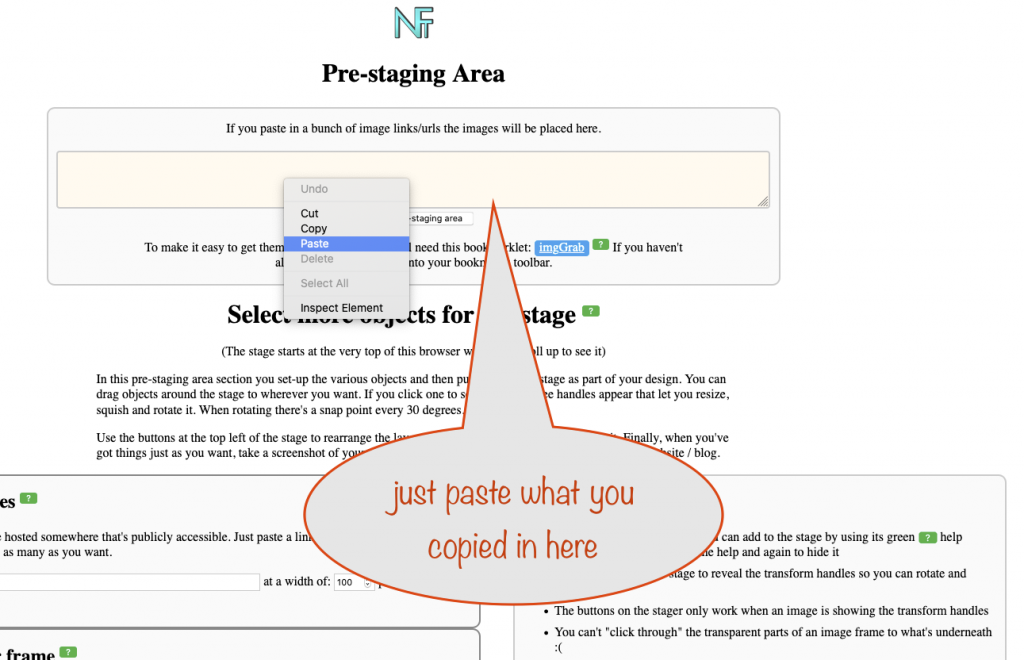
Pre-staging Area
Thanks to feedback received, in the latest release we’ve now got a pre-staging area. Originally, all product images were loaded straight onto the stage. This was fine with only a few but when there were plenty, it meant a lot of time spent deleteing the ones you didn’t want.
So now they’re initially loaded into the pre-staging area and fron there you click any you want on the stage. With this approach, you also get the chance to set the size of an image when it gets there, which is really cool!
A shout goes out to Christie C for being the first to make this suggestion! You know who you are 💐
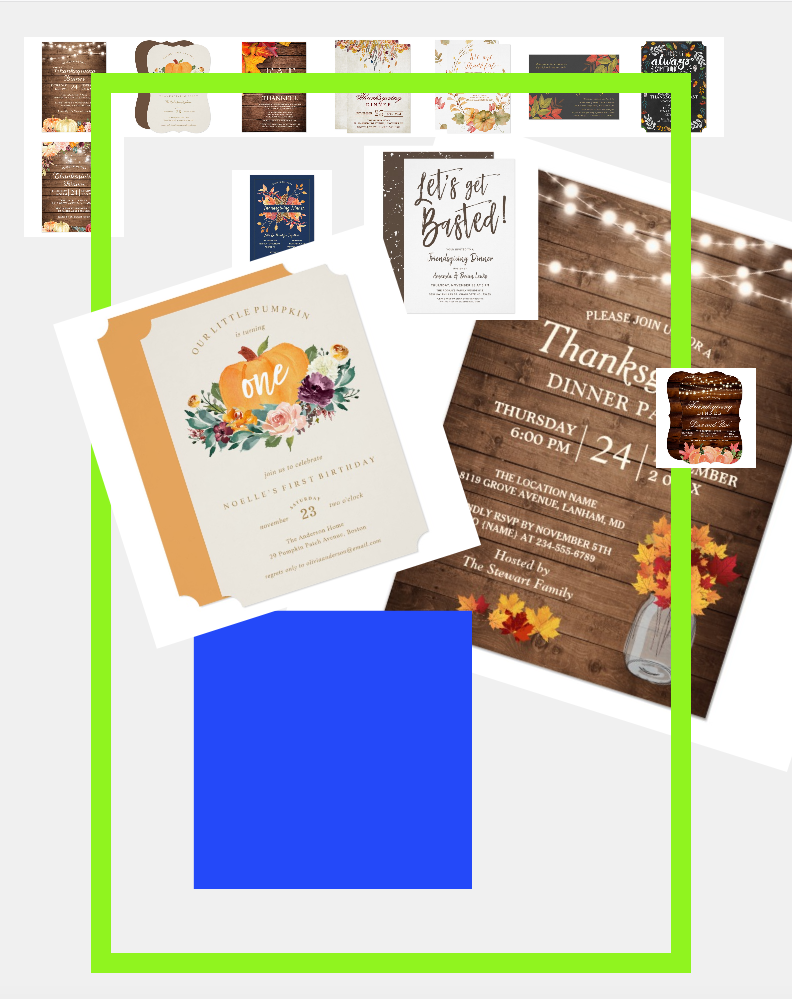
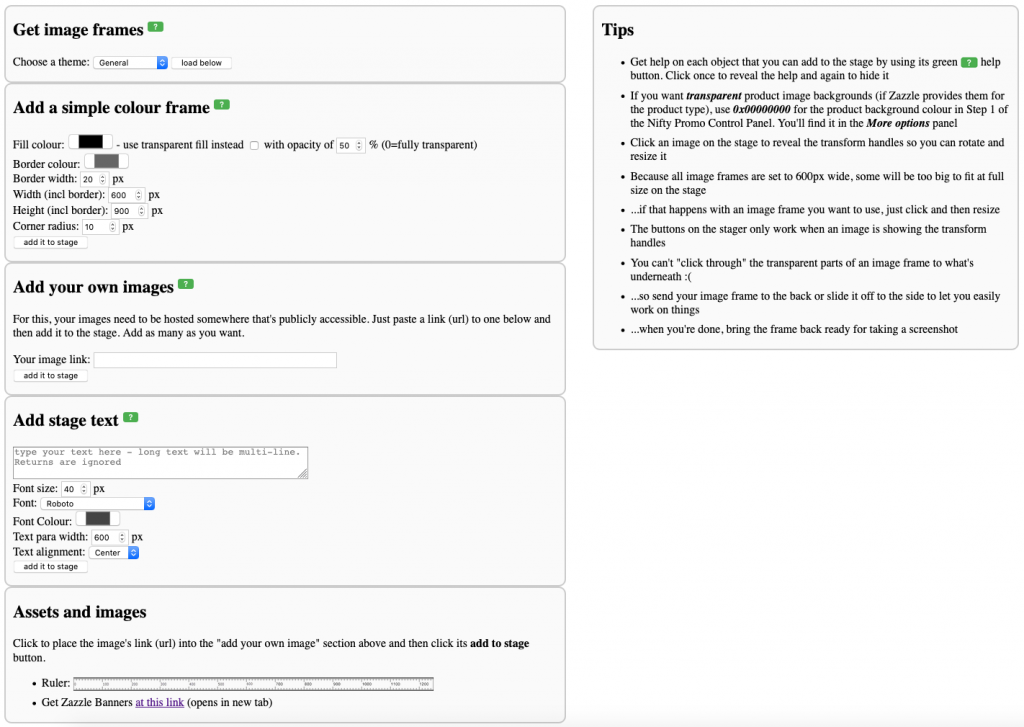
Simple rectangular frames
You can add simple rectangular frames to the stage to help in your creative quest for the perfect pin / image.
Add as many as you need. Remember, you can always edit them once they’re on the stage. Just toggle the edit panes and work from there.
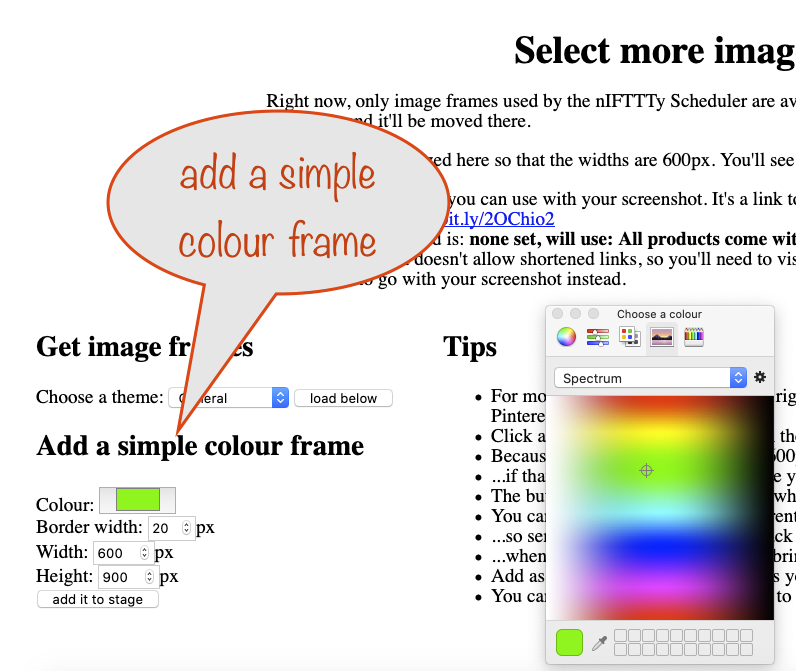
The simple colour frames behave in the same way as the image frames and images. You can change their stage layer order and delete them with the buttons on the stage. Resizing works the same way as the others, too.
Use your own graphics
Add as many of your own images as you like. As long as they’re publicly accessible, everything will be fine. Just paste in a link where shown and add it to the stage with the button provided.
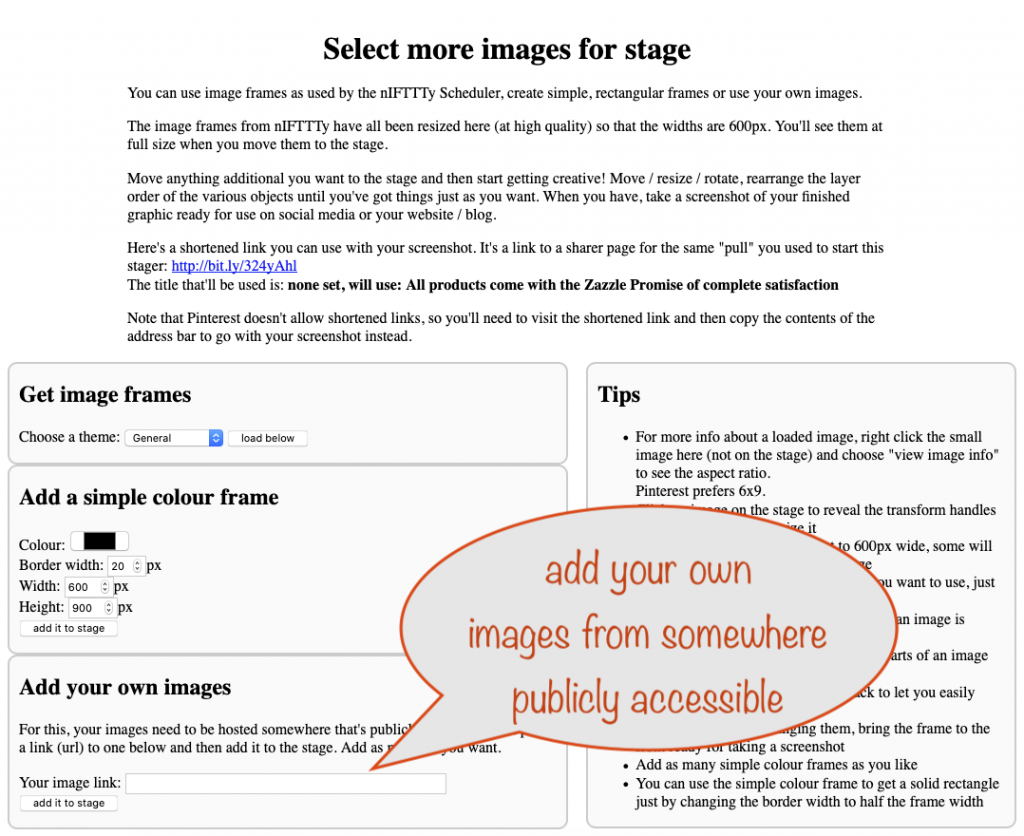
This is where you add product images from PODs other than Zazzle and Society6. You can even add product images from the grid displayed at the bottom of the Nifty Promo Control Panel using this technique. Cool!
All you have to do is to get the image link/url. Right-click and copy is your friend here 🙂
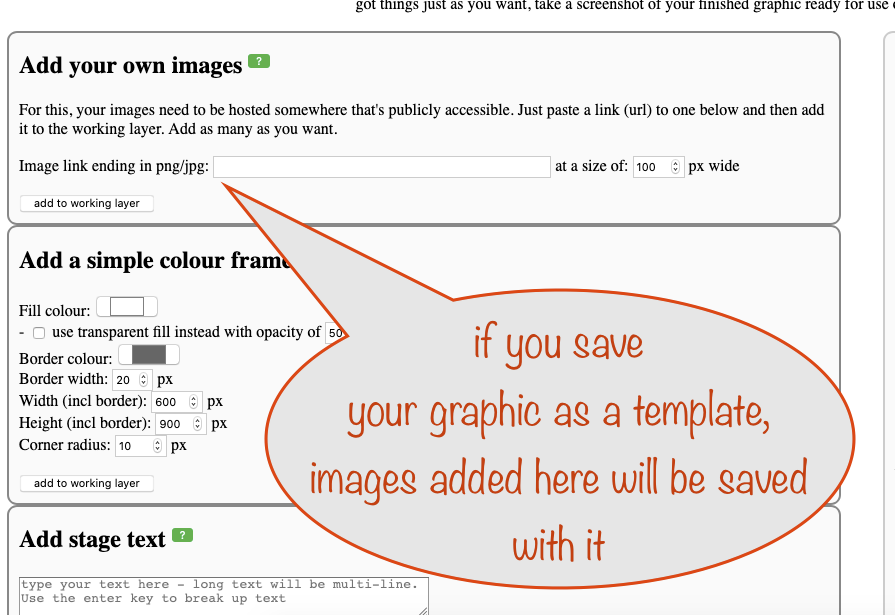
When you make and save a template, any images added this way will be saved with it. It’s a great way to brand your social media shares with your logo.
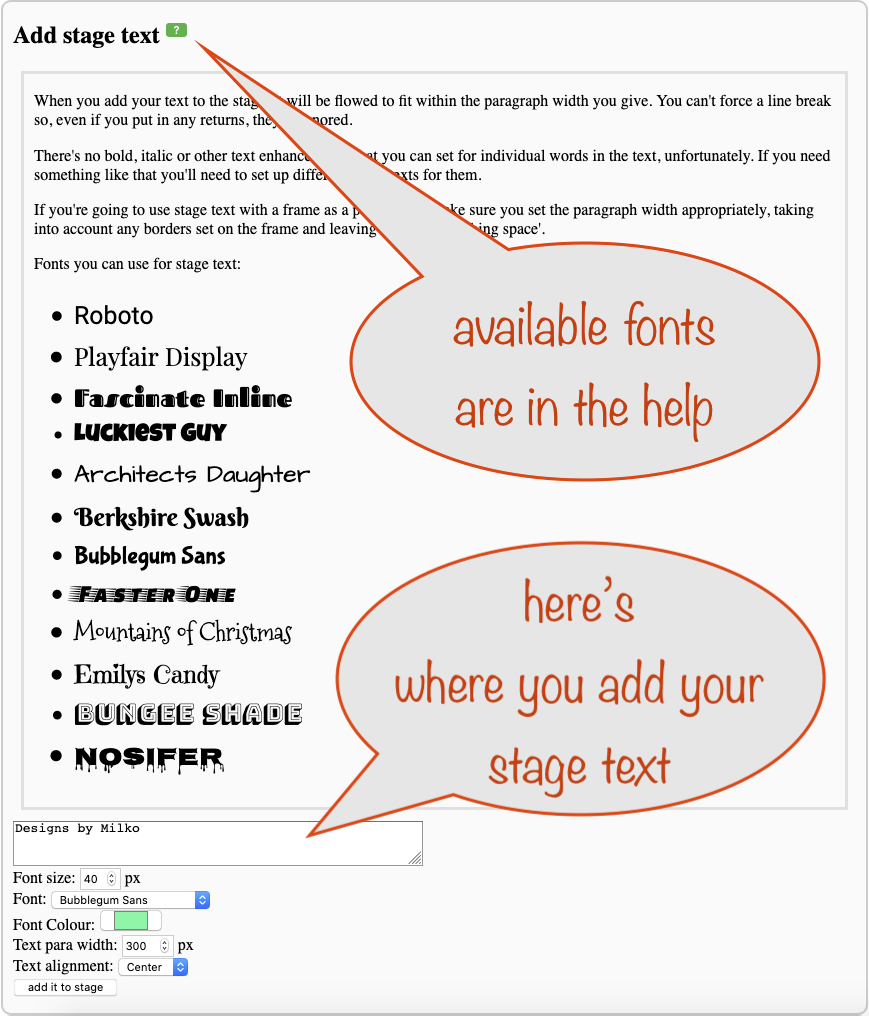
Adding stage text
Stage text can be multi-line and in any colour. There’s a selection of fonts you can use that should cover pretty much any design / target audience.
As with all the other objects, you can have as many as you like and they can be resized, rotated, dragged and have their layer position adjusted.
Add a ruler or clipart to the stage
You can add a transparent or solid white ruler to the stage to help when designing your graphic.
There’s also the option to add clipart that you find online.
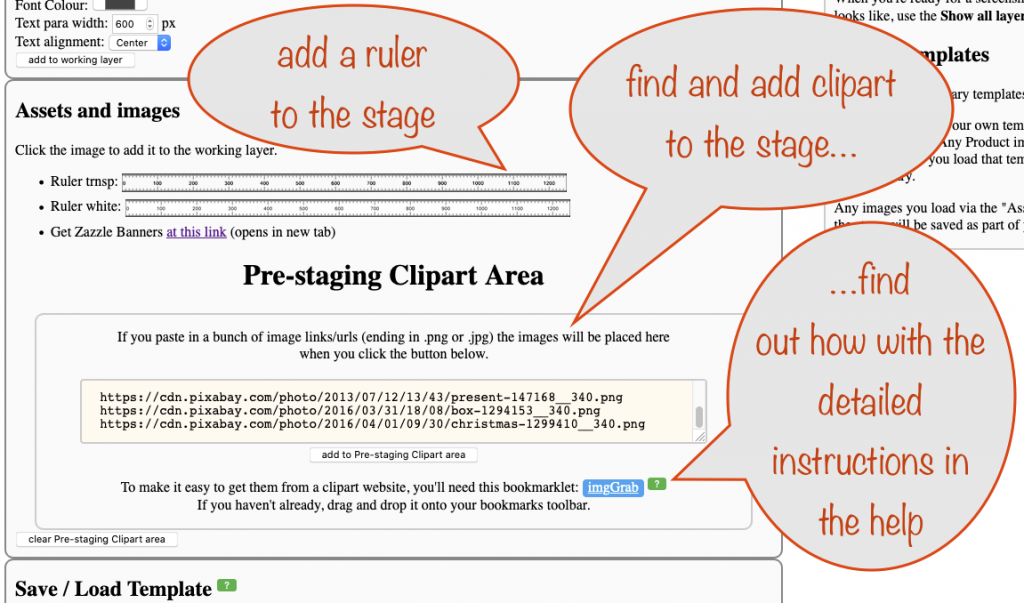
To get clipart that you find online, you’ll need the imgGrab bookmarklet. Click the green ? help button for detailed instructions.
To begin with, you can simply find one you like, find out its image location / url with a right-click and paste that in the area provided instead – your choice.
Clipart compilations
You can use the clipart compilations as a quick way of getting clipart for your graphic.
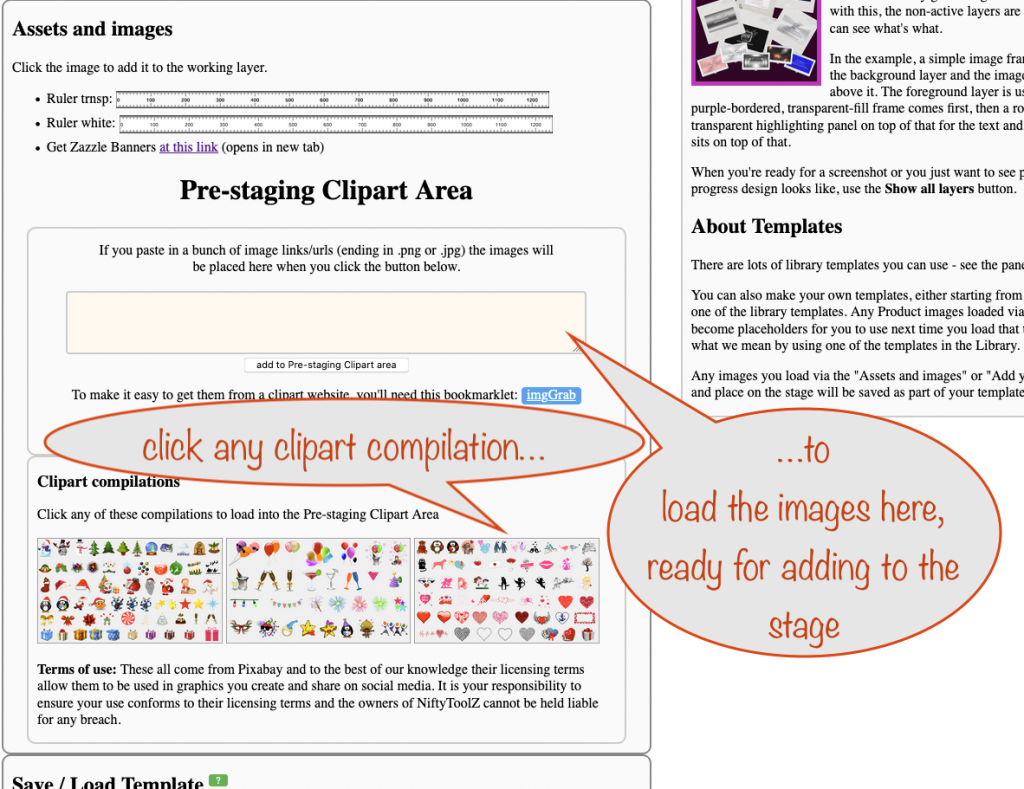
Click the compilation with clipart you want to use with your graphic and its images will be added to the Pre-staging Clipart area. Then just click the image(s) you want and they’ll be added to the stage.
Get help with the green help buttons
Find useful help specific to an object by clicking its green ? help button. Click again to close the help panel it opened.
Editing on the stage
Once you’ve put them on the stage, frames and text can be edited with the edit panes. They make it really easy to fine-tune your design and give it the polish needed to attract those all-essential clicks!
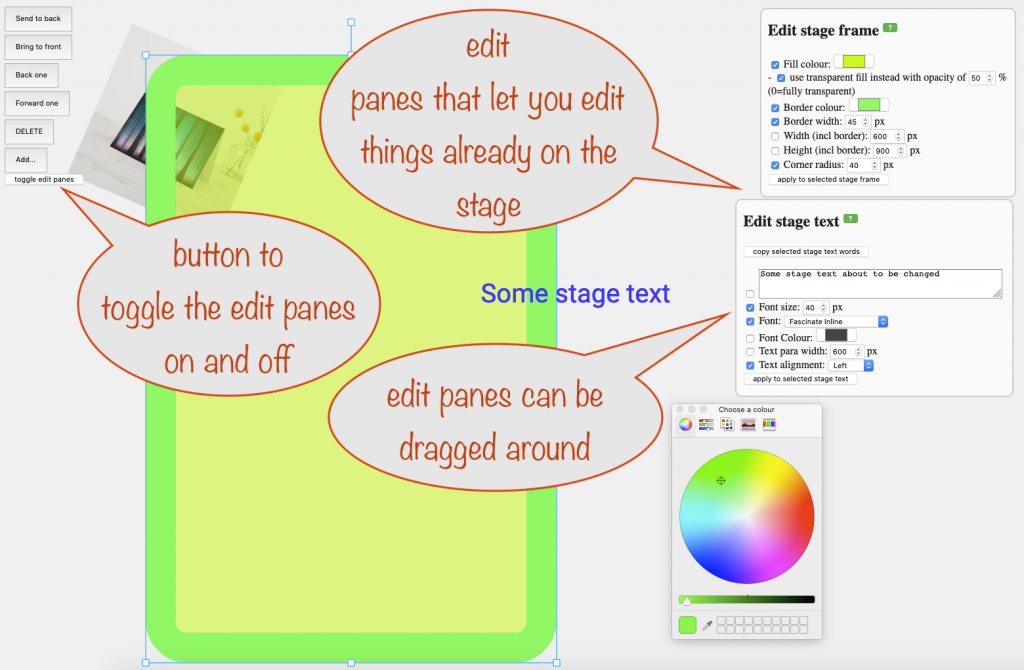
To use them, toggle the edit panes with the button on the left. Drag the panes into a convenient place if they’re in the way and then select the text or frame you want to change. When the selection / transform handles are showing, you’re ready to edit.
Put a check mark next to the attribute(s) you want to change and away you go. When you’re ready, hit the apply changes button. So easy!
Saving and Loading Templates
You’ll save lots of time with this really exciting capability. It lets you put together common layouts and save them as templates ready for next time.
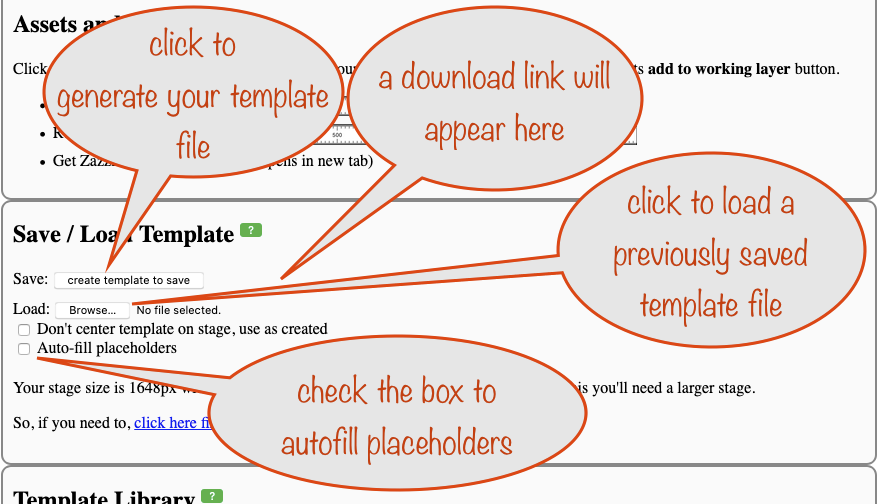
Once you’ve assembled a great layout, just hit the button to generate your template file and then download it onto your computer with the link that appears. Frames and text will be saved and, for any images you’ve placed, you’ll get ‘magnetic’ placeholders to make it a cinch to use next time.
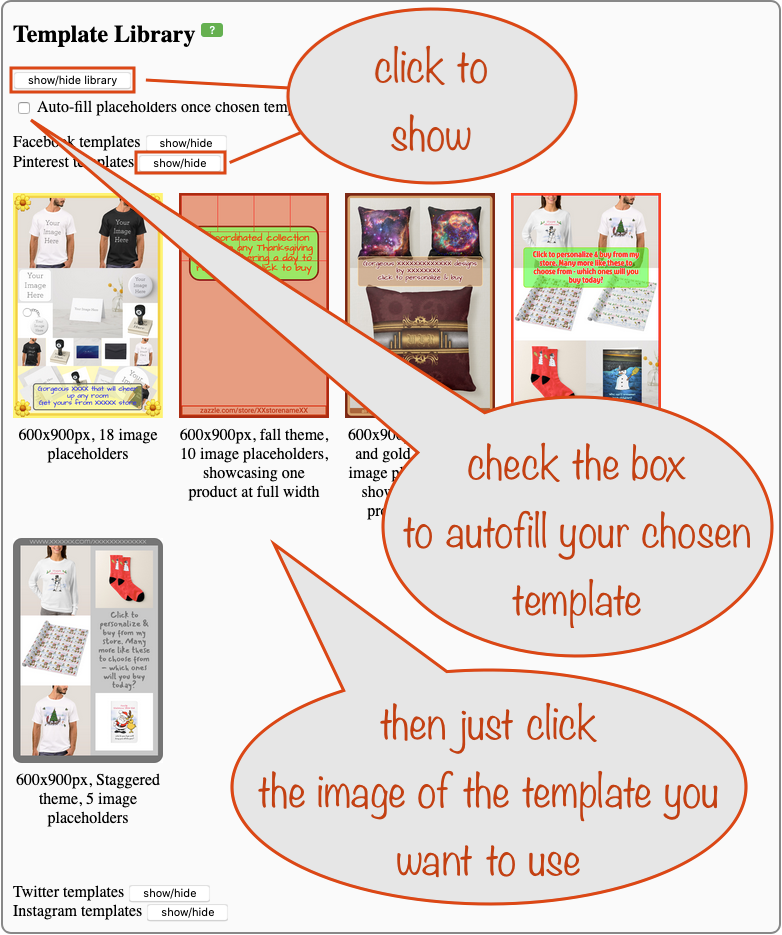
When you load one of your previously saved templates, you can autofill its placeholders with the product images alreay in the pre-staging area. If you want this to happen, check the Auto-fill placeholders box.
You can do this with templates from the Template library (see below) as well.
Best-fit placeholder generation
This mini tool helps you fill an area with the number of placeholders you want, doing all the sums for you so you can concentrate on the design.
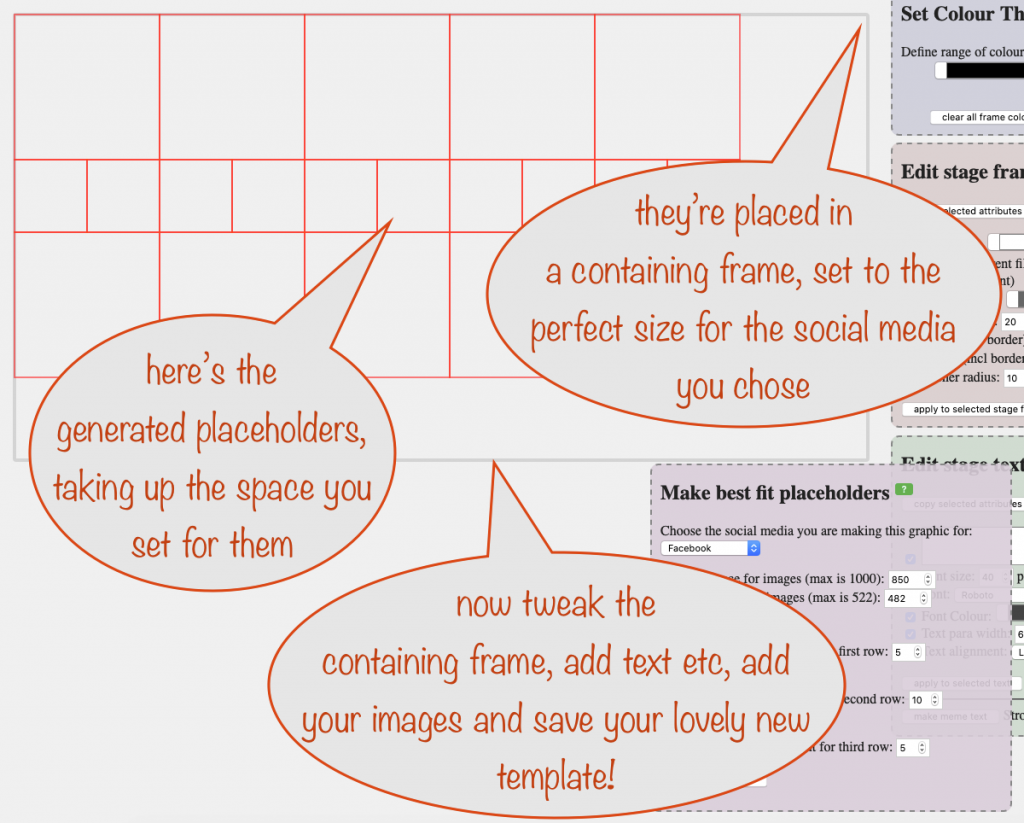
It makes it so much quicker to make your own templates from scratch. Here’s the set-up for the above:
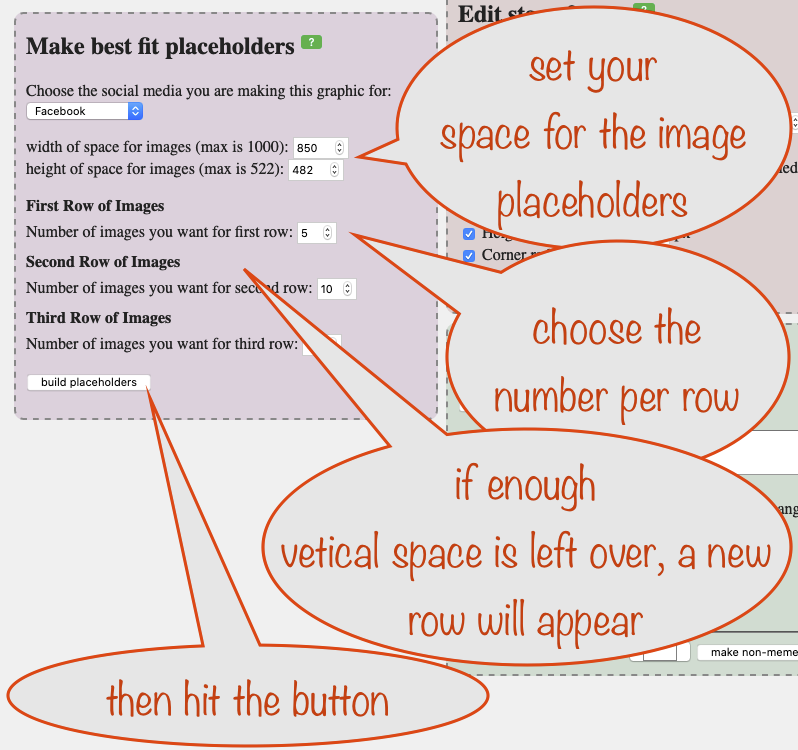
There’s even a checkbox to auto-fill the placeholders once they’ve been generated with your current product images. Everything’s designed to take the strain and things as easy as possible for you.
Design grid and snap-to
There’s a design grid (grid-lines are every 10px) to help you with alignment of things on the stage.
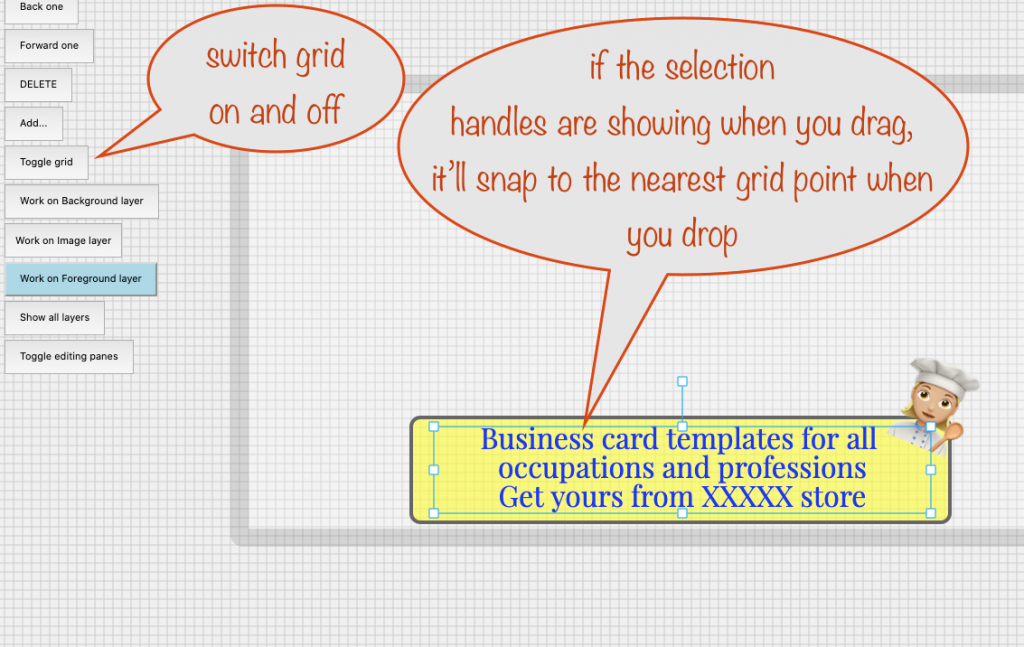
When it’s switched on, snap-to is enabled. To use it, make sure the selection handles are showing first. Now when you drag and drop, the frame / text / image will align to the nearest grid point.
If you drag without first selecting, snap-to is ignored. It’s also ignored when you use the arrow keys to move your selection, giving you finer control over placement.
The inbuilt Template Library
In the template library you’ll find ones designed at the sizes recommended for various social media.
Find templates for Pinterest, Facebook posts, Twitter and Instagram. Each comes with ‘magnetic’ product image placeholders (see below) to make the most of them.
As time goes on, we’ll be adding more templates to the library. If you want to donate any you design, that would be fantastic. Shout via the NiftyToolz, Tips and Support group on Facebook.
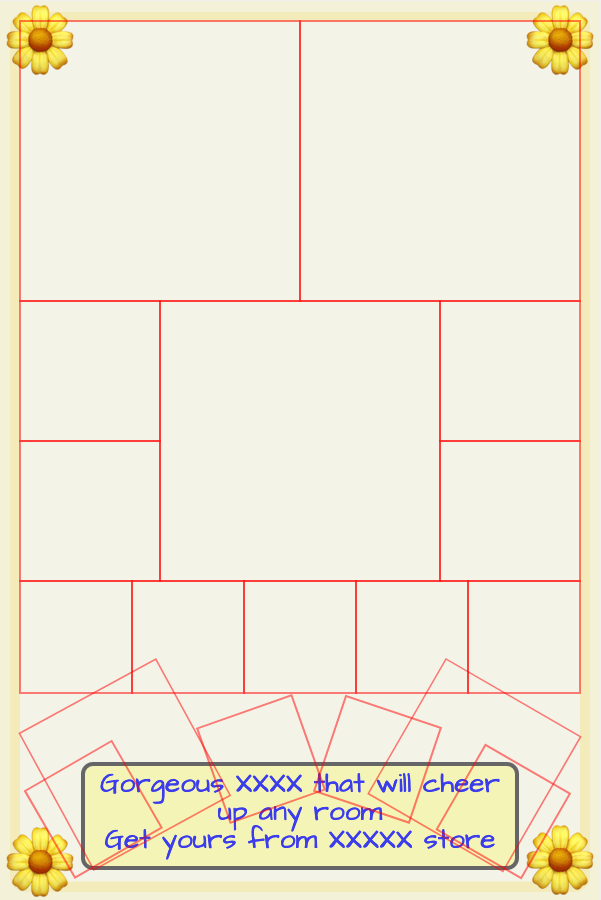
Template image placeholders
Templates in the library have image placeholders to make it a cinch to place your images. If you create and save a template yourself that has images, they will become placeholders when you next load the template.
This is what the ‘magnetic’ placeholders look like, together with what it looks like with images dropped into place.
Remember, you get given a link to use when you start the Product Stager from the Zazzle and Society6 Nifty Promo Control Panels. That link will take the visitor to a product grid containing all the products in your original “pull”. Here’s the link for the wedding collection shown: http://bit.ly/367Zjf9
Set colour theme
Watch the colours of the frames and text on your stage change as you change the range colours in the Set Colour Theme editing panel.
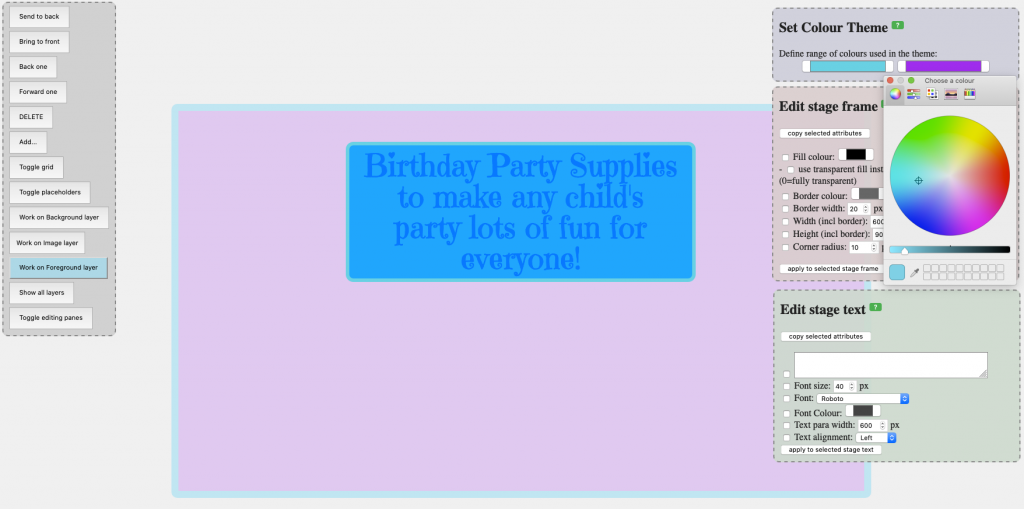

You can use the eye-dropper to choose the range of colours for your theme from your product images or use the colour-wheel, sliders or crayons in the colour-picker.
The range of colours it makes is always enough to give different colours for the border, fill and text colour for all frames / text you have on your stage.
Cheat Sheet
There’s a handy cheat sheet listing the most useful things to know:
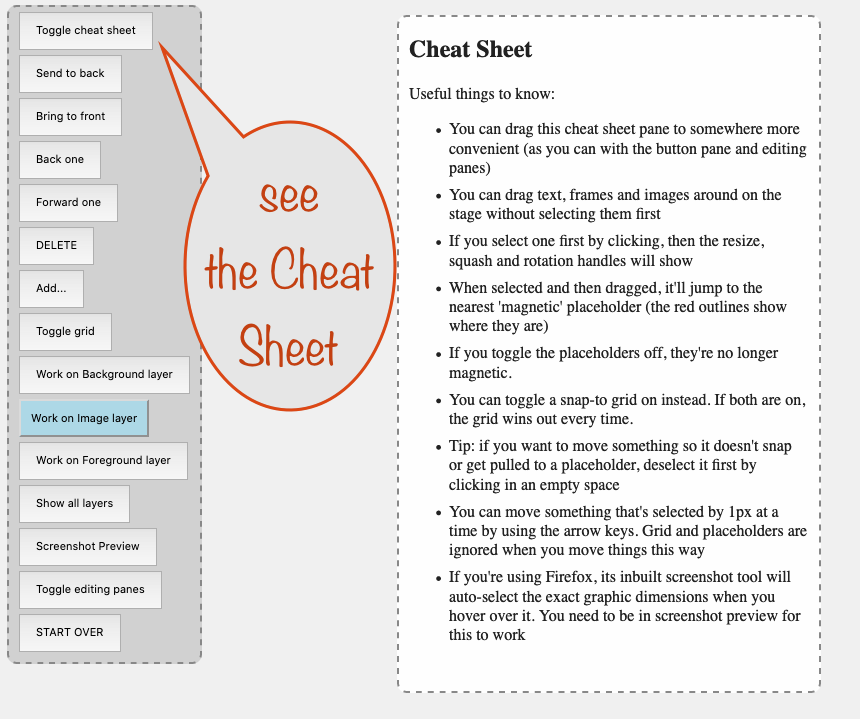
It’s a must – for anyone just getting started with the Product Stager.
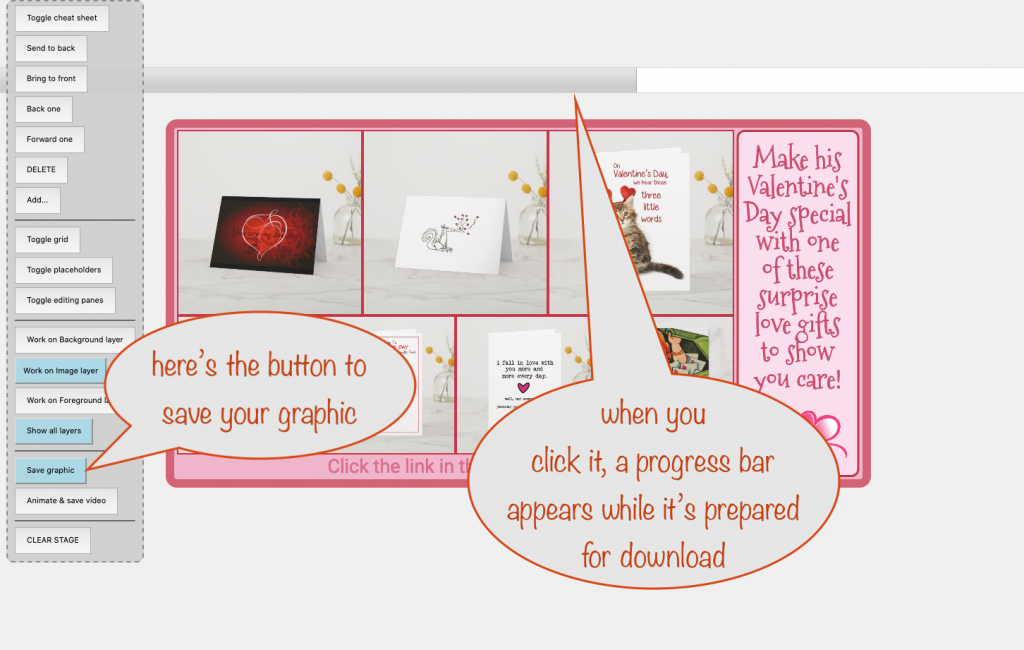
Downloading your graphic
When you’ve finished your graphic, you can download it ready to use in a share.
Animating and saving as a video
Pretty much the same as saving as a graphic, except you get a WebM format video in your downloads folder.
It’s a shame that browsers don’t support making MP4 videos because that’s the type that all the social media sites use (Pinterest, Facebook, Twitter, Instagram).
So you’ll need to convert your downloaded video to MP4 first, But don’t worry, it’s easy peasy – just upload to the website we recommend to do the conversion for you. You’ll be given the link when your download completes (and it’s also in the Tips section).
Meme text
Ok, it’s not strictly meme text because meme text uses a specific font with a black outline. Ours lets you use any of the supported fonts and uses the stroke colour you set – but it serves the same purpose, making your text readable over any background.
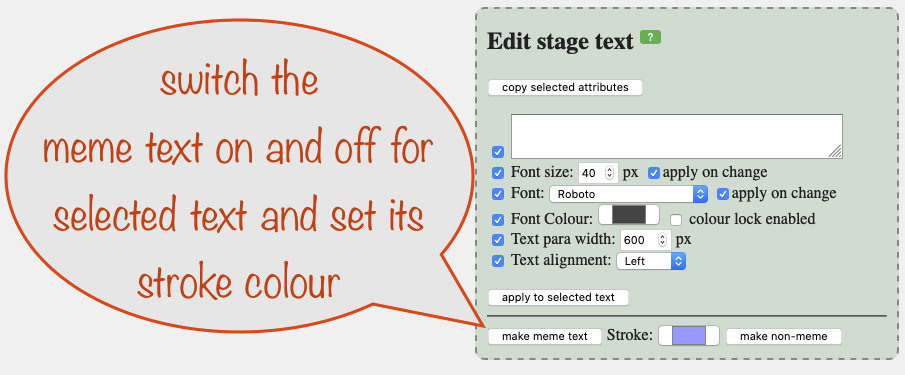
On some fonts it doesn’t work so well, giving pointed strokes on the outline. It usually affects uppercase Ms the most. Most fonts are good though 🙂
Colour locks
The “roll your own” colour theme is a great feature but sometimes you don’t want some of your stage text/frames to be affected. That’s where the colour locks come in.
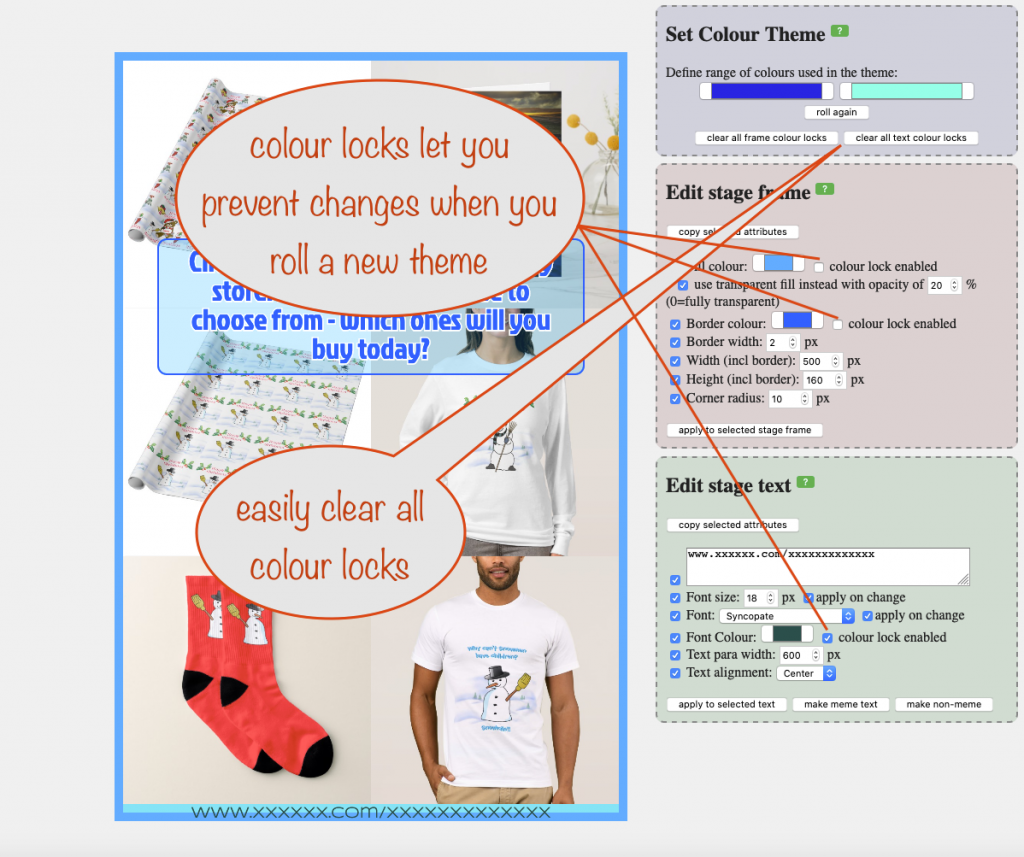
Just check the box next to the elements you don’t want changed and then apply them to that element.
Show font changes immediately
What font works best with your design? Can you squeeze the text into the available space? Sometimes you just want to “suck it and see” – and that’s where this feature comes in handy
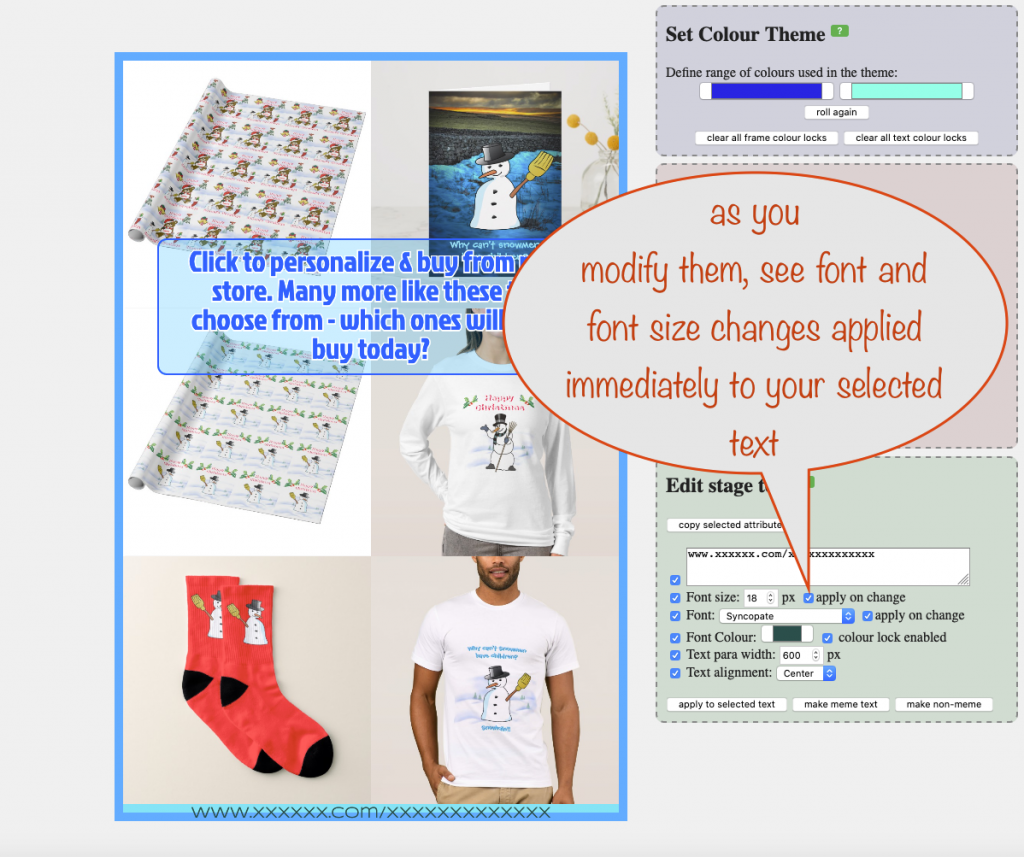
When you check the boxes your selected text will change as soon as you make a change to either the font or the font size making it super quick to see the results.
By the way, there’s something really handy in Firefox with dropdowns: if you initially click one, after that, the left and right arrow keys select the previous/next item in the list. It makes it super fast to zip through the fonts!
Generated text for your share
Another time-consumer keeping you from getting back to designing products is composing the text to go with your share. That and choosing hashtags to go with it. There’s nothing worse than a blank starting point!
So now you can get a head start with the auto-generate feature.
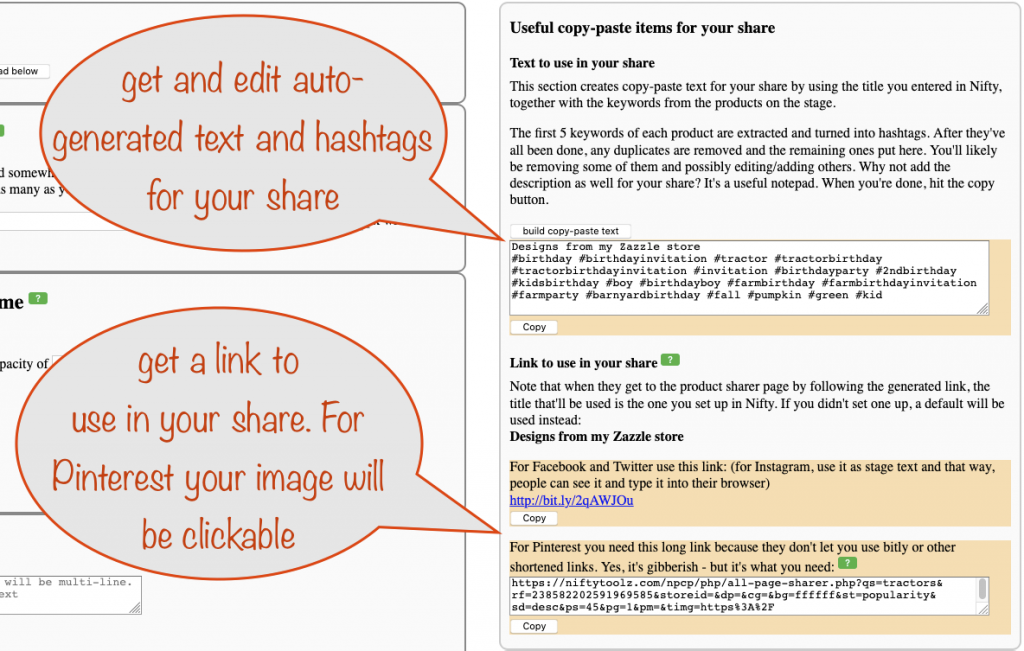
You get given the title you initially set up in the Nifty Promo Control Panel and a bunch of hashtags.
For Zazzle, the hashtags are picked from the first five keywords for each product on the stage. Any duplicates are removed and you’re given the final result to edit, ready for copying and pasting into your share.
For Society6, the hashtags are compiled from the titles of the products that are on the stage. Again, any duplicates are removed before being assembled into the copy-paste area.
About the generated link
The generated link will take your visitors to a product grid sharer page, using your referral id and the tracking code you set up in Nifty. The products shown will be all those that were in your original “pull” in Nifty and available here in the Product Stager.
Once there, they’ll be able to click any they like to be taken to the product page where they can then customize and buy.
The great thing about this approach is that it reduces the chances of them being enticed away to other people’s products.
You see, if you don’t use the generated link but instead give your own to your store or collection, Zazzle provides too many ways for visitors to get sidetracked to other people’s products.
So stick with the link you’re given and increase your chances of a sale or two!
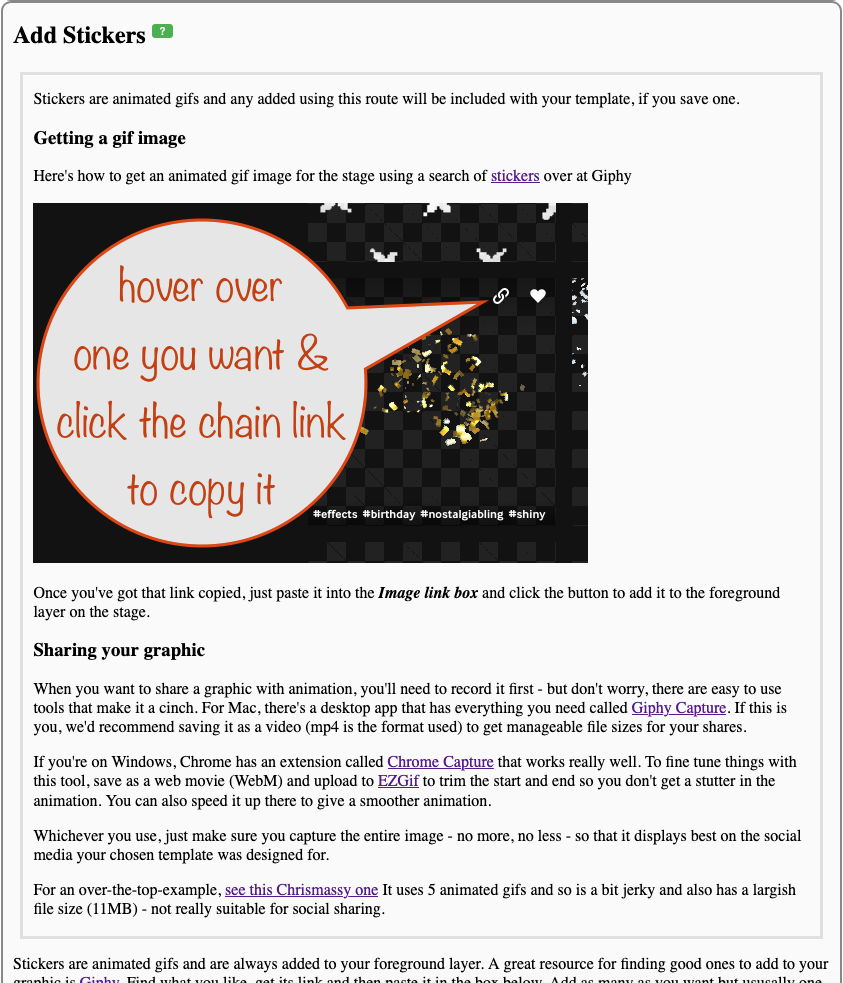
Stickers
You can add stickers, also known as animated gifs. When you use any of these, a simple screenshot won’t do the trick, you’ll need to record your graphic instead, a bit like a movie.
Here’s an example of one:
Here’s the panel for adding stickers:

Tools that let you record your animated graphic are linked in the help that goes with it:
Here’s another example, this time saved as an mp4 video
…and here’s the link given by the Product Stager to go with it
A poor second cousin no more!
Until now, the POD Product Stager has lagged a bit in ease of use when compared to the ones for Zazzle and Society6.
It can never be fully on par because there can’t be a generated link to go with your design but now there’s a way to easily get a whole bunch of images all at once from just about any POD store to go in your template.
Introducing the multi-Image Grabber
“What’s that?” we hear you ask. Well, the clue’s in the name. It’s a button for your browser’s toolbar (a “bookmarklet”) that grabs all the links for images in a section of a POD webpage that you click on.
And it quickly lets you do this for the Nifty POD Product Stager:
How to get and use it
Follow along with the next few screenshots and you’ll master it in no time 🙂
Getting the bookmarklet. First, visit the Nifty POD Product Stager, then scroll down to the pre-staging area. It’s then just a case of dragging that blue bookmarklet to your toolbar and dropping it there somewhere convenient:
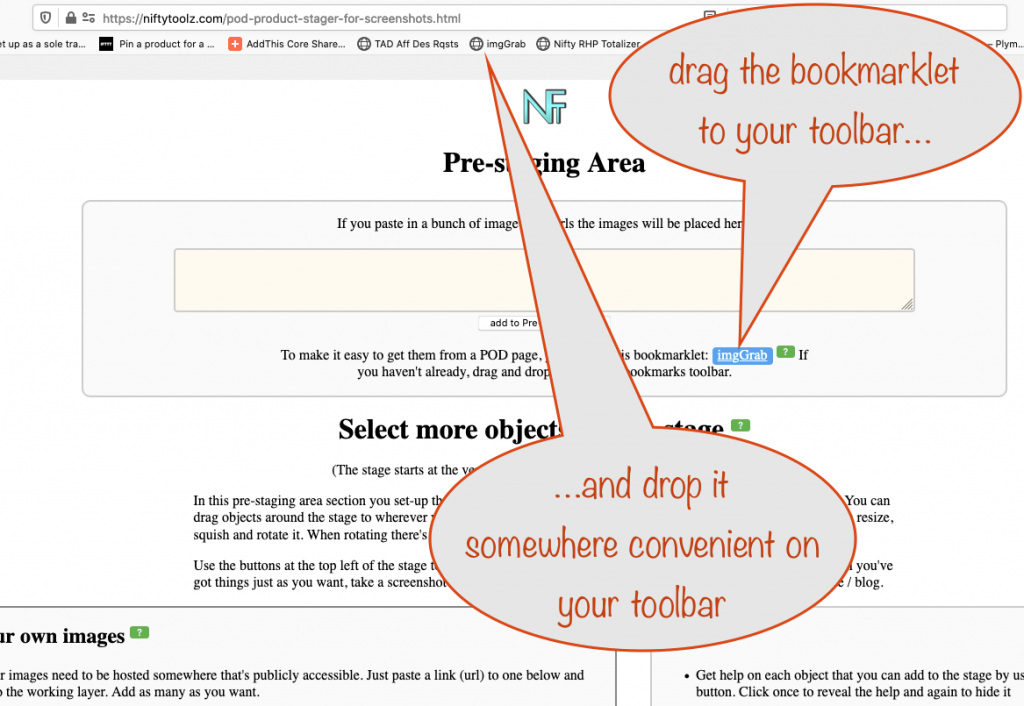
If you don’t have a toolbar showing and don’t know how to show it, click the green help button next to the bookmarklet for a link to a page showing how to do it for all major browsers.
Ok, now you’ve got in on your toolbar, get to one of your POD stores (not Zazzle or Society6 as they’re better dealt with in their own Product Stagers). For this, we chose one of our user’s RedBubble stores:
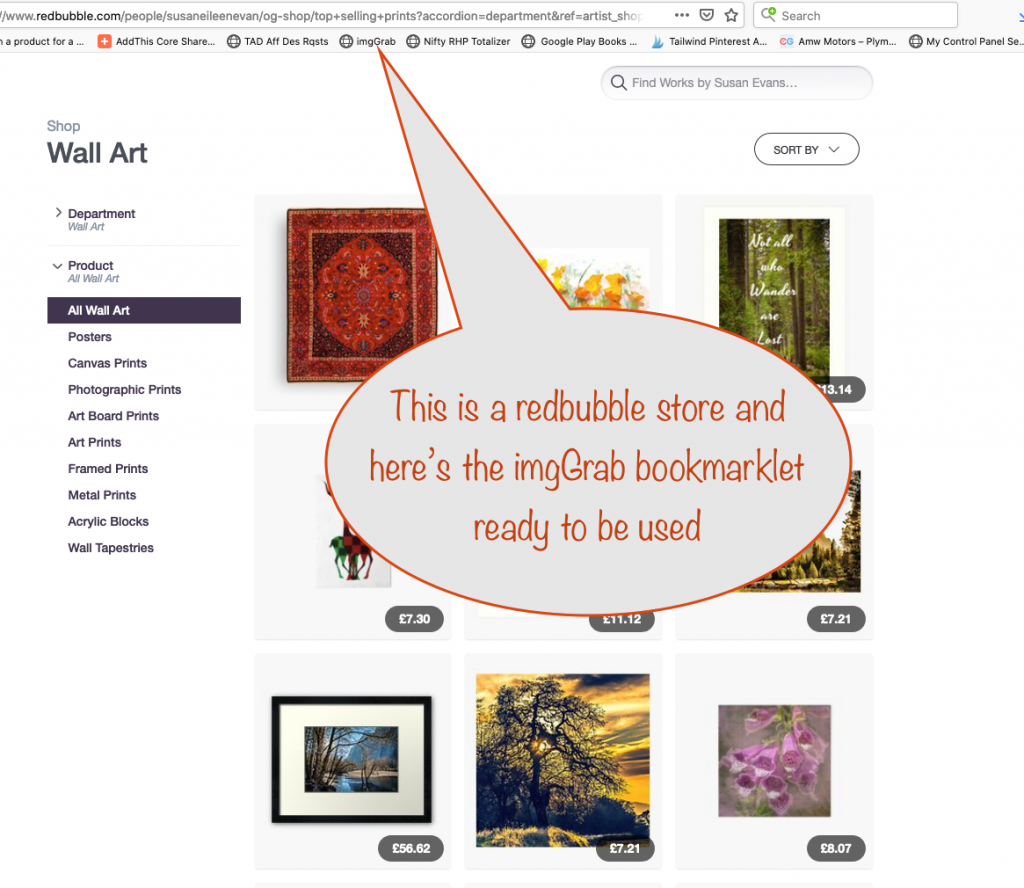
Once you get to the page that has the images you want to grab, hit the imgGrab bookmarklet and then hover over the area that has the images in it:
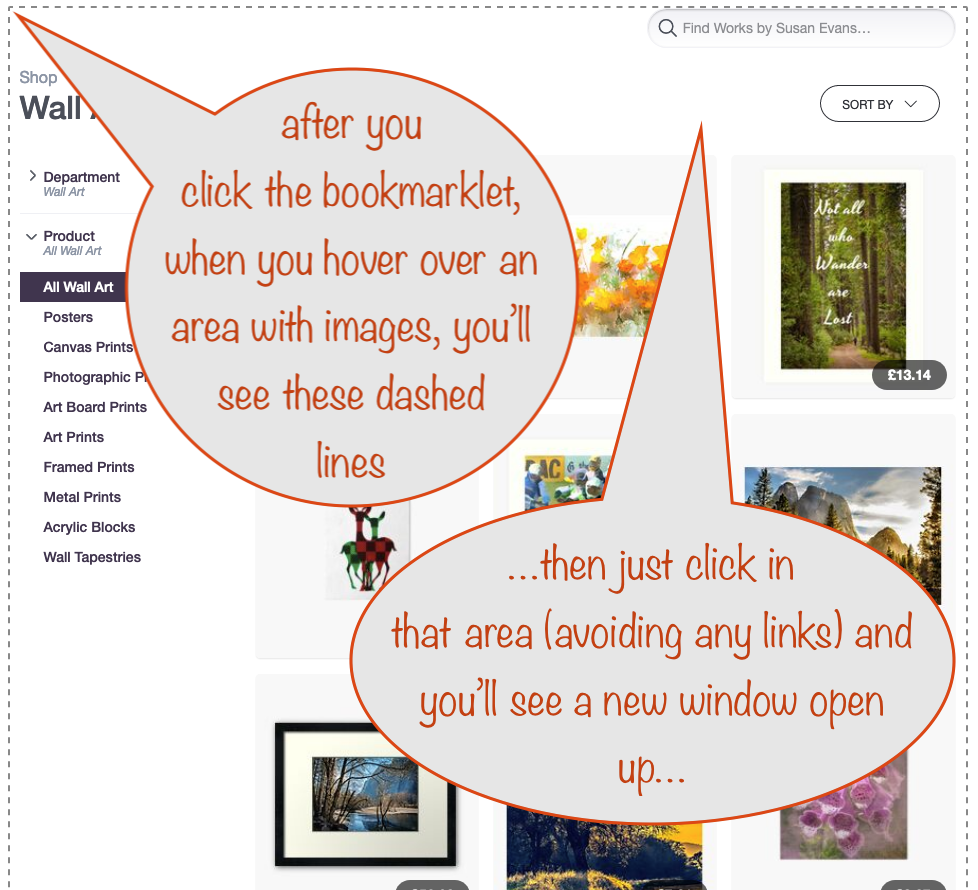
Once you’ve made sure it’s highlighting the area containing the images you want to grab, just click in that area. Just be sure you avoid clicking a link or a linked image or you’ll be taken away from the page!
When you click, a new window will open containing the image links/url:
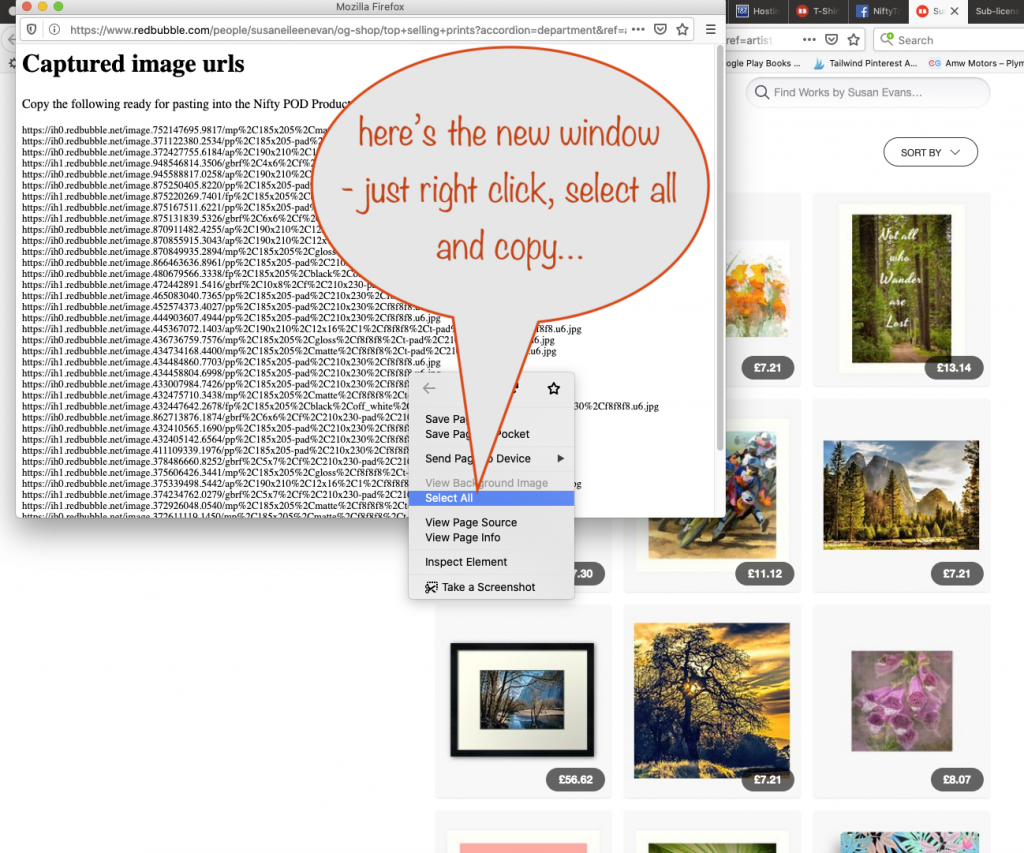
Now you’ve got your image links/urls all nicely copied, you’re ready to paste them where it counts.
If you can’t see the window, make sure it’s not accidently covered over by your main browser window.
Also, if you miss clicking on the right area, click the bookmarklet again to start afresh. Sometimes it can be a bit tricky getting it right first time!
Here’s what it looks like once you’ve pasted them, with the box enlarged just for the purpose of showing you here.
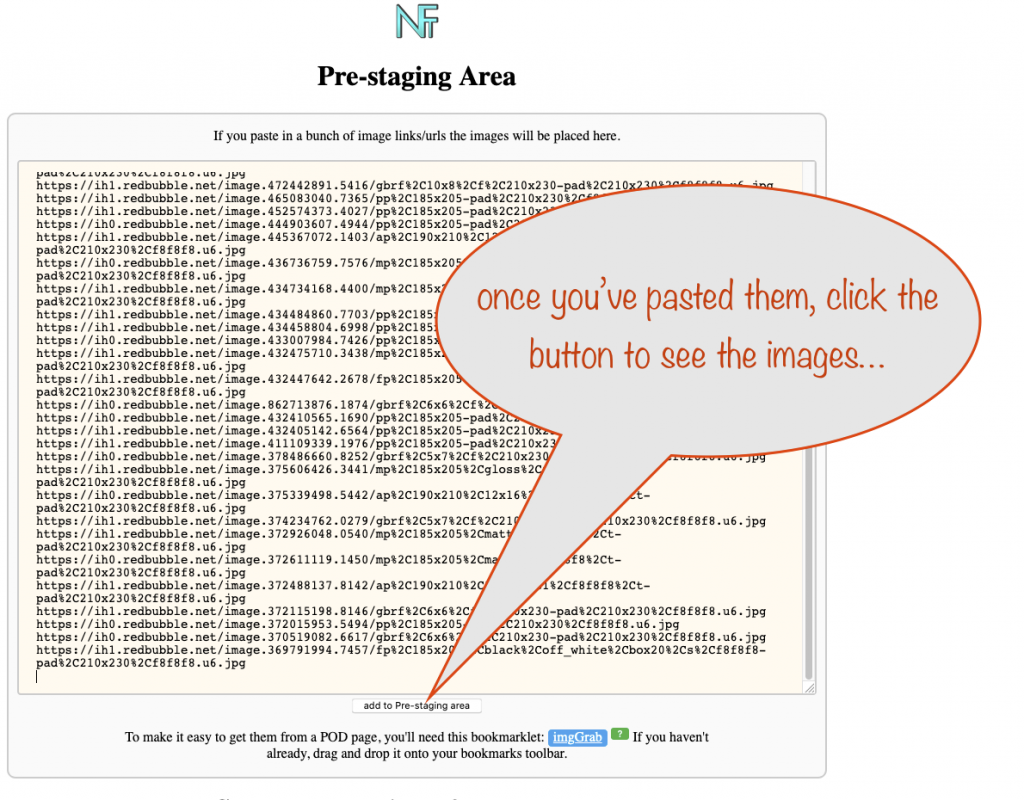
Now that you’ve pasted them just click the button to load their corresponding images into the Pre-staging area.
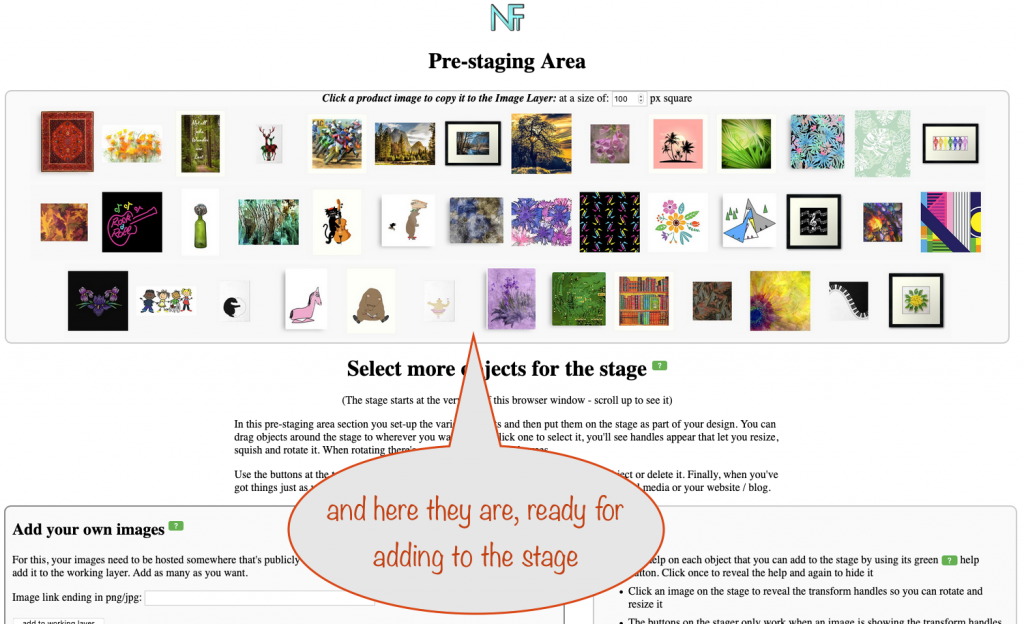
Once those images are in place, you’ll be able to autoload them when you load a template – either your own or one from the library.
That’s it – have fun with it 🙂
If you’ve got any suggestions for improving the product stager, please get in touch in the usual ways.
Thanks!