this mini lamp is another module in the Nifty Hobby Projects for LEDs and Solar series written by team-member Mark Ridley
This tutorial shows you how to make a mini lamp that’s powered by 3 rechargeable AA NiMH batteries. It’s incredibly easy to make, too!
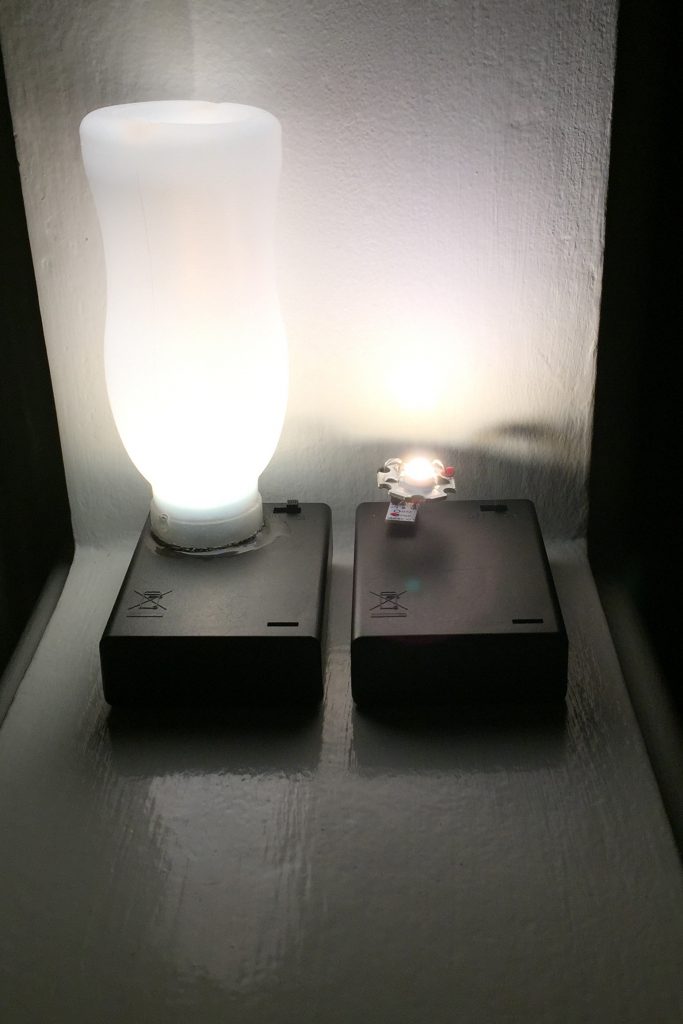
So you’ve been wondering what to do with the AA batteries you’ve been recharging with your solar panel. Well, this is a great idea and really practical, too.
Benefits
- The yoghurt pot diffuser is soooo cute!
- 1 watt LED gives plenty of light
- Uses a warm-white LED to prevent the wakefulness you get with cold white LEDs
- 5 hours continuous use (with 2000mAh batteries) before it gets too dim
- For bedtime reading, will last about 2 weeks at 20mins reading per night
- You can go walkabout with it while camping as it fits neatly in your jeans pocket with the bottle sticking out – totally hands-free. Make two and have one for each pocket!
- The battery box acts as a very stable stand for the lamp
- Safe to use – no mains electricity involved
- Your solar powered charger will recharge them in just 10 hours of sunshine
What you need
First off, you need the lamp diffuser. Mini yoghurt bottles are perfect for this – and you can give your gut biome a boost at the same time!
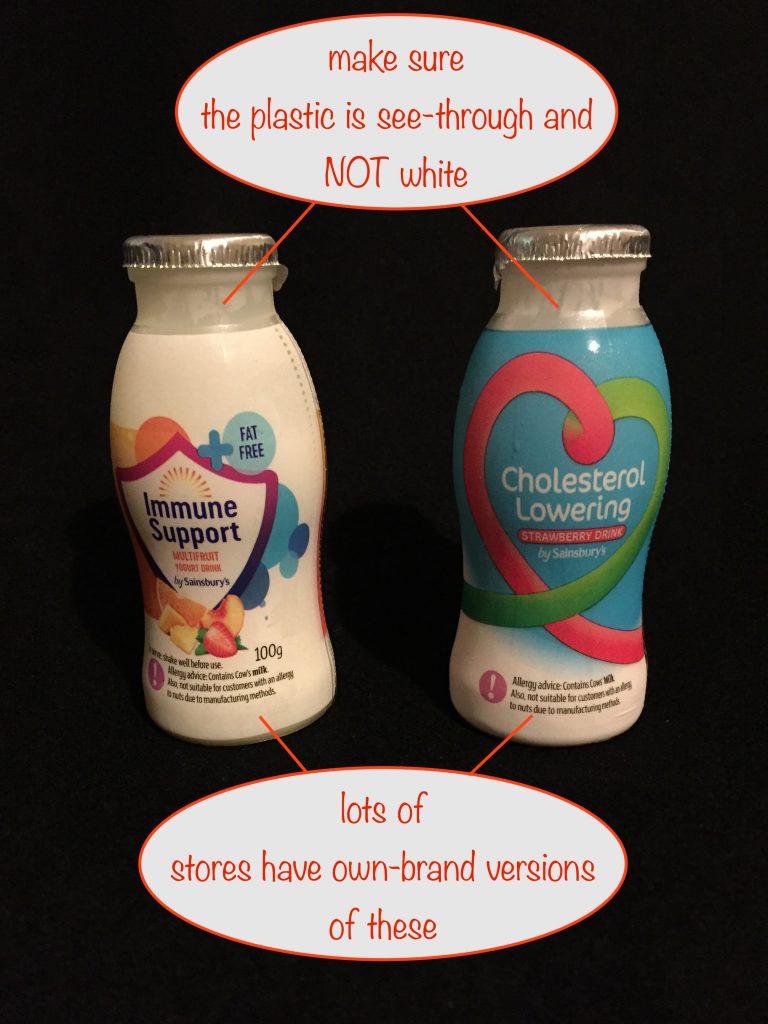
Just make sure you get the type with semi transparent plastic and not the pure white ones you get with some. Also, make sure you get the narrow-top type – the top is 28mm in diameter (about an inch across).
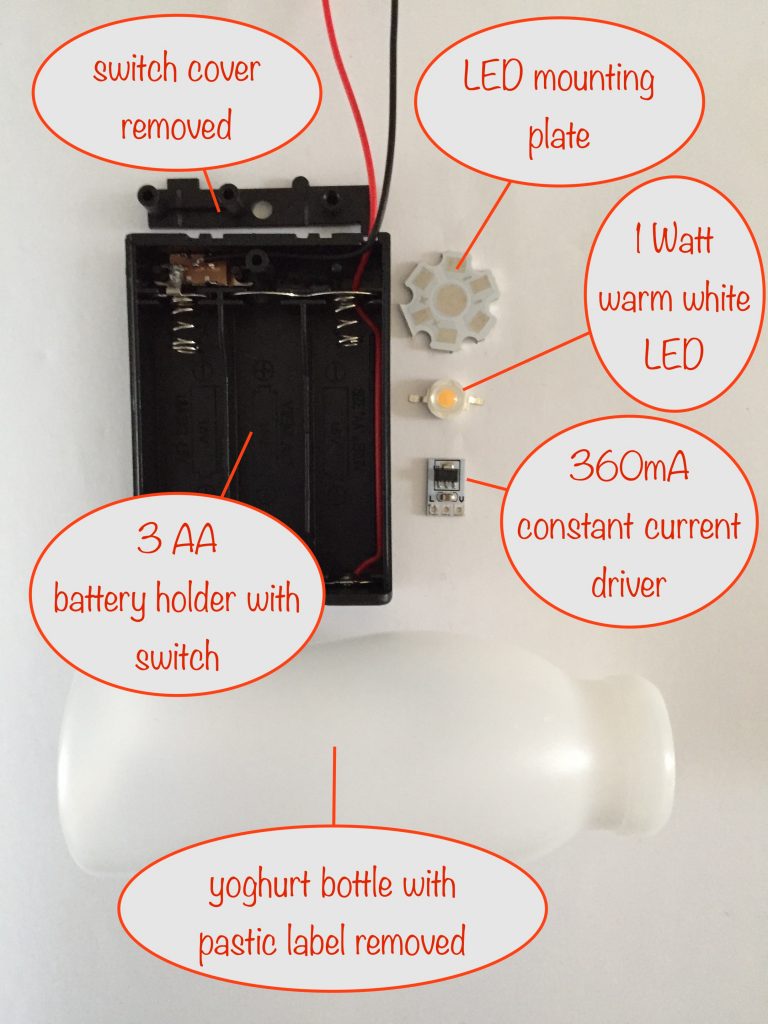
Components you need
- 1 x 1 Watt warm white LED
- 1 x mounting plate heat sink for the LED
- 1 x 350mA constant current source LED driver board – you could use a 260mA one instead for a slightly dimmer but longer lasting lamp
OR
You can get an all-in-one LED, heatsink and constant current driver instead – your choice - 1 x 3 AA battery box with switch
- 3 x 2000mAh (or better) rechargable NiMH batteries
- A short length of insulation from a 16 or 18 awg wire (or a piece of red and a piece of black heat shrink tubing)
In addition, you’ll need
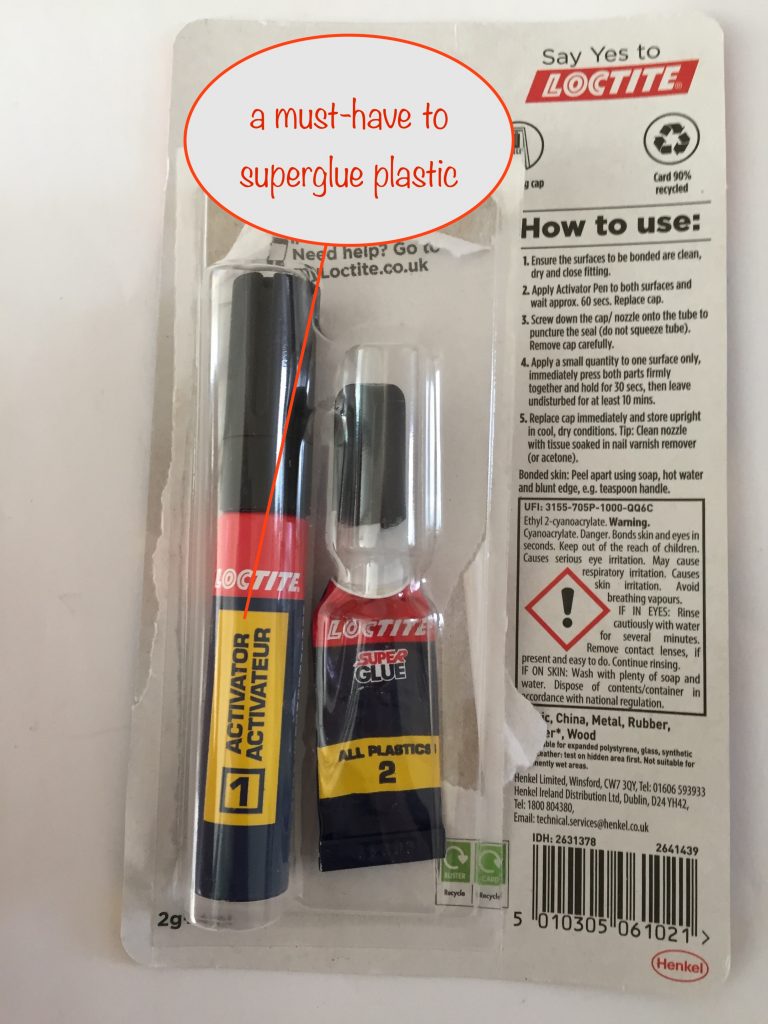
- Superglue
- Superglue activater
The activator is the only way to successfully glue plastic, so don’t skip using it.
Assembly
Follow along and you’ll soon have your own cute lamp 😎
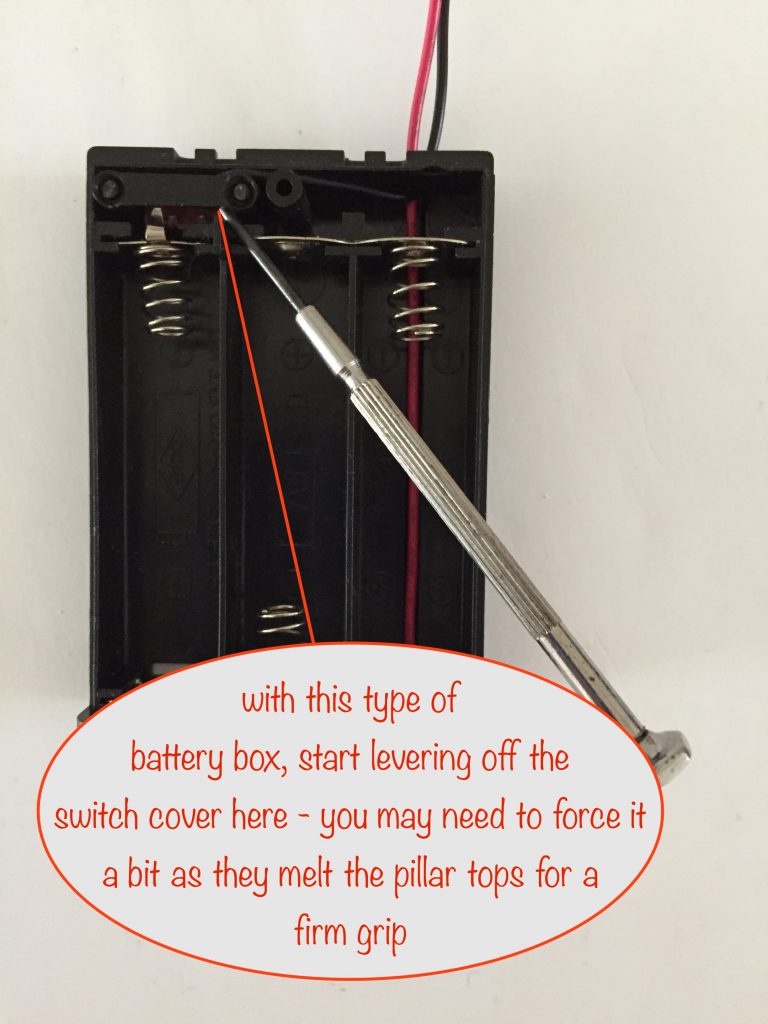
Preparing the battery box
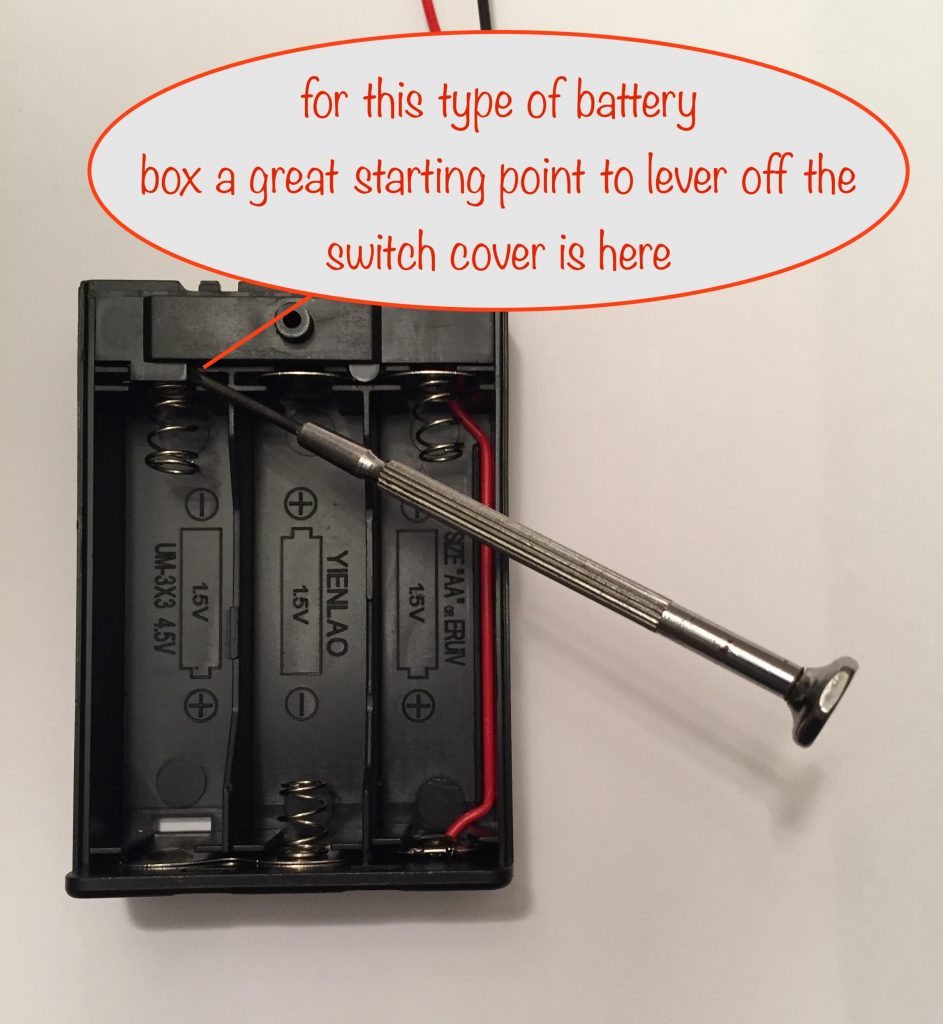
The first step is to gently prise off the switch cover.
There are two common types of battery box so depending on the type you have the picture might be a little different but the principle is the same. Use a small watchmaker’s screwdriver to find a good starting point to get some leverage:
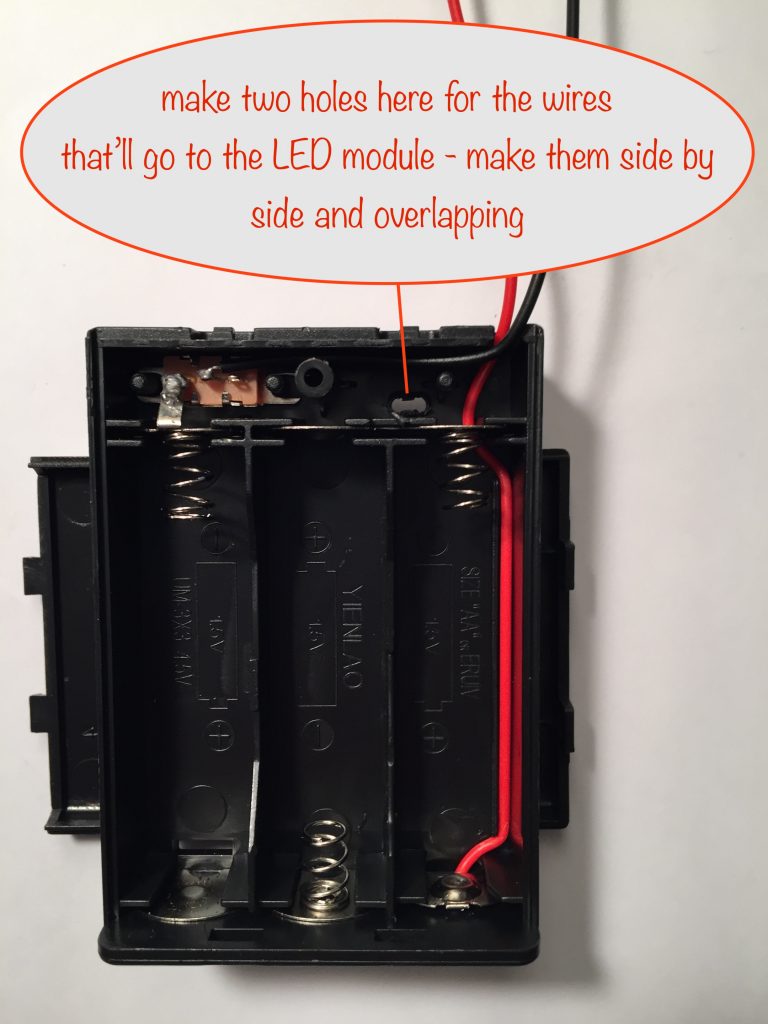
Next, make the holes for the wires that’ll feed power to the LED module:
Making the LED Module
Mounting the LED
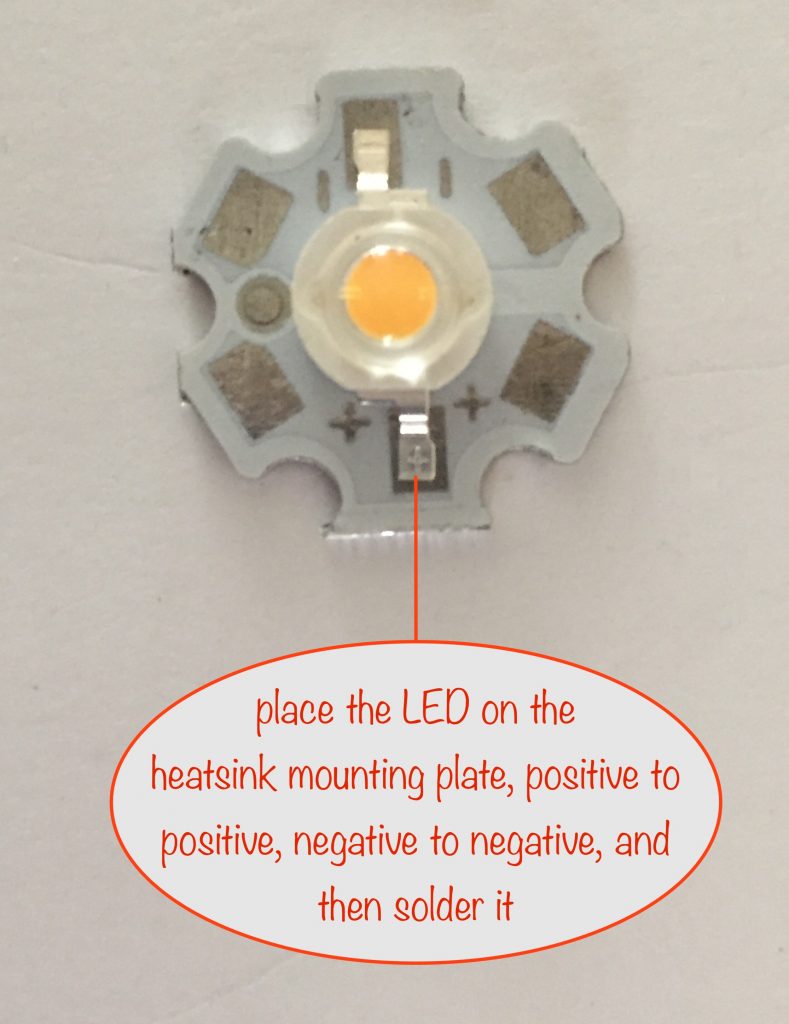
If you have thermal paste, put a small dab on the mounting plate heatsink in the center before placing the LED. If you’re using the 260mA driver, then you don’t really need it.
If you don’t use the thermal paste when you’re using the 350mA driver, the LED is likely to get a little hotter and its life expectancy will be reduced somewhat.
Next, carefully place and solder the LED to the mounting plate, making sure you get the polarity right so you’ll connect things correctly later.
Next step is to prepare the wires.
Preparing the wires
The wires that get connected between the battery box and the LED module (see below) serve two purposes:
- supply power
- provide mechanical support to hold the LED module firmly in place
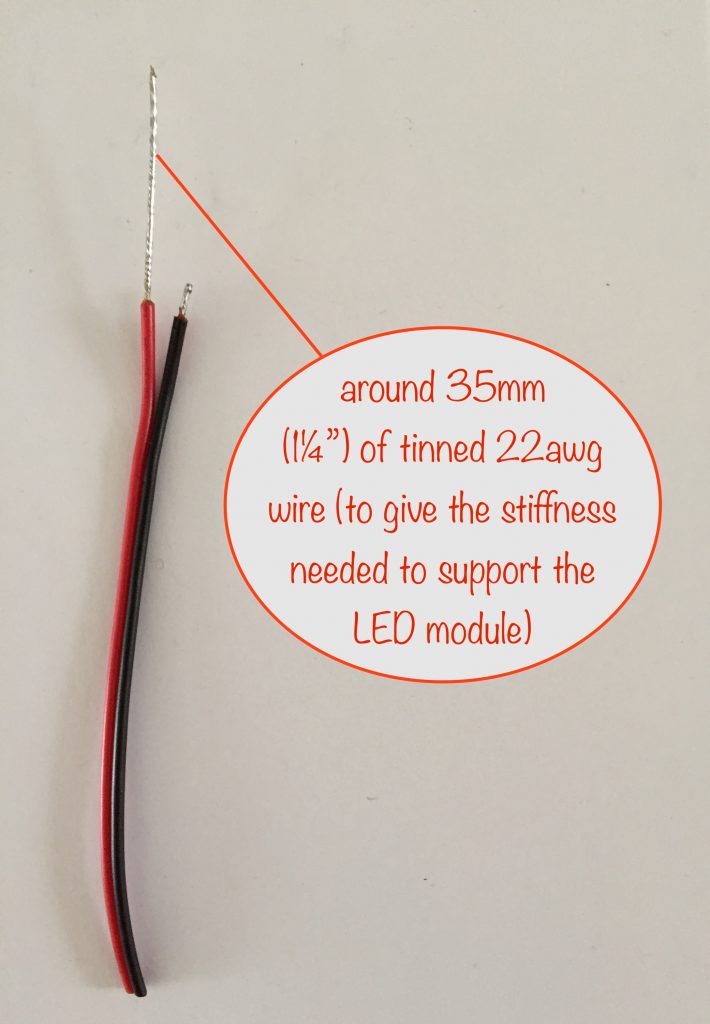
You need to use standard multicore wire wth pvc or similar insulation (not silicone as it’s too flexible) around 22awg.
Strip off around 35mm (1⅓”) insulation from both wires.
Next, twist the strands and lightly solder them. That’ll give them the stiffness needed to support the LED module. Cut the black wire as shown and put the piece to one side – you’ll be using it a little later.
In the next step, you’ll bend the wires into shape and connect things up.
Connecting up the wires, driver board and mounted LED
In this step, you’ll solder the wires to the constant current board and shape them ready for soldering to the heatsink with the LED mounted on it.
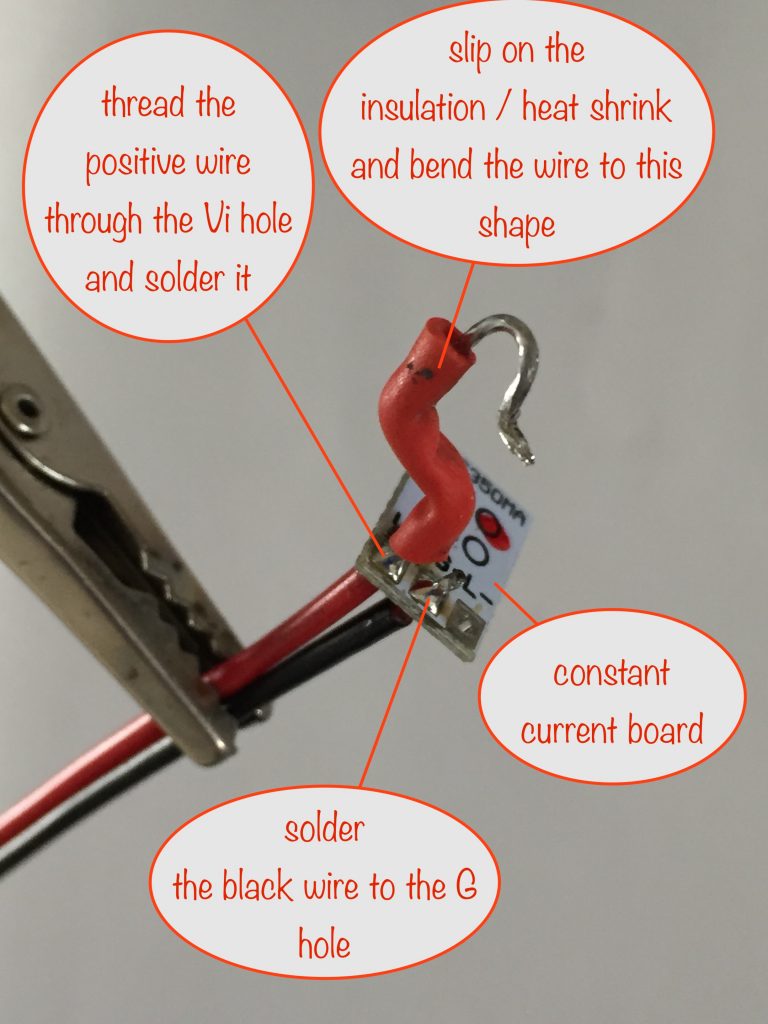
Do the positive one first: thread it through the Vi (volts in) hole up to the shoulder of the insulation and solder it in place. Add the insulation / heat shrink tubing and bend the wire to the shape shown.
Check it against the LED heatsink mount to help with shaping and length.
Next, solder the black wire to the center hole marked G (for ground).
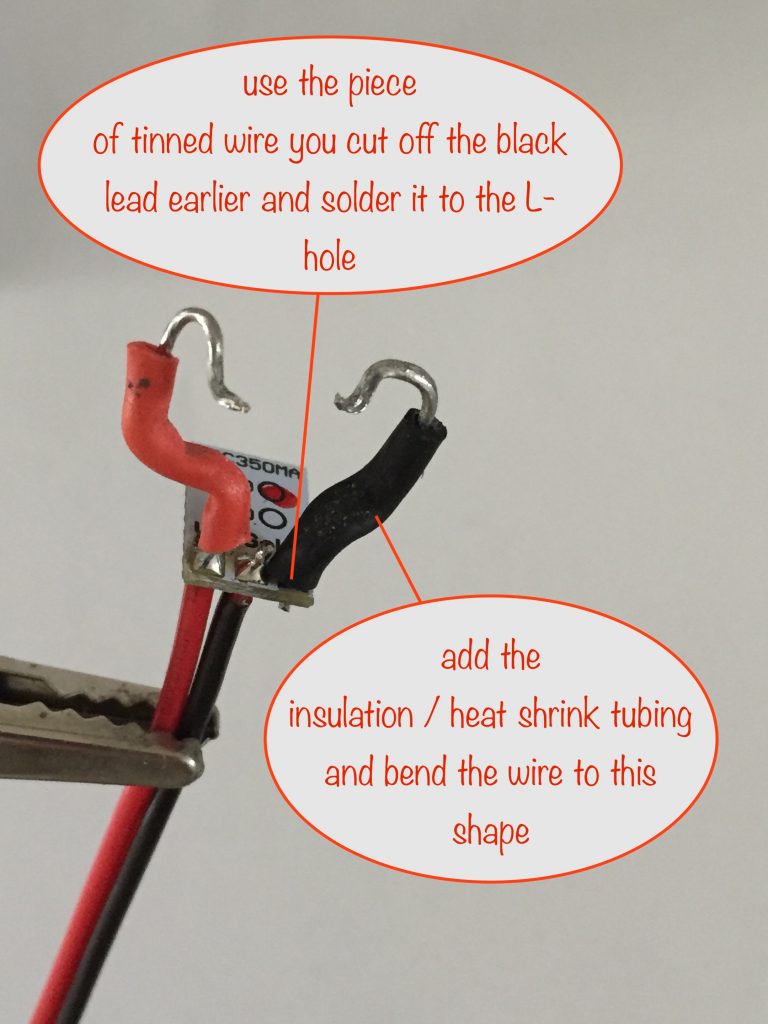
Lastly, get the piece of tinned wire you snipped off the black lead earlier and solder it to the L- (LED minus) hole as shown. Add the insulation / heat shrink tubing and bend it into shape.
Again, check it against the LED heatsink mount to help with getting the bend approximately right.
In the next step, you’ll solder the wires to the LED heatsink mount:
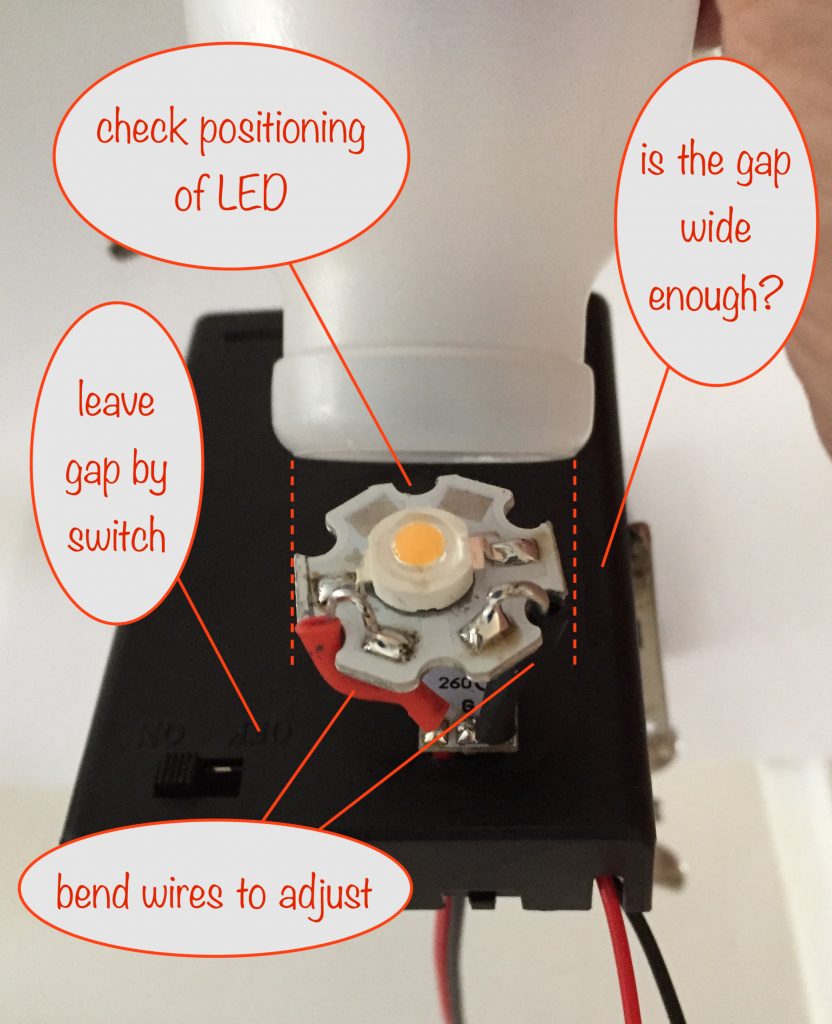
Solder the positive and negative wires as shown and thread their other ends through the holes you made earlier in the battery box.
The distance between the constant current board and the LED heatsink mount is about 8mm (⅓”). Fine-tune the bends to get the right position so that it’s centred in the yoghurt pot neck and there’s enough of a gap between the neck and the switch and the neck and the side of the battery box.
Be careful when you’re bending the leads – don’t put any stress on the heatsink mount solder pads as they’re quite delicate and could come away if you’re not careful.
You’ll be supergluing the yoghurt pot diffuser into place a little later. For now, the next step is to connect the LED module wires to the battery box.
Connecting the LED module to the battery box
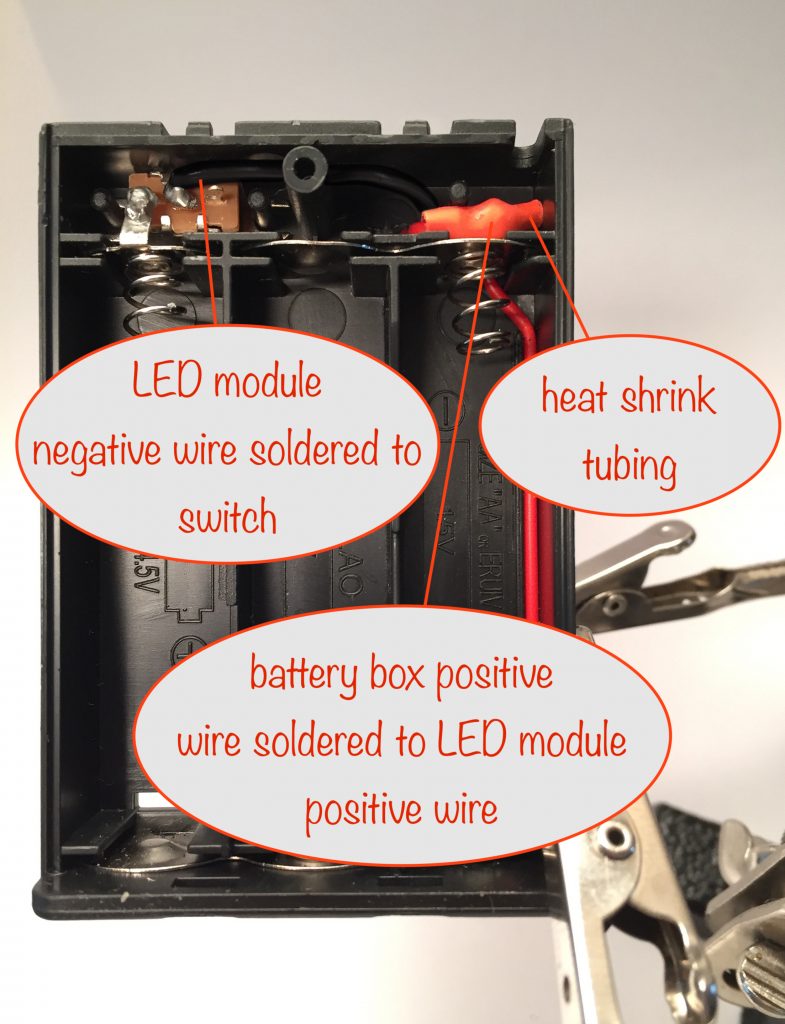
First, desolder and remove the existing black wire from the switch centre connection.
With that removed you can solder the LED module black wire in its place.
Finally, slip a piece of heat shrink tubing over the existing battery box positive wire and then solder it to the positive wire from the LED module. Slide the heat shrink over the connection and heat with your soldering iron to shrink it into place.
Testing
This should only take a moment. Slip three AA batteries into the battery box and slide the switch to the on position.
Be careful not to look directly at the LED as it’s bright enough to hurt your eyes.
Finally, make sure the heatsink LED module is parallel to the battery box so that it will shine straight up.
Gluing the yoghurt bottle diffuser
The plastic used in the yoghurt bottle is known as HDPE and the only way to glue it is to use a superglue with a superglue activater first. The same pretty much applies to the battery box plastic (and many other type of plastic).
If you’ve watched any of the CSI TV programmes you’ll know this: superglue vapour sticks to fatty acids. So make sure the inside of your yogurt pot is scrupulously clean or you’ll get white patches and spots inside when you superglue it!
I bought a Loctite pack that comes with a small amount of superglue and the activater pen. I used up the glue a long time ago but the activater pen is still good.
💡Tip: keep your superglue in the fridge. The low temperature keeps moisture out of the air and so helps prolong the life of your superglue. It’ll last way beyond what you’d get if you kept in on a bog standard shelf or in a drawer.
Before doing the gluing, make sure you use surgical spirit (rubbing alcohol) to clean the top of the yoghurt pot and where it’s going to be glued on the battery box.
When you’ve done that, apply the superglue activater where you’ve just cleaned. Give it at least sixty seconds before applying the glue so it’s got time to do its magic.
Now is a good time to have a practice in placing the yoghurt pot over the LED module. It might catch on the insulation, so do any fine tweaking.
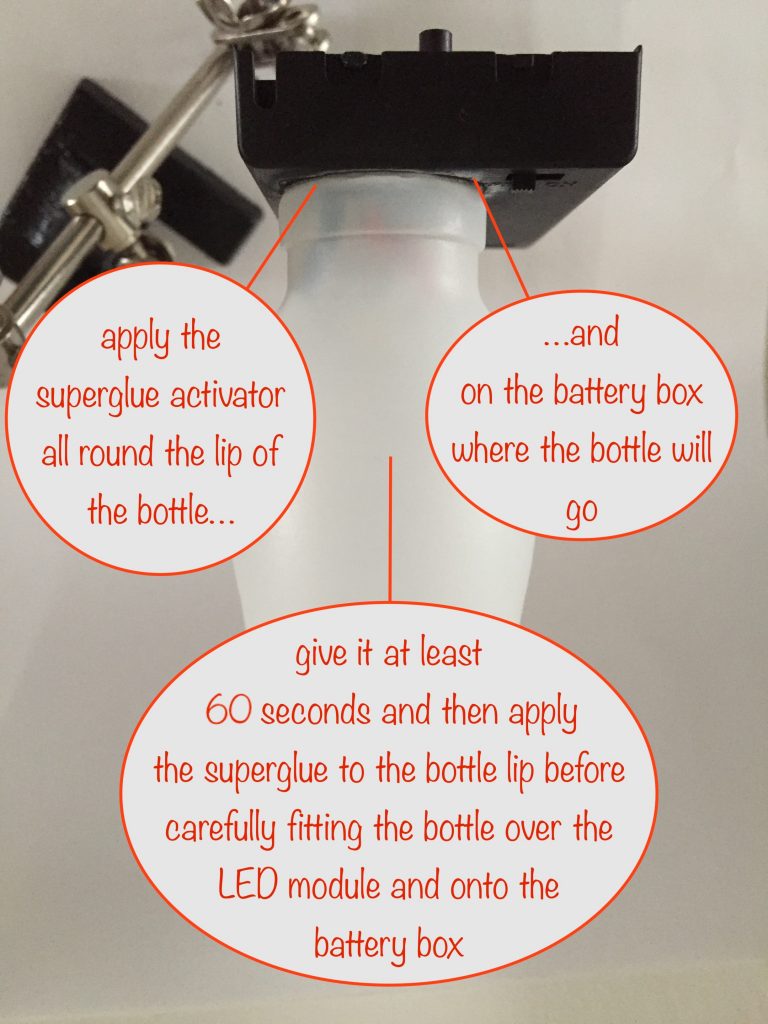
Having done that, you can now do the gluing – apply the superglue thinly and evenly around the top of the yoghurt pot and carefully hook over the LED module and into place on the battery box.
Take extreme care to place the yoghurt pot diffuser correctly first time – you only get one chance!
Once the yoghurt pot diffuser is in place, hold it firmly but gently for a minute. Hold the sides – don’t press on the bottom or you’ll deform it.
That’s completes it all – and now you’ve got the cutest camping / bed-time reading lamp that ever there was 😎
We’d love to hear your comments – so you know what to do 🙂
Alternative ping-pong ball diffuser
Here’s another variation, this time with a ping-pong ball for the diffuser. I’m using this as a porch light that I switch on when it’s dark and someone comes to the door.
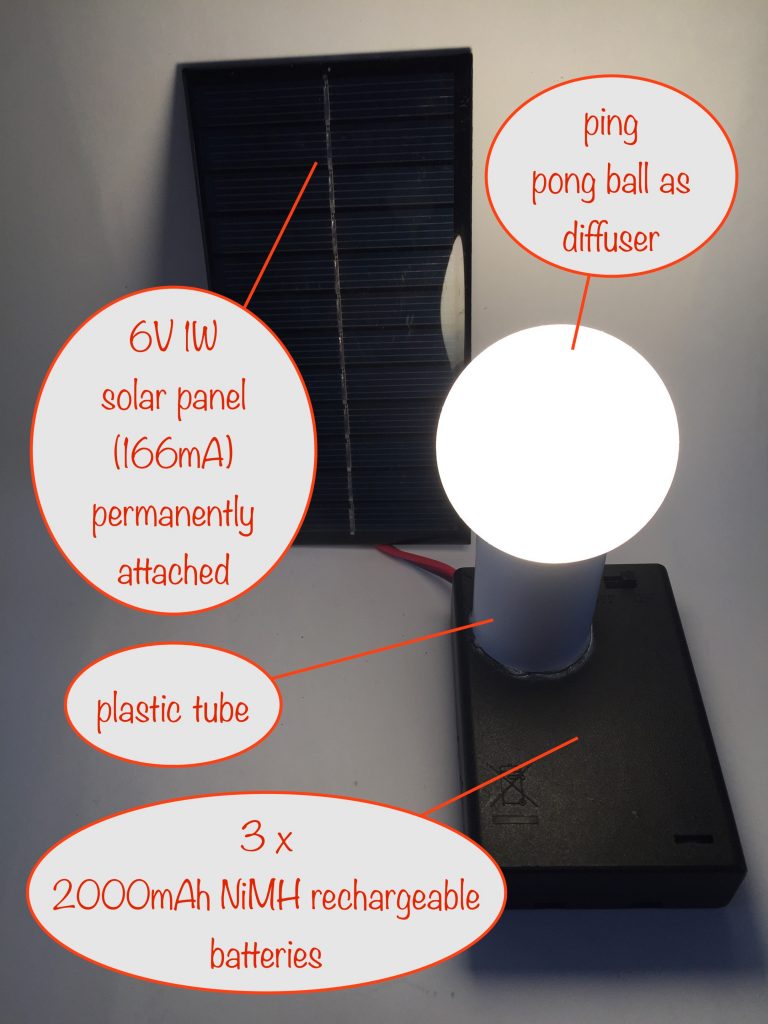
It doesn’t get used that much so I’ve permanently attached a 6V 1W solar panel that delivers at most 166mA. That’s perfect for charging 2000mAh NiMH batteries as it’s a little less than the C/10 charge rate recommended by the manufacturers.
With the amount of use it gets, the batteries should always have plenty of charge to deliver a bright light.
Other projects in the Nifty Hobby Projects for LEDs and Solar series (so far, more to come very soon):
- Flasher Memory Aid
- Dark-activated Switch
- 5 LED String
- Fibre Optic Display
- Mini Sparkles Colour-changing LED Fibre Optic String
- Solar Lithium Ion Battery Charger
- Solar NiMH Battery Charger for 2 AAA batteries
- Solar NiMH Battery Charger for 2 AA batteries
- Solar NiMH Battery Charger for 6 AA batteries
- Timer-delay Off Switch
- 4-LED Porch Light
- Main page with links to where to buy stuff