Styling Text in WordPress the Lightning Quick and Easy Way

Ever wished you could easily highlight some text in the WordPress block editor and apply your own predefined text styling to it – without resorting to editing as html?

And better than that, only have to do it once for your whole site?

How does highlighting work “out of the box”?

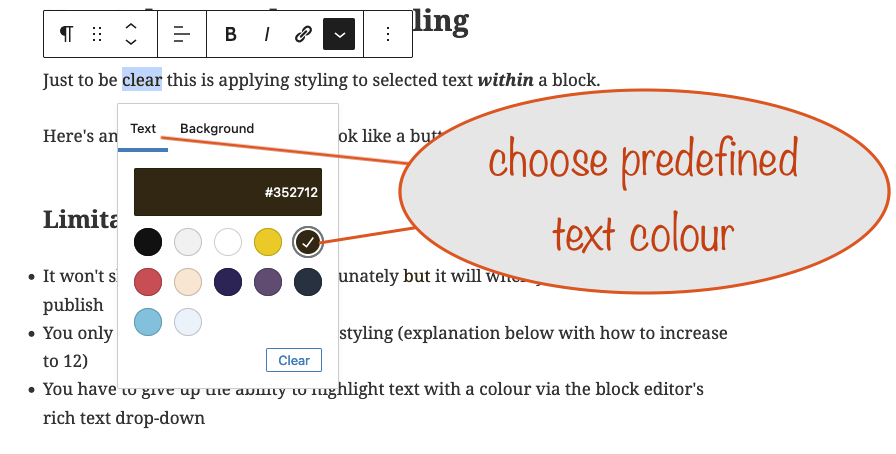
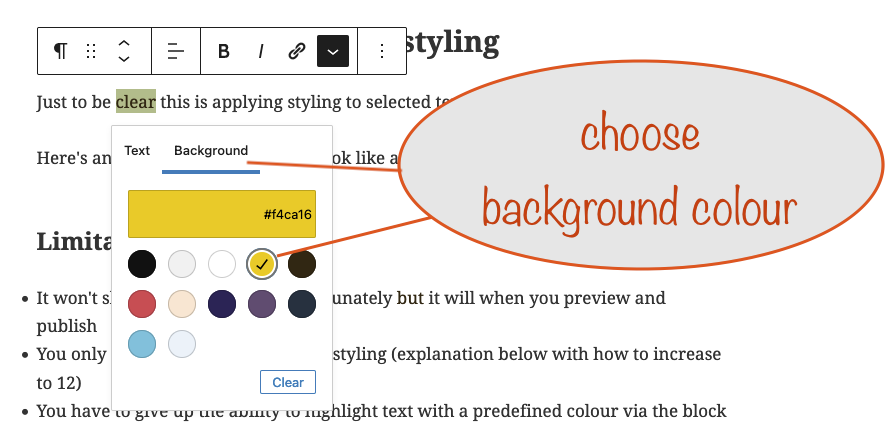
As things stand, using the Block Editor’s rich text drop down, you can highlight text with one of 12 predefined colours (see the screenshot) for the foreground and the same ones for the background – or you can use a colour of your choice.

Here’s how you do it. Select some text and then:
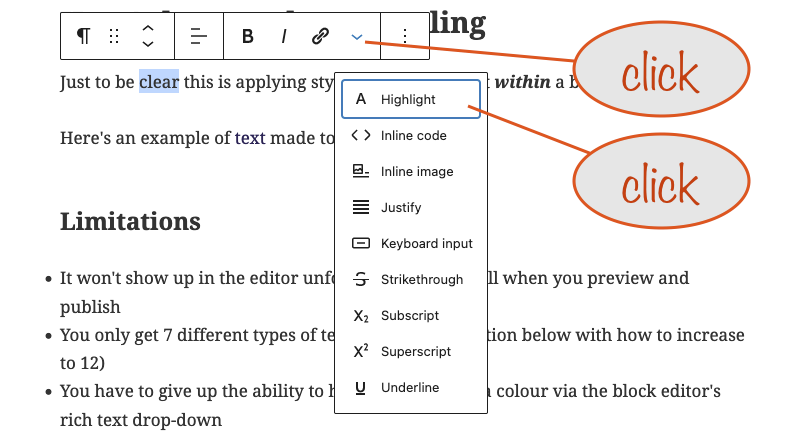
You don’t have to use a pre-defined colour. Instead you can choose from the full colour palette by clicking the panel above the circles, if that’s what you want.

Maybe you’re writing a tutorial and want to mention the name of a button to click or to draw attention to a specific piece of text on a page that you’re talking about in your article.

Here’s how to apply your own text styling

Just to be clear this is applying styling to selected text within a block.

Here’s an example of text made to look like a button.

Limitations

  • It won’t show up in the editor unfortunately but it will when you preview and publish – but you can do something to show you’ve done it, read on to find out how
  • You only get 12 different types of text styling (explanation below)
  • You have to give up the ability to highlight text with a predefined colour (via the block editor’s rich text drop-down) for every one you “hijack”

How does it work?

The trick is to hijack what happens when I choose to highlight text using the block editor’s rich text drop-down.

Here, I’m hijacking the predefined colour called “Dark Purple”.

I know it’s called that because the name appears when I hover over it in the predefined colour palette. Note that in the following “Dark Purple” becomes “.has-dark-purple-color”.

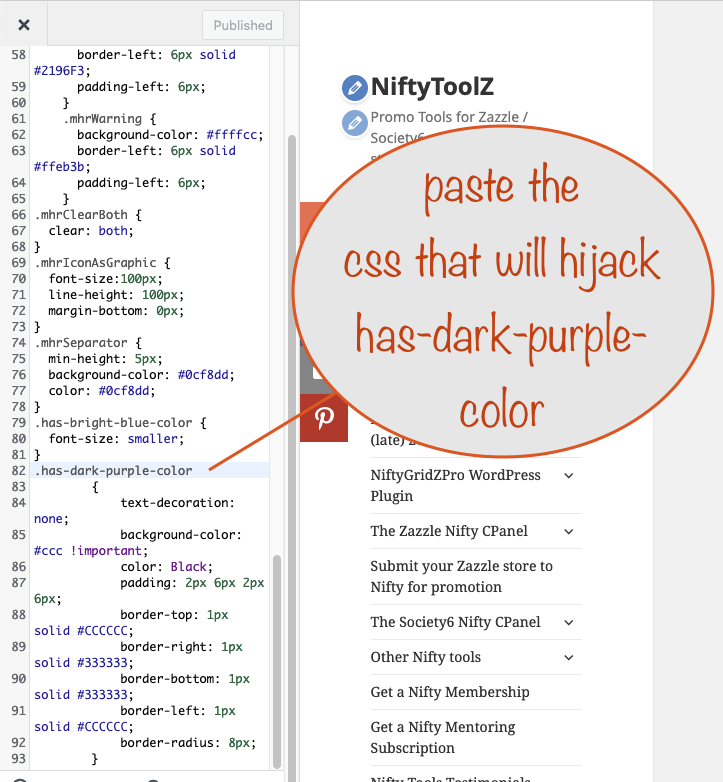
.has-dark-purple-color
        {
            text-decoration: none;
            background-color: #ccc !important;
            color: Black;
            padding: 2px 6px 2px 6px;
            border-top: 1px solid #CCCCCC;
            border-right: 1px solid #333333;
            border-bottom: 1px solid #333333;
            border-left: 1px solid #CCCCCC;
            border-radius: 8px;
        }

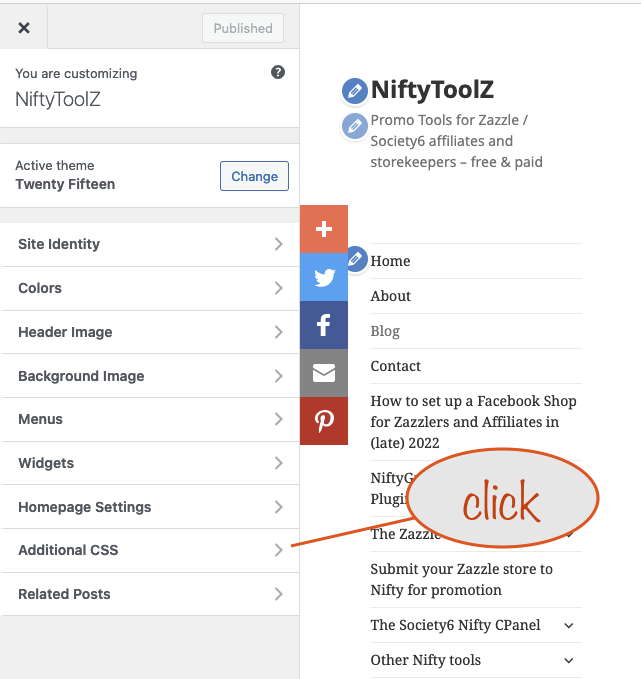
The above is a css (cascading style sheet) definition that will make text look like a button – and you place it in your customizer‘s additional css area.

For this example, we’ll copy the above css and paste it in:
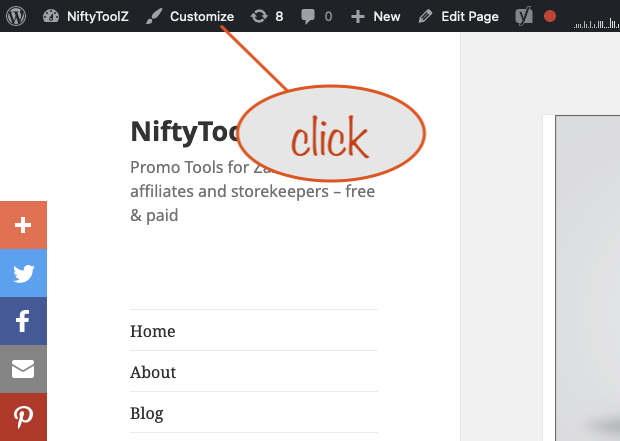
Once you’ve pasted it, you need to hit publish

Remember, you can only hijack the predefined colours, the ones with names.

Making sure you can see hijacking when editing your page

In the block editor, it helps to be able to see where you’ve used a hijacked highlight colour. The best way I’ve found to do this is to set its highlight background colour to one of the default ones.

If you’ve hijjacked both light and dark highlight text colours, you’ll need to use contrasting background colours for them to make sure that you can always see hijacked text.
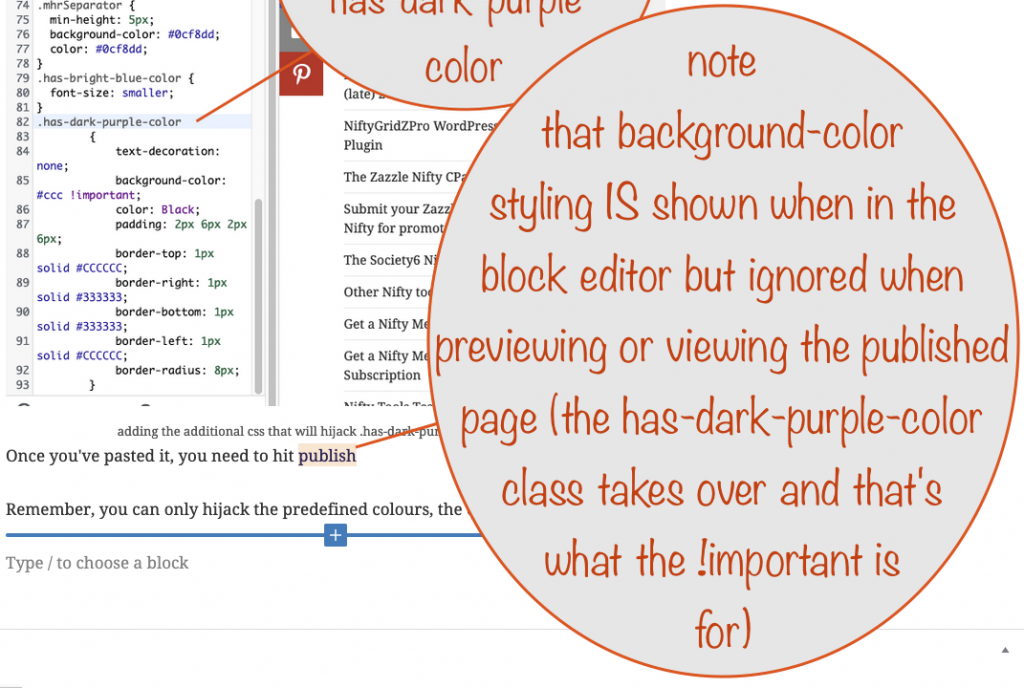
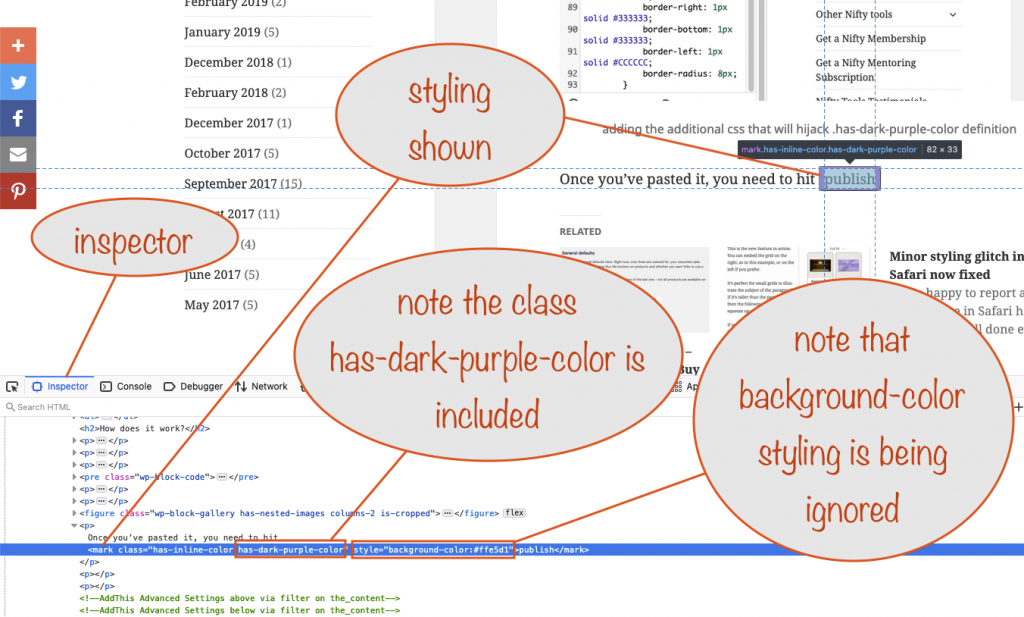
When you’re editing the page / post, the background colour for any hijacked highlights is the one chosen via the rich text drop down and not the one set up in your css class override.

When you’re previewing or once the page is published, the class takes over and the background-color with the !important setting gets used instead.

The “publish” text in the screenshot has its background color set to light pink via the rich text drop down, as you can see in the screenshot.

When the page is previewed / published, you see the button styling instead (here it is again).

Tip

Remember that any hijacking will apply across your whole site. It’s because the hijacking method you learned here redefines the highlight colour classes.

You know, the ones that get applied when you use the rich text drop down for highlighting selected text within a block.

So be sure to choose wisely!

For example, I often refer to buttons in lots of posts and pages, so it makes sense to hijack a highlight colour class for displaying them in an obvious way.

Another example from this website: I’ve started to always say (opens in a new tab / window) when a link does that. So I’ve hijacked the bright blue highlight colour for that purpose. I don’t change the colour fom bright blue but I do set the font size to font-size: smaller

If you want to play around with css there’s a great css resource on w3schools.com (opens in a new tab / window)

I hope you’ve found this helpful and will put it to good use. We’d all love to hear how you’ve used it so drop off a comment to let us know!
Learn how to create Pinterest pins that get 20 X the impressions

I did some experiments with manually created pins because I wanted to see what the effect would be compared to those pinned using Pinterest buttons.

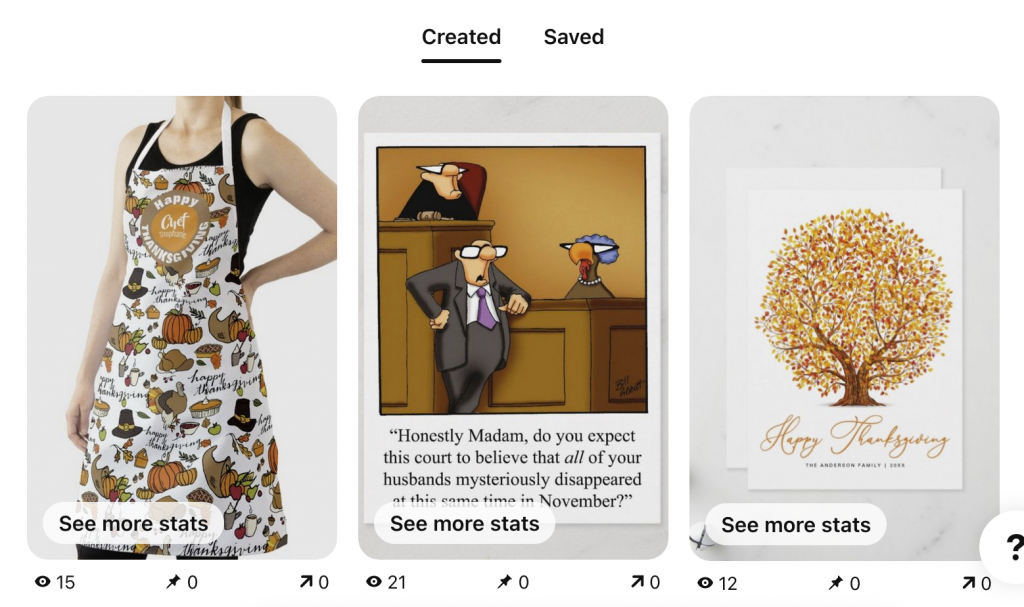
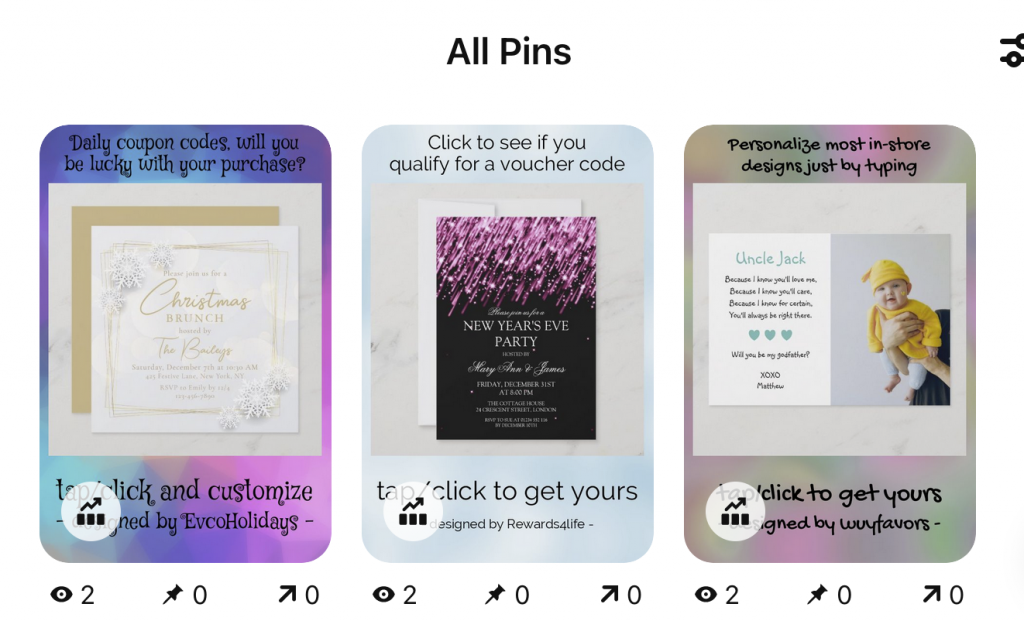
Impressions compared on very recent pins

Compare the impressions between the manually created pins (top image) and the pins created using a Pinterest pin (aka pin-it) button.

All of those pins were created in the last couple of hours and you can see the difference in impressions they’ve received already.

In a day or two, the manually created ones (Created heading) are going to be vastly better than the ones made with pin-it buttons (All Pins heading).

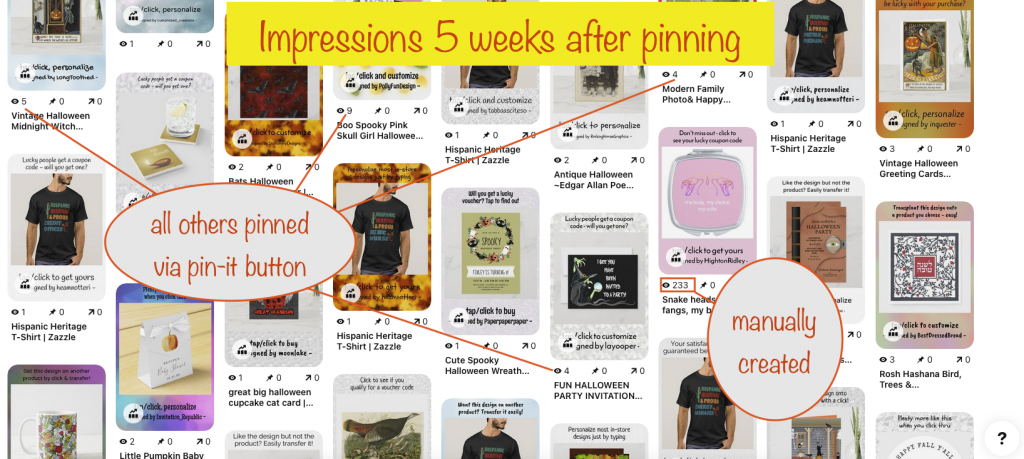
Impressions compared on 5-week-old pins

25 X the impressions compared to best-performing pin created with a button
(click to see larger – opens in a new tab / window)

The pins shown above were all created on October 1st 2022. The best performing pin created with a pin-it button got 9 impressions. Compare that with the manually created pin – it’s had 233 impressions in the same time frame!

So that’s 25 X the impressions. Read on to find out how you can achieve the same!

About pinning

When you use a Pinterest (aka pin-it) button to make a pin:

  • via the product page on Zazzle
  • using the Nifty Speed-Sharing tool
  • with the Nifty Auto-Pinner tool

..two observations:

  1. The description text on the pin is the standard, bland description Zazzle provides for the type of product being pinned.
    Yes, the designer’s description is ignored.
  2. Around the same time as the designer’s description started being ingnored in favour of Zazzle’s standard one, impression rates on pins of Zazzle products dropped really low

I can understand 1) to some extent – some of the descriptions designers give are eye-wateringly inappropriate:

  • some stuff them with keywords so they’re not actually descriptions
  • some just repeat the product’s title
  • some use a generic description that’s unrelated to the design

The downsides of those I think explains Zazzle’s reasoning: they go for a generic description of the product type so their reputation is unharmed.

The drop in pin impressions 2) that happened around the same time isn’t a surprise. Why? It’s likely because Pinterest factors in the uniqueness of a Pin’s description in deciding what to show on people’s feeds.

Best way forward?

Watch this video on how to quickly and easily create stonking pins that’ll attract lots of impressions:

If you’re a serious Zazzle designer with a limited amount of time to devote to promoting, I’d suggest a combination of manual pinning and speed-sharing.

With a little more time, or you’re a designer with a small affiliate hat, I’d recommend doing the same, but more of it with both your own and other people’s designs.

A serious designer-cum-affiliate will do auto-pinning, speed-sharing of great sellers and maybe half a dozen manually created pins per day.

Nifty

Of course, any of those type of people who value their time will be using Nifty already. Not only to speed up their promoting but to make it easy peasy as well.

You can use Nifty for free if you don’t mind a 50/50 split on any earned referral fees. If that doesn’t appeal, you can get a membership by paying a monthly subscription (link opens in a new tab / window).

It would be really cool to hear about your experiences with manually created pins, so if you don’t mind sharing them, drop off a comment. Thanks!

Demo of the Zazzle and Society6 Video capability for social media

We’ve surpassed ourselves on this one – so everyone says!

We made this video using the new version of the Nifty Product Stager.

Space-themed watches for astronomers and astronauts-to-be

There’s one for Zazzle, one for Society6 and one that works for most other PODs (print-on-demand stores).

Why not try the beginner-mode on your store? It lets you get one for your most popular product designs on Zazzle or random ones from your store on Society6:

Just click the link and put in your store name – you’ll have your own video in just 2 clicks. How cool is that? 😎

You could use the video you download right away on Facebook just by dragging and dropping it into a new post or in a reply. But we don’t recommend it. Why? You’ll only get HD videos that are sharp and clean if you convert to MP4 first.

For Twitter, Pinterest and Instagram, you have to convert your video to MP4 – but don’t worry, when you make your video you’re given a link to an online converter that we’ve tried, tested and recommend.

You can either provide your own link to your store in the status text or use the one provided by the product stager.

Note: At the time of writing, Facebook is experiencing the occasional glitch. If your uploaded video gets stuck at Progress 0%, cancel the upload (not the post/reply) and drag and drop it again. After maybe 20 or 30 seconds, it should jump to Progress 90% and then quickly finish. If it still doesn’t, try cancelling and re-uploading again. Four tries is the most we’ve had to do.

Save even more time when speed-sharing

Update: We’ve done this now for both the Zazzle and Society6 Nifty CPanels

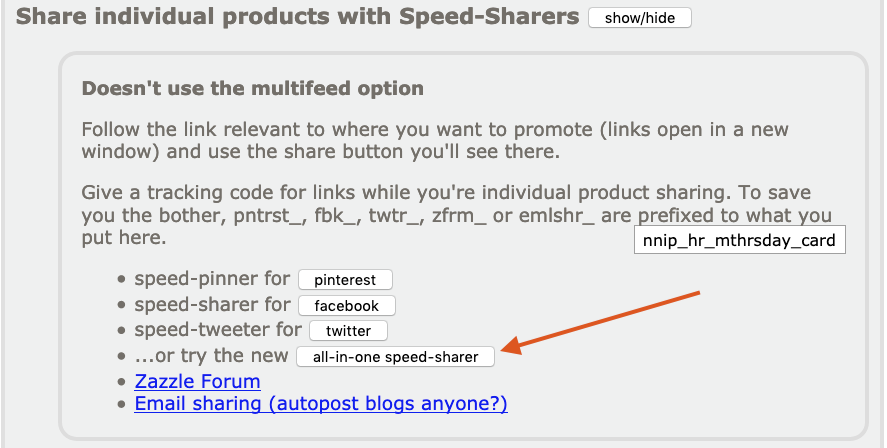
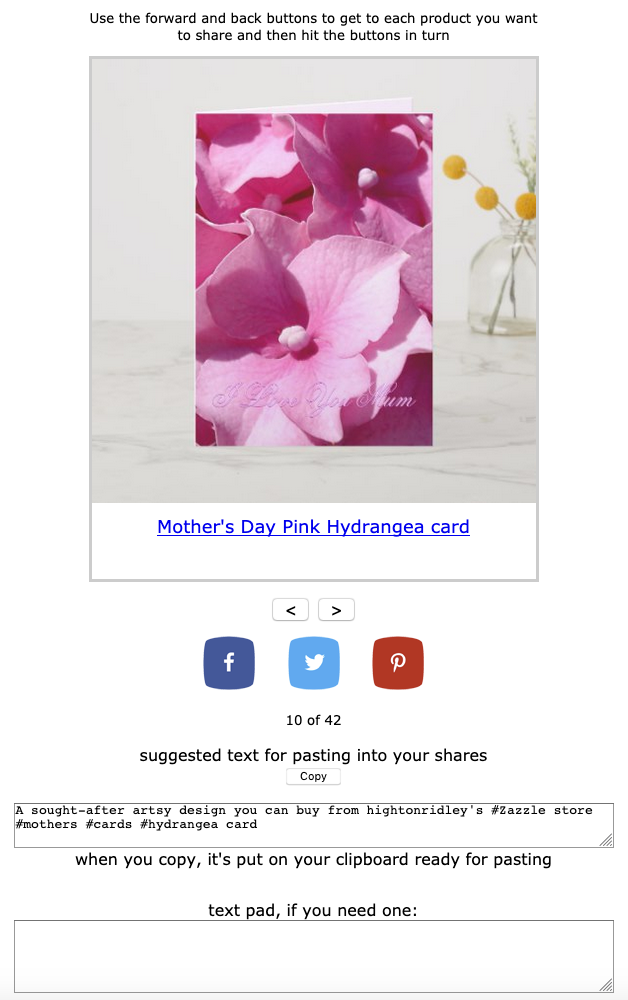
the just-added all-in-one speed-sharer
the new all-in-one speed-sharer – click to try

If you’re doing a promoting session where you want to promote the same select few products down more than one social media channel, until we added this update what you’d have likely done would be to open tabs for each of the speed-sharers and then flicked between those tabs, speed-sharing as you go.

With the new all-in-one speed sharer, they’re combined into one. No more flicking back and forward between tabs. It may seem like a small thing but it saves lots of time when you need to promote this way.

Examples of when you’d be using this approach

  • You’ve done a bunch of designing and you want to get your newest stuff “out there”, coordinated across your social media channels.
  • You’re having a little bit of a promotion campaign for a a few tightly-focussed product designs and you want to share in a coordinated way across your social media channels

Why is this coordination important?

When you coordinate across your channels in this way, it increases the chances of your share being seen by more people (ie a few from Facebook, a few from Twitter and some from Pinterest).

If you’re focussing on attracting potential custom by including a promo code, coordinating across the channels can boost your results.

Coordinating in this way can also give each product a little bit more prominence in search engines.

So, we hope you enjoy the time-saving you gain with this. 😎

How to use Zazzle Promo codes

This applies only to promo codes for the zazzle.com domain, as limitations at Zazzle’s end prevent Nifty working with promo codes for the others.

If you’ve successfully signed up to receive the “Associate News” emails from Zazzle, you’ll know in advance what the upcoming promotions and their codes are.

And remember, everyone loves a money-off voucher so using those promo codes is a great way of encouraging sales!

ℹ️ You can check for current promo codes here

For example, it’s now in the run-up to graduation season. Anyone serious about promoting will already have one or two niFTTTy Schedules going for it. So here’s how to get them to start using promo codes.

As soon as Zazzle tells you about a graduation promo, all it takes is a quick tweak to get those IFTTT applets to use the promo code and encourage sales.

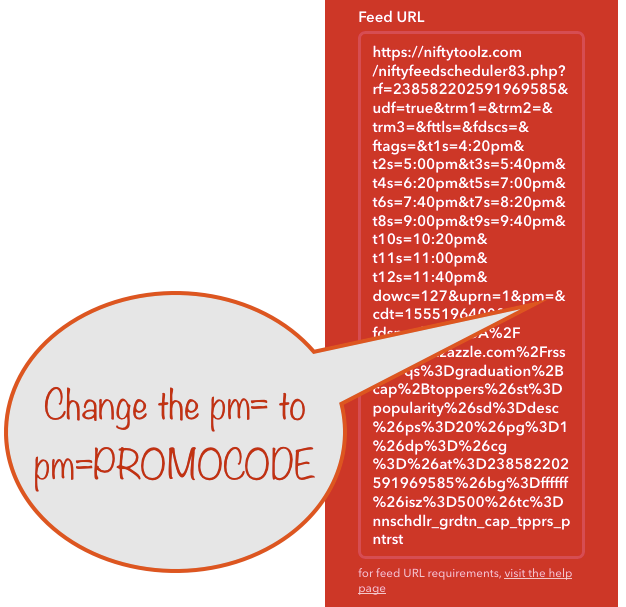
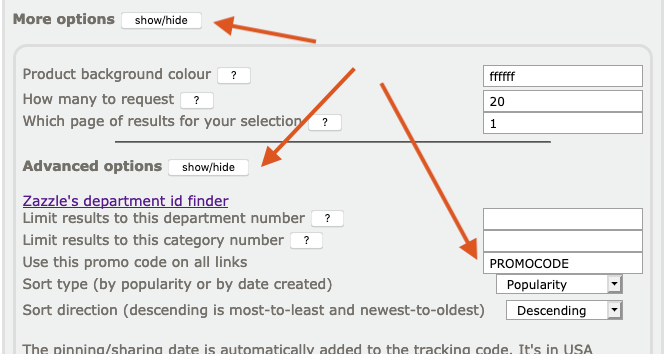
Here’s how you tweak your applet to use the promo code you get from Zazzle. Let’s say it’s PROMOCODE

Make sure you don’t accidently press return – it’s vital that the feed url is one long, unbroken line.

You’ll also want to mention it in the description. Don’t forget to say when it ends (maybe give the time as well). Make sure you put the details before the EntryTitle so it doesn’t get cut off!

Don’t forget…

to change things back when the promo ends.

Use them as you manually promote, too

Don’t just use them on your nIFTTTy schedules, use them when speed-sharing, sharing slideshows or sharing product grid pages.

setting up the promo code in the Zazzle Nifty

Here’s where you set up your promo code – once entered, all links generated by any of the Nifty tools will use it – regardless of whether it’s valid at Zazzle or not.


Has this motivated you to take advantage of Zazzle’s promos? Well, why are you still here? 🤪