Written by team-member Mark Ridley
I’ve completed twelve of the how-to modules with more to follow as I work on them.
As I found out while researching for these projects, there’s a lot of out-of-date and some simply wrong information out there. Rest easy, though. I’ve built each of these projects over the last few weeks so the components listed are all currently available and the circuits work safely.
These projects all came about because of a Chinese-written English description. I wanted 100 flashing LEDs and that’s how they were described. But they weren’t flashing, they were colour-changing – not at all what I was after. Well, having received them, I thought I’d better find a use for them!
So, read on for a list of the hobby LED / Solar projects that you can build, too. All instructions, tips, explanations, circuits and component lists are covered – and have all been built and tested by me – so you can build the one(s) that take your fancy with confidence.
Who are these projects aimed at?
Anyone with a passing interest in electronic hobby projects including kids aged 12 years and up.
Why the age limit? It’s because the projects involve a soldering iron and sometimes a drill as well. I would recommend some form of supervision for the lower end of the age range as a sensible safety precaution.
If you don’t want them using an electric drill, a hand drill is fine because holes only need to be put in thin ABS plastic.
Mix ‘n match
I’ve designed these as modular projects so they can be connected together to suit what you want to achieve. Ideas for their use include Christmas decorations, party lights, porch lights, nightlights and relaxation room lights. I’m sure you’ll come up with your own ideas as well!
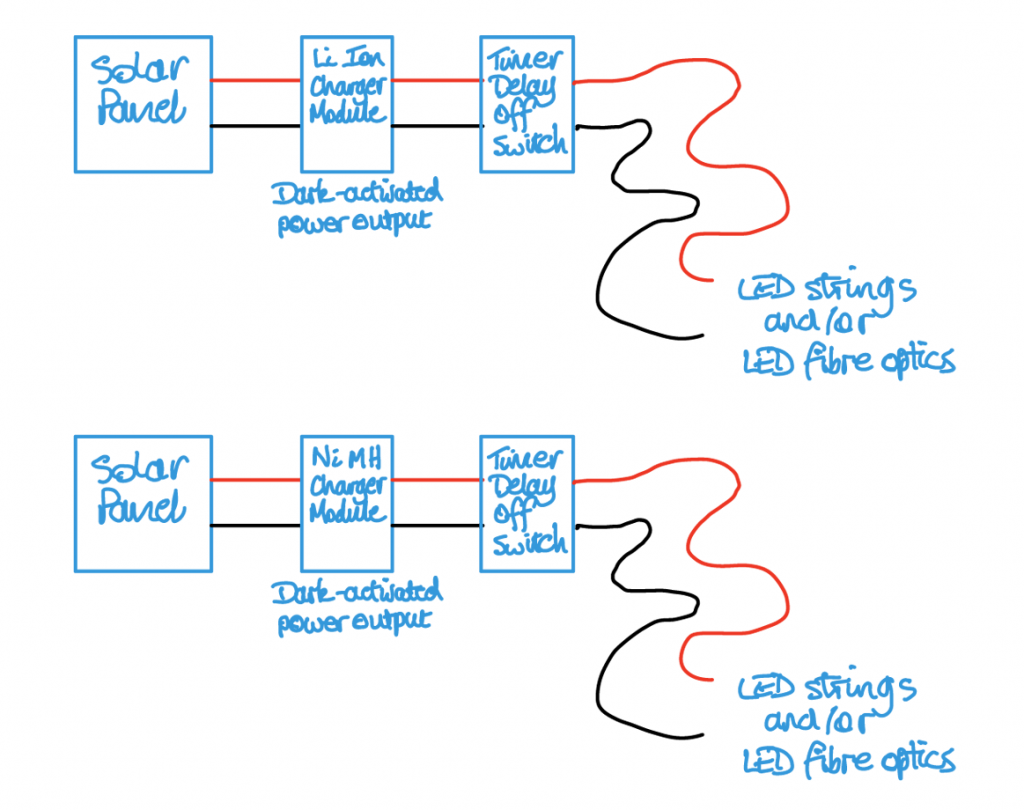
Typical Outdoors Set-ups
It’s never a good idea to fully discharge your batteries because they’ll last more charge / discharge cycles if you don’t. So I recommend always using the Timer Delay Off Switch so you’ll hopefully leave some charge in the battery.
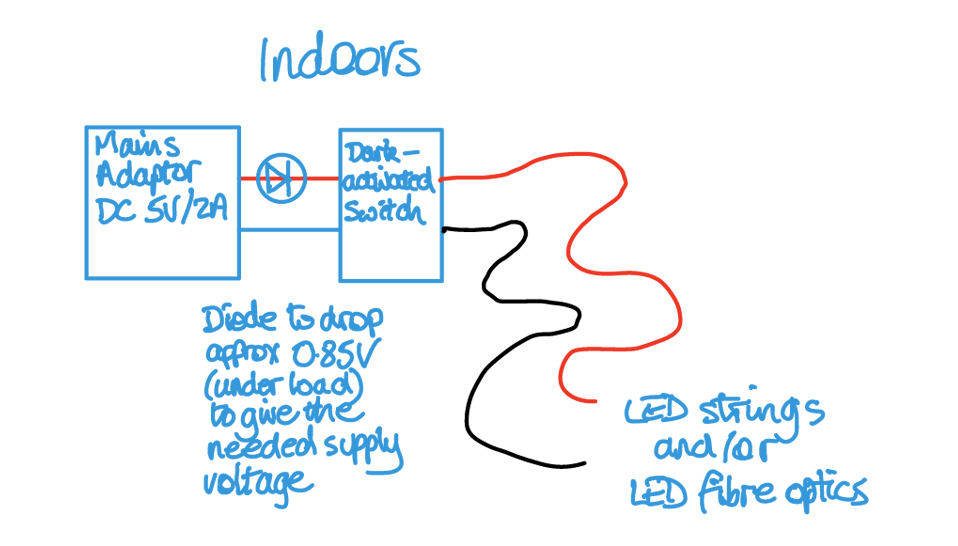
Typical Indoors set-up
List of Modules
- Stand-alone Memory Aid project (Done)
- Dark-activated switch for use indoors (Done)
- String of 5 colour-changing LEDs using ping pong balls to diffuse each LED’s light (Done)
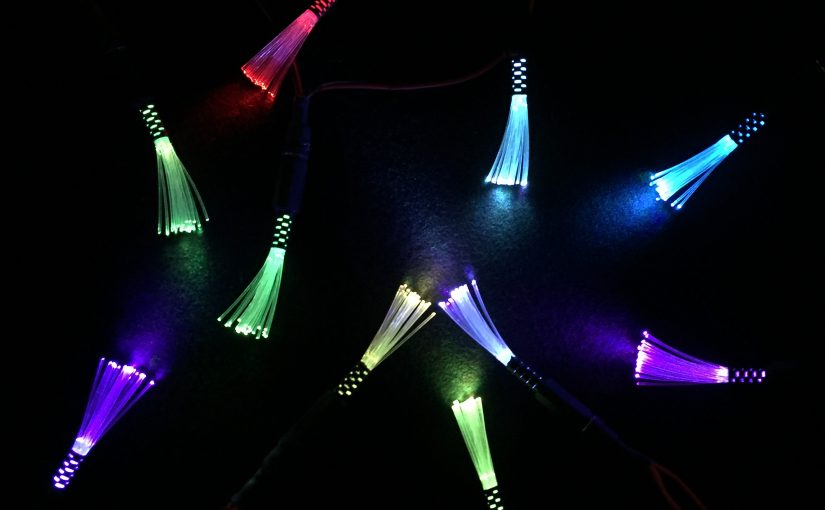
- Fibre optic display using 5 colour-changing LEDs (Done)
- Mini Sparkles fibre optic string using 10 colour-changing LEDs (Done)
- Solar panel Lithium Ion battery charger with over-charge protection and dark-activated power output (uses TP4056 board with in-built protection) (Done)
- Timer-delay Off Switch (switchable between 4 and 8 hours) for when you want your LED strings and / or LED Fibre Optics modules to switch off during the night. This will conserve your battery power during the times when there’s not enough sun to fully recharge it (Done)
- Solar panel NiMH battery chargers (using a maximum trickle-charge current of less than C/10 to protect the batteries as recommended by manufacturers) (3 Done)
- Night-time Porch Light (Done)
- Mini camping / bedtime reading lamp with yoghurt pot diffuser
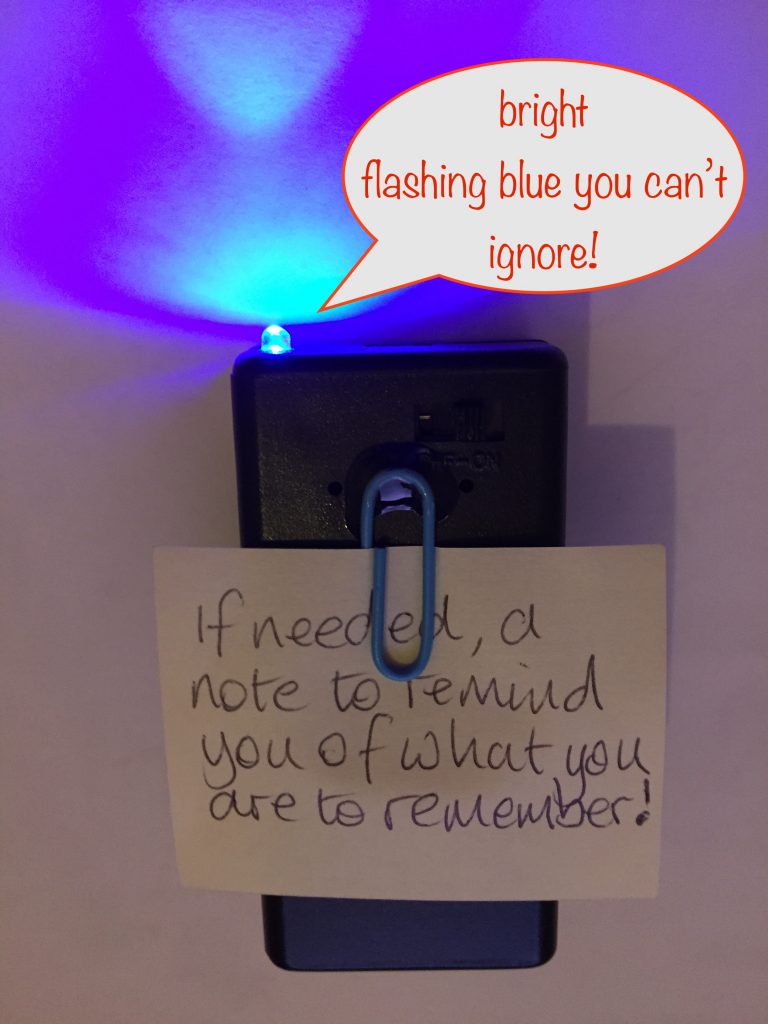
Stand-alone Memory Aid project
To help older people whose memory is starting to fail – a flashing LED in a PP3 battery box with attached paperclip for reminder notes.
Building this module involves mainly hands-on craft skills with a small amount of soldering.
Link to project: Nifty Flasher Memory Aid
Dark-activated Switch
This is designed for indoor use and so isn’t weather-proof.
The dark-activated switch allows you to power a number of colour-changing LED displays, delivering up to a safe maximum of around 2 or 3 amps. This is limited by
- the power source supplying the module
- the current capacity of the diode(s), if you added any, in the power source feed into the dark-activated switch (usually 1 amp)
- the ability of the output semiconductor (a MOSFET) to dissipate heat within the confines of the battery box used
It uses a phototransistor sensor to detect falling light levels and, when it’s dark enough, whatever it’s powering will be switched off. The battery box switch is used to disable the sensor so that the power is permanently on.
Link to project: Nifty Dark-activated Switch
String of 5 colour-changing LEDs
Designed for outdoors or indoors – great for your garden, patio or gazebo or decoration for your Christmas tree, a wreath or your porch.
The strings use ping pong balls as light diffusers – and they look really great!
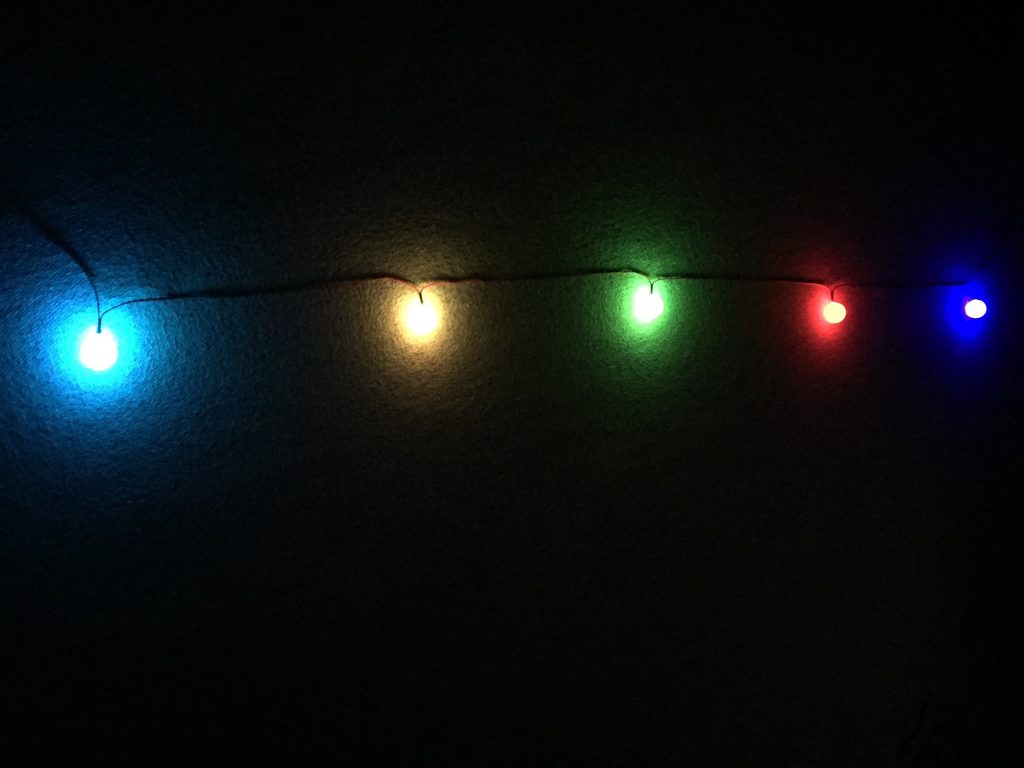
Link to project: 5 LED String
Fibre Optic Display
Designed for indoors – great for night lights, Christmas decoration and relaxation rooms – or just to add an accent to your living space.
Building this module involves mainly hands-on craft skills with a small amount of soldering.

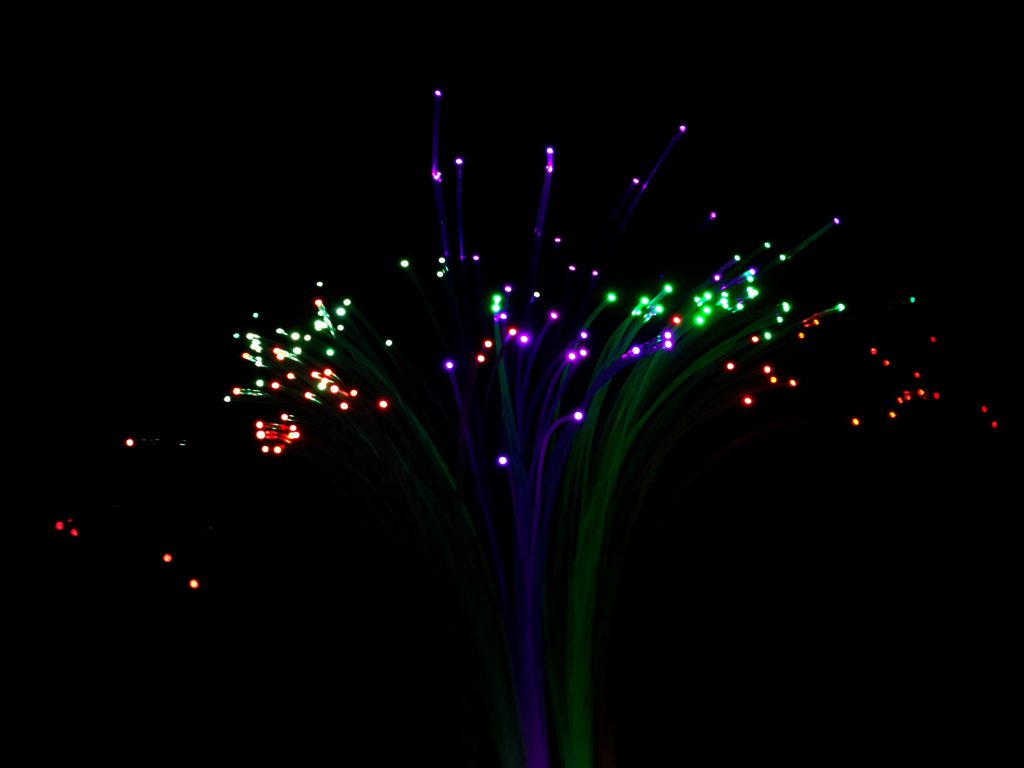
The fibre optic display uses 5 colour-changing LEDs, each with their own bundle of 30 fibres, to give an incredibly pretty display and as the colours slowly change, it gives a subtle sense of movement.
Having them in pairs is a great way to give visual balance so, once you’ve mastered making the first one, crack on and make more. One dark-activated switch can easily power and control 6 of them, so don’t hold back!
Link to project: Fibre optic display
Mini Sparkles Colour-changing LED Fibre Optic String
Designed for indoors – great for shelf lighting, night lights and Christmas tree decoration – or just to add an accent to your living space.
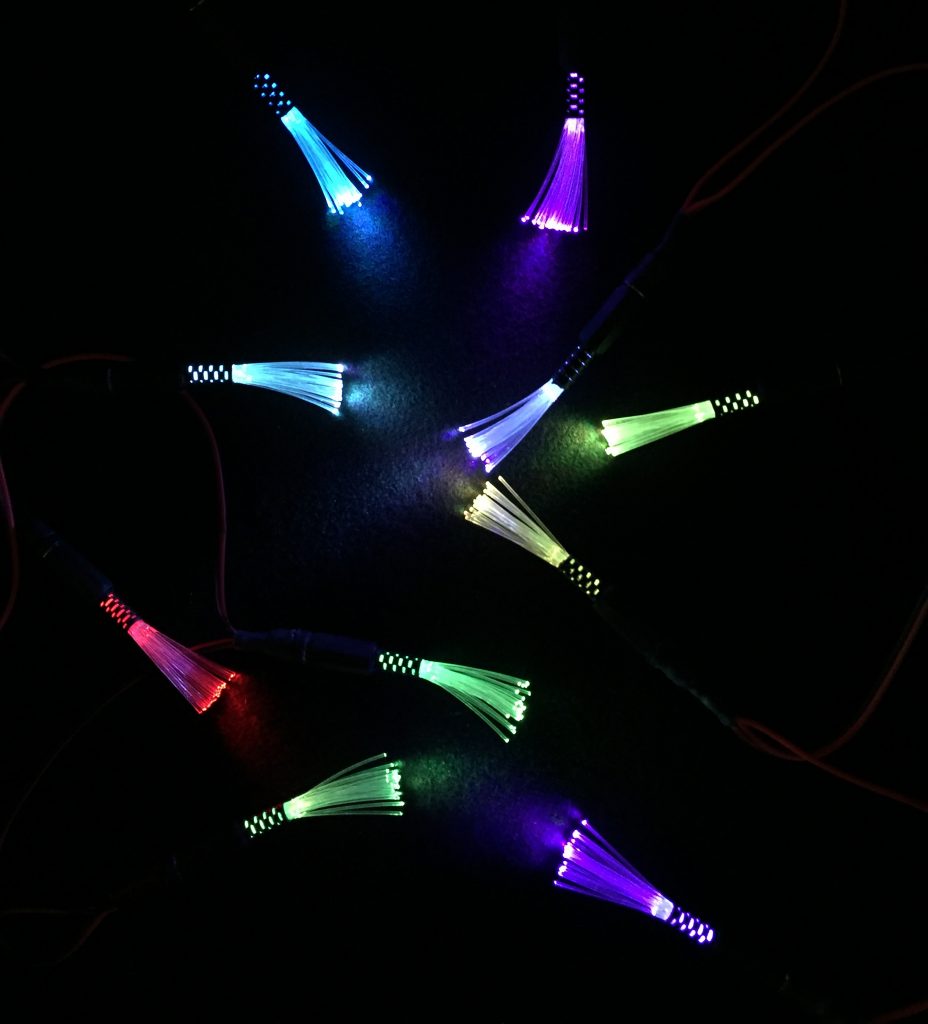
Again, this uses colour-changing LEDs and the short lengths of fibre give a really great sparkling effect.
It’s a bit of a tight fit but is a great use of DC power plugs and panel sockets to give a fun project with minimum soldering that’s well within the capability of those at the younger end of the 12+ age range.
Link to project: Mini Sparkles Colour-changing LED Fibre Optic String
Solar Lithium Ion Battery Charger
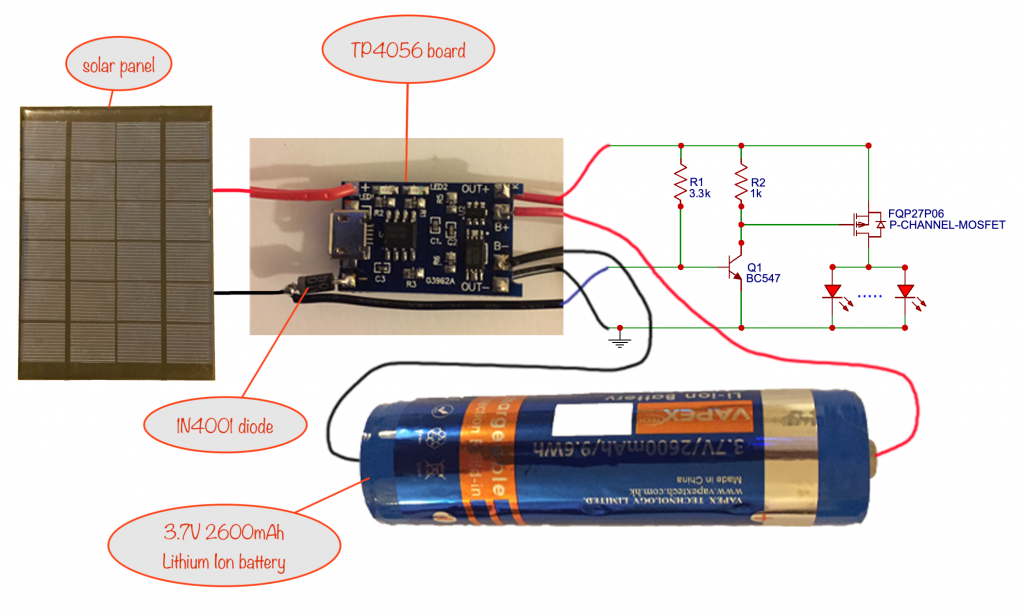
This module charges the battery during the day and switches on the connected LED display module(s) at dusk. It’ll happily power two strings of 5 colour-changing LEDs from dusk to dawn.
You can use it with the Timer-delay Off Switch module to conserve battery power during the night – great for spells of cloudy weather (we’re in the UK after all!) or during the winter months.
Link to project: Solar Lithium Ion Battery Charger
Solar-powered charger for 2 AAA NiMH batteries
This tutorial shows you how to build a charger for 2 AAA NiMH batteries. You decide on which two battery capacities you want to be able to charge with it and there’s a switch to let you flip between them.
Link to project: Solar-powered charger for 2 AAA NiMH batteries
Solar-powered charger for 2 AA NiMH batteries
This tutorial shows you how to build a charger for 2 AA NiMH batteries. You decide on which two battery capacities you want to be able to charge with it and there’s a switch to let you flip between them.
Link to project: Solar-powered charger for 2 AA NiMH batteries
Solar-powered charger 6 AA NiMH battery charger
If you want to charge AA NiMH batteries, then this project lets you charge six at a time. Just like the one above, you decide on which two battery capacities you want to be able to charge with it and there’s a switch to let you flip between them.
Link to project: Solar-powered charger for 6 AAA NiMH batteries
Timer-delay Off Switch
Conserve your battery’s juice by switching off whatever it’s powering after a switchable time delay.
Attach a magnet to get 5 hours before it switches off or don’t use a magnet and it’ll switch off its load after 8 hours.
The key components here are a reed switch that closes when you bring a magnet near and a steel washer for the magnet to cling to.
Link to project: Timer-delay Off Switch
4-LED Porch Light
…or you can use more LEDs depending on how you intend to power it.
This is a great starter project for kids at the lower end of the 12+ range with only a little soldering
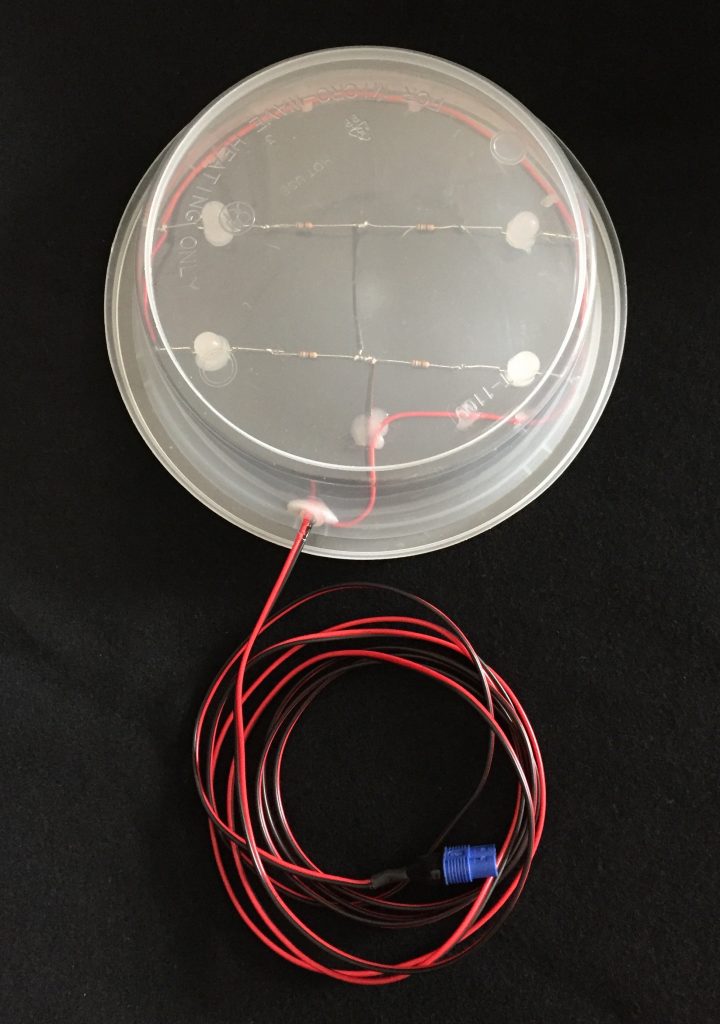
The LEDs used are diffused, high powered white ones to give a glow rather than directional light. If you can find an enclosure that is semi-opaque, you’ll get a more even diffuse glow.
Link to project: Porch Light
Mini camping / bedtime reading lamp
Something to do with your solar-charged rechargeable AA batteries.
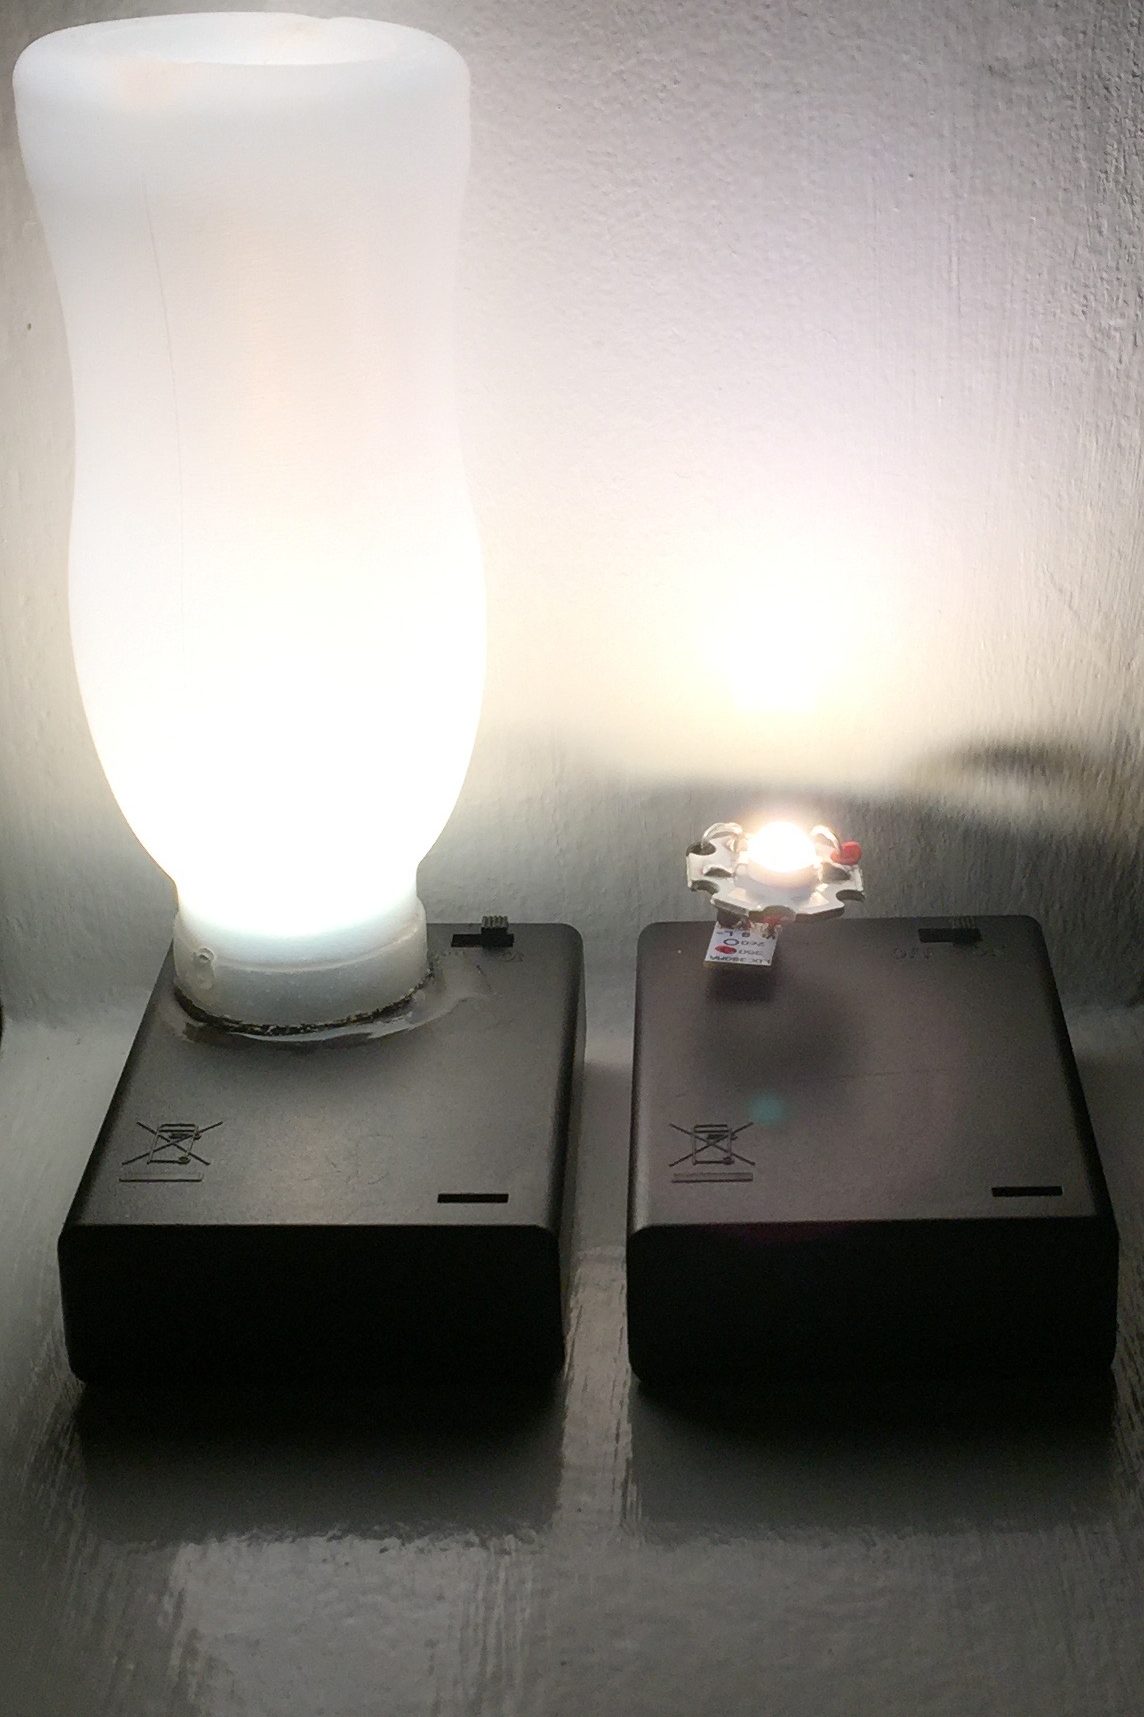
This really cute camping / bedtime reading lamp uses a mini yoghurt pot as a diffuser. The battery box makes a great stand – and for hands-free camping walkabout, it fits in your jeans pocket with the diffuser sticking out.
As a reading lamp (20 mins per night) it should last a couple of weeks before the batteries needing to be recharged. Assumes you use 2000mAh rechargable batteries.
Link to project: Mini camping / bedtime reading lamp
Tools in common you’ll need for these projects
See the individual project modules for any additional tools they need.
- 18 Watt soldering iron, 25 Watts at a push
- Desoldering pump / solder wick – ‘cuz we all make mistakes!
- “Helping Hand”
 – invaluable aid while soldering or gluing
 - Wire strippers covering 26 to 16 AWG
- Side cutters
- Small snipe-nose / needle-nose pliers
- Set of watchmaker-style screwdrivers (cross and flat-bladed) – also useful for poking and prodding
- Glue gun for fixing components and wires in tight spaces to prevent short circuits
- Small drill with drill bits increasing in size to 6mm diameter
Resources
Info / How-to
- YouTube video of Solar panel Lithium Ion battery charger (6, above)
Note that 2 Lithium Ion batteries in parallel are used in the video. We don’t recommend this because it can lead to fire if any of the following apply:- they don’t use the same chemistry
- they’re from different manufacturers
- they have different ages / usage histories
- YouTube video on how to cut stripboard easily
- YouTube video on how to solder components on stripboard
Learn the basics
…and find other projects to build at electronicsclub.info
UK Suppliers / supply links
Here’s a list of the cheapest / best supplier pages for most of the bits and pieces needed for the Nifty projects. I’ve grouped them in such a way as to minimise delivery costs.
They are all from the UK unless they are significantly cheaper or there’s really no alternative.
For the FQP27P06 P-Channel MOSFET and IRLB8721 N-Channel MOSFET – I’m working on a cheap source for small quantities. Watch this space
- Amazon – 22awg 0.3mm² Silicone Electrical Wire This is a super-flexible 2-core wire and is great for LED / Mini Sparkles Fibre Optic strings and connector leads between mix ‘n match modules
- Amazon – 4.8mm Clear Heat Shrink Tubing 2:1 Ratio Perfect for the Fibre Optics and Mini Sparkles modules
- Amazon – Black Hot Glue Sticks, 20Pcs 7mm x 100mm Used in multiple modules
- Amazon – 100 x 5mm RGB slow colour-changing LEDs Used in Fibre Optics, LED String and Fibre String modules
- Amazon – TP4056 18650 Lithium Ion Battery Charging Board Module This is the one with the on-board protection chips, used in the Solar Lithium Ion Battery Charger module
- Amazon – 6V 3.5W Solar Panel Used in the Solar Lithium Ion Battery Charger module
- Amazon – Superglue Used in the 5 LED String module
- AliExpress – Boguang (China) 6V 3W flexible solar panel Used in the Solar Lithium Ion Battery Charger module (highly recommended but up to 6 weeks delivery. I bought a 6V 10W flexible solar panel from them that I couldn’t be happier with – and got it within around 3 weeks. )
- AliExpress – (China) 10 Pairs 3.5 * 1.3mm DC Plug and Panel Mount Socket Connector Used in Mini Sparkles Colour-changing LED Fibre Optic String
- AliExpress – all-in-one 1W LED, heatsink and constant current driver Used in the Mini Camping / Bedtime Reading Lamp module as an alternative to buying the constant current board, heatsink and LED seperately
- AliExpress – Ultra-small 260/350mA Constant Current board Used in the Mini Camping / Bedtime Reading Lamp module
- ComponentShop – 3.7V 2600mAh Li-ion 18650 Single Cell Battery (button top) Vapex Used in the Solar Lithium Ion Battery Charger module
- ComponentShop – Battery holder for single 18650 Battery (Wire Connects) Used in the Solar Lithium Ion Battery Charger module
- ComponentShop – PP3 Battery box / holder with switch Used in multiple modules
- ComponentShop – 3 AA Battery box / holder with switch Used in multiple modules
- ComponentShop – 8 AA Battery box / holder with switch Used in Solar 6 AA NiMH battery charger
- ComponentShop – Flashing (1.5Hz) ultra-bright diffused blue 3mm LED Used in Memory Aid module
- ComponentShop – 5mm ultra-bright diffused White LED Used in Bedside Lamp module
- ComponentShop – 0.75mm diameter Fibre Optic Cable Used in the Fibre Optic and Mini Sparkles modules
- ComponentShop – 3.2mm Black Heat Shrink Tubing 2:1 Ratio Used in multiple modules
- ComponentShop – 1.6mm Black Heat Shrink Tubing 2:1 Ratio Used in multiple modules
- ComponentShop – 4.8mm Black Adhesive Lined Heat Shrink 3:1 Ratio Used for weatherproofing in Solar Lithium Ion Battery Charger, LED String and Timer-delay Off Switch modules
- ComponentShop – 9mm Black Adhesive Lined Heat Shrink 3:1 Ratio Used Mini Sparkles Colour-changing LED Fibre Optic String
- ComponentShop – Resistors Complete range of resistors needed for all modules
- ComponentShop – Reed Switch – Used in Timer-delay Off Switch (outdoor option)
- ComponentShop – Neodymium Magnet – Used in Timer-delay Off Switch (outdoor option)
- ComponentShop – DC Power in-line socket Female 2.1mm and matching DC Power Plug Male 2.1mm Used indoors between modules / strings
(for delivering power from a mains adapter into a dark activated switch, a 2.5mm socket is needed to fit the standard size of plug on mains adapters) - Kitronik – 1MΩ Trim Pot – Used in the Dark-activated Switch
- Kitronik – BC547 transistor – Used in the Dark-activated Switch
- Kitronik – White 10mm 1750mCd diffused LED – Used in the Porch Light module
- eBay – Ping Pong Balls Used in the LED String module
- eBay – Copper stripboard 64 x 95mm – Used in most modules, just cut to desired size
- eBay – UV Glue (quantity of glue not specfied, I think it’s 3 grams) enough for two or three 5 LED string / fibre optics modules.
When one runs out and you buy another, dismantle the used-up one and keep the LED. That way, you have a spare so you can use two at once to speed up setting. Just solder a 330Ω resistor to one of the legs and power it with a 9V pp3 battery, using one of the battery connectors you salvage from the battery box in the dark activated switch or fibre optic display module. - ebay – Business Card plastic storage box Used in the Timer-delay Off Switch and the Solar Lithium Ion Battery Charger modules
- ebay – 1W LED mounted on heatsink Used in the Mini Camping / Bedtime Reading Lamp
- ebay – Loctite superglue with activator Used in the Mini Camping / Bedtime Reading Lamp
Other projects in the Nifty Hobby Projects for LEDs series:
- Flasher Memory Aid
- Dark-activated Switch
- 5 LED String
- Fibre Optic Display
- Mini Sparkles Colour-changing LED Fibre Optic String
- Solar Lithium Ion Battery Charger
- Solar NiMH Battery Charger for 2 AAA batteries
- Solar NiMH Battery Charger for 2 AA batteries
- Solar NiMH Battery Charger for 6 AA batteries
- Timer-delay Off Switch
- 4-LED Porch Light
- 10-LED Bedside Lamp
- Mini Camping / Bedtime Reading Lamp