this is another mix ‘n match module in the Nifty Hobby Projects for LEDs and Solar series
Options to think about
You could use this module with either the Solar Lithium Ion Battery Charger or the Solar NiMH Battery Charger (TBD) modules, and, to preserve battery juice, the Timer-delay Off Switch module.
One good reason for making it as a module is so that you can swap it out for a string of LEDs at Christmas.
Or power it from a Dark-activated Switch and a mains adaptor. Again, you could use it with the Timer-delay Off module and still swap it out for a LED string at Christmas.
If you choose this option you might like to use six or even eight LEDs. Why? It’s because you’re not limited by a solar panel to keep the battery charged enough to cope with more than a few overcast days.
Another option is not to make it as a module but to make it permanent and include the Solar Lithium Ion Battery Charger and Timer-delay Off switch circuits inside the enclosure. You’d still need a power-in lead, though, so you can connect up a suitable located solar panel.
Choosing your enclosure
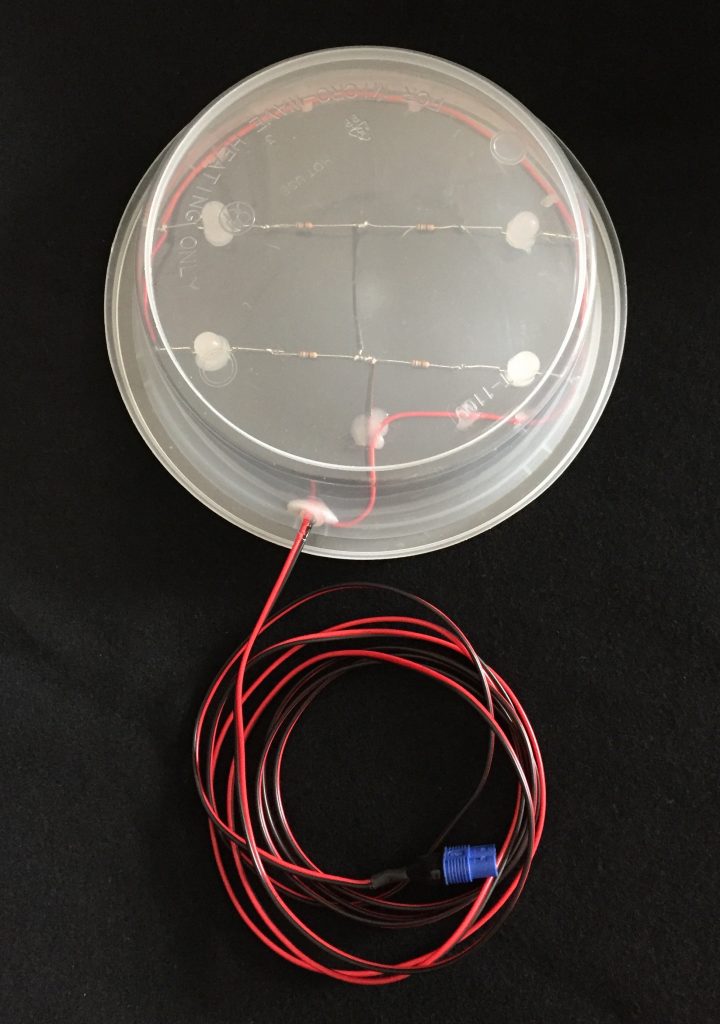
The most challenging part of this module is finding a suitable enclosure. The one I’m using came from a Chinese takeaway I had! (Remember, reuse before recycle 😎)
If you can find one that is semi-opaque, it’ll diffuse the light better and give a glow rather than you being able to see the individual (diffuse) LEDs and the wiring / resistors, like you will if you use clear plastic like mine.
Preparation
Tools etc. you’ll need:
- 18 Watt soldering iron, 25 Watts at a push
- Desoldering pump / solder wick – in case of mistakes!
- Wire strippers covering 26 to 16 AWG
- Side cutters
- Small snipe-nose / needle-nose pliers
- Glue gun for holding the LEDs in place and sealing the enclosure to keep out the weather
- Small hobbyist drill with a 2mm and 3mm drill bit (plus larger ones if the hole for your connector leads need it)
Components / parts list
See the main page (opens in new tab) for links to where you can buy these.
- 4 x white 10mm high brightness diffused LEDs (luminous intensity 1750mCd)
- 68Ω ¼Watt, 1%, 5% or 10% tolerance current-limiting resistors, one per LED. This value is fine for the voltages you’ll get from any of the Nifty powering modules.
See the end for how 68Ω was calculated - 1 x enclosure
- 1 x Power input lead – twin flexible, multi-strand 20 swg is good
- your choice of connector. As usual, as it’s for power in, it’ll be a female type.
I’m using EC5s because I had a bunch to hand, you may prefer the EC3s or another robust, weatherproof-able connector – just make sure you use the same type as you’re using on the other mix ‘n match module you’ll power it with
On with the build…
The build
Placing the LEDs
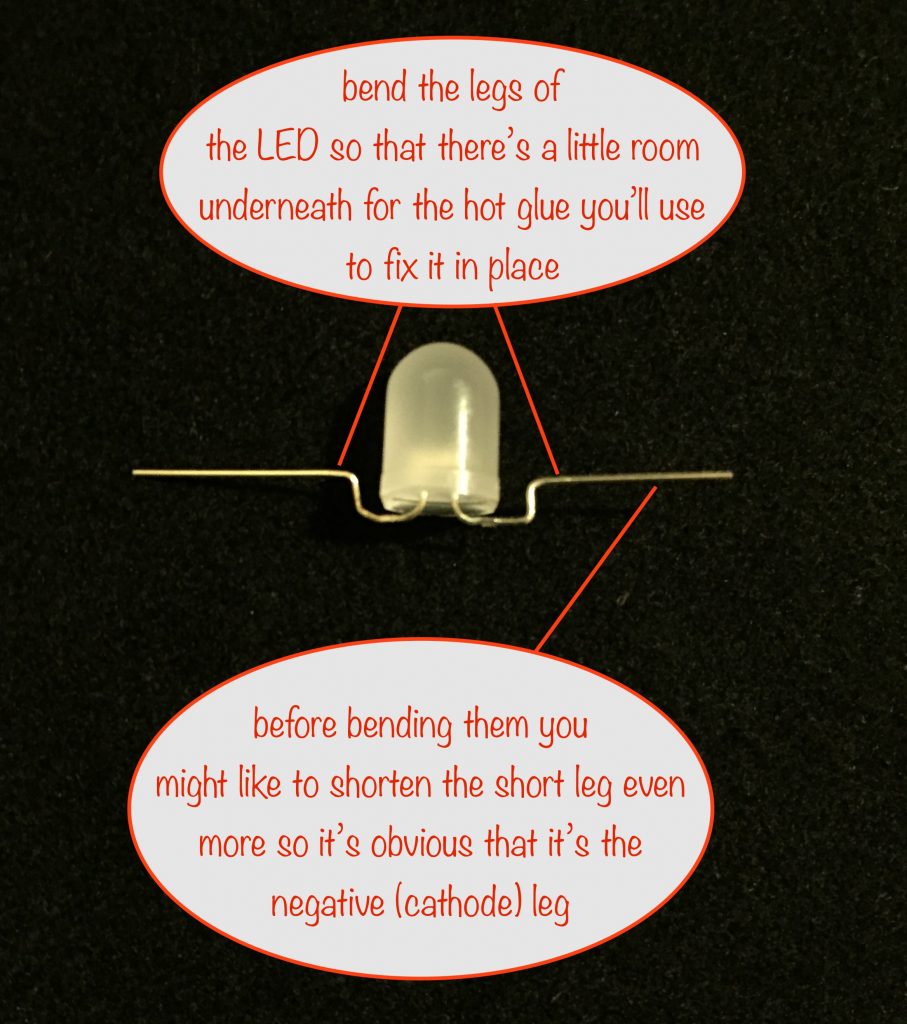
The first thing to do is to bend the legs of the LEDs so you leave a little room for the hot glue that’ll hold them in place on the lid of your enclosure.
Next you’ll place the LEDs at roughly the same intervals around the enclosure lid and hot glue them in place. Make sure you point the negative (cathode) legs in towards the centre.
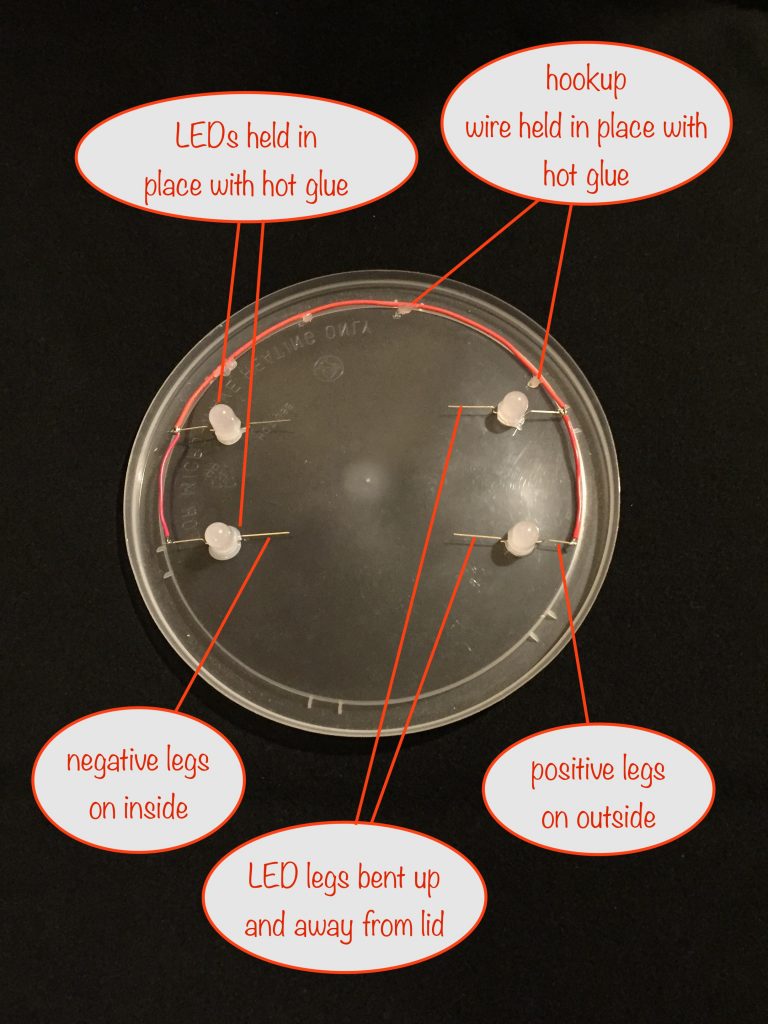
Once you’ve got them placed, carefully measure off each piece of your hookup wire and solder to the outside LED legs as shown. You can use hot glue to hold it in place so it’s easy to clip the lid on later without the wire getting in the way.
Placing the resistors
With that done, you can now place the current-limiting resistors (68Ω) and solder them to the negative legs of the LEDs and to each other.

Once you’re happy with how you’ve placed the resistors you can solder them – just be careful not to damage the plastic lid you’re using.
Supplying power
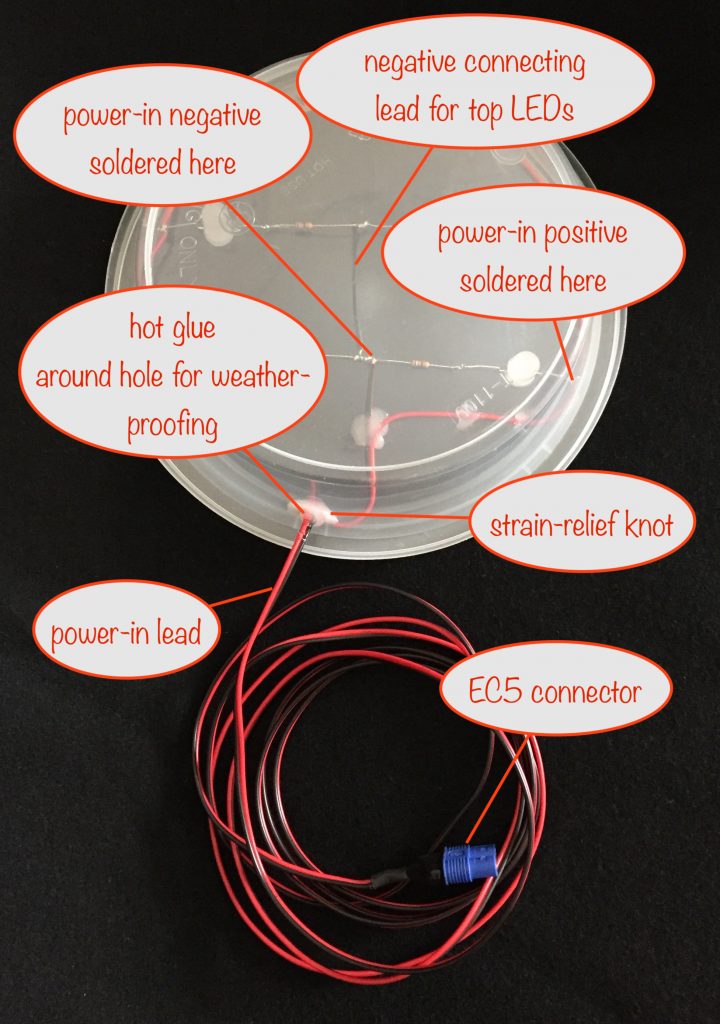
In the last step, you connect the centre (negative) of both resistor chains together, make a hole for the power in-lead in the body of your enclosure, make a strain-relief knot and then solder the positive and negative wires to power the LEDs.
Finishing off
Finally, hot glue around the hole and power-in lead to weather-proof it. If your lid isn’t tight fitting to the body of your enclosure, you’ll need to hot glue it as well to properly weather-proof it.
Calculating the resistors
You can ignore this if you like as it shows that whichever of the suggested options you go for, the value of the resistor turns out to be 68Ω.
The recommended LEDs for the module are White 10mm High Brightness Diffused LED with a viewing angle of 60 degrees. Luminous intensity 1750mCd
The specs give us the information we need for calculating the current-limiting resistors to use:
- LED forward voltage: 3.1V
- Typical LED current: 20mA (max is 25mA)
Powering with Solar Lithium Ion Battery Charger module
Fully charged voltage: 4.2V
Using Ohms Law: R=V/I:
R = (4.2V-3.1V)/0.02A, ⇒
R = 65Ω, ⇒ next nearest available value is 68Ω
Powering with Solar NiMH Battery Charger module (TBD)
Fully charged voltage: 4.5V
Using Ohms Law: R=V/I:
R = (4.5V-3.1V)/0.02A, ⇒
R = 70Ω, ⇒ next nearest available value is 75Ω, BUT if we use 68Ω, then I=V/R, I=(4.5-3.1)/68 = 0.0206, or 21mA, which is well within the 25mA max that the LED can handle
Powering with 5V Mains adaptor
…with 1N4001 diode in the positive output lead to bring the voltage down to around 4.4V
Voltage: 4.4V
Using Ohms Law: R=V/I:
R = (4.4V-3.1V)/0.02A, ⇒
R = 65Ω, ⇒ next nearest available value is 68Ω
So you can see that whichever module you use to power your Porch Light, 68Ω is the resistor value you need.
Other projects in the Nifty Hobby Projects for LEDs and Solar series (so far, more to come very soon):
- Flasher Memory Aid
- Dark-activated Switch
- 5 LED String
- Fibre Optic Display
- Mini Sparkles Colour-changing LED Fibre Optic String
- Solar Lithium Ion Battery Charger
- Solar NiMH Battery Charger for 2 AAA batteries
- Solar NiMH Battery Charger for 2 AA batteries
- Solar NiMH Battery Charger for 6 AA batteries
- Timer-delay Off Switch
- 10-LED Bedside lamp
- Mini Camping / Bedtime Reading Lamp
- Main page with links to where to buy stuff